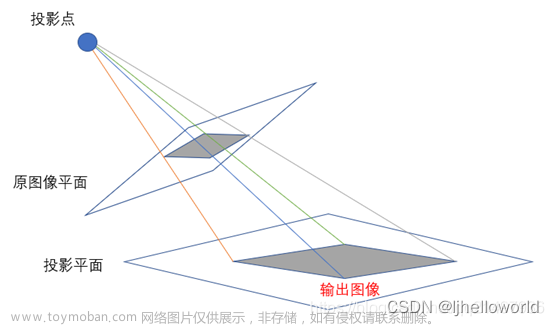
透视变换是一种图像变换技术,用于将图像投影到新的视平面上。它可以通过对图像进行透视、旋转、缩放和扭曲等操作,从而改变图像的视角和形状。在OpenCV中,我们可以使用cv2.warpPerspective函数来实现透视变换操作。
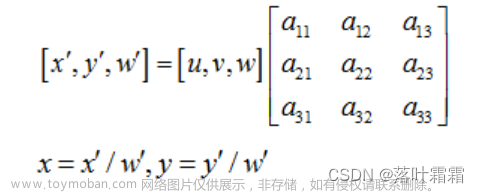
透视变换的原理是基于透视几何学的原理。给定原始图像中的四个非共线点和目标图像中对应的四个点,可以通过计算透视变换矩阵来建立两个平面之间的对应关系。透视变换矩阵是一个3x3的矩阵,它可以通过cv2.getPerspectiveTransform函数计算得到。当进行透视变换时,我们需要计算一个3x3的透视变换矩阵H。该矩阵可以通过给定的四对点的对应关系来计算。假设原始图像中的四个点为 A、B、C和D,对应的目标图像中的四个点为 A’、B’、C’和D’。
我们可以将原始图像中的点表示为齐次坐标形式:
A
=
[
x
A
y
A
1
]
,
B
=
[
x
B
y
B
1
]
,
C
=
[
x
C
y
C
1
]
,
D
=
[
x
D
y
D
1
]
\begin{gathered} \mathbf{A} = \begin{bmatrix} x_A \\ y_A \\ 1 \end{bmatrix}, \quad \mathbf{B} = \begin{bmatrix} x_B \\ y_B \\ 1 \end{bmatrix}, \quad \mathbf{C} = \begin{bmatrix} x_C \\ y_C \\ 1 \end{bmatrix}, \quad \mathbf{D} = \begin{bmatrix} x_D \\ y_D \\ 1 \end{bmatrix} \end{gathered}
A=
xAyA1
,B=
xByB1
,C=
xCyC1
,D=
xDyD1
同样,目标图像中的点也可以表示为齐次坐标形式:
A
′
=
[
x
A
′
y
A
′
1
]
,
B
′
=
[
x
B
′
y
B
′
1
]
,
C
′
=
[
x
C
′
y
C
′
1
]
,
D
′
=
[
x
D
′
y
D
′
1
]
\begin{gathered} \mathbf{A'} = \begin{bmatrix} x_A' \\ y_A' \\ 1 \end{bmatrix}, \quad \mathbf{B'} = \begin{bmatrix} x_B' \\ y_B' \\ 1 \end{bmatrix}, \quad \mathbf{C'} = \begin{bmatrix} x_C' \\ y_C' \\ 1 \end{bmatrix}, \quad \mathbf{D'} = \begin{bmatrix} x_D' \\ y_D' \\ 1 \end{bmatrix} \end{gathered}
A′=
xA′yA′1
,B′=
xB′yB′1
,C′=
xC′yC′1
,D′=
xD′yD′1
透视变换的目标是找到一个3x3的矩阵H,使得:
A
′
=
H
⋅
A
,
B
′
=
H
⋅
B
,
C
′
=
H
⋅
C
,
D
′
=
H
⋅
D
\begin{gathered} \mathbf{A'} = H \cdot \mathbf{A}, \quad \mathbf{B'} = H \cdot \mathbf{B}, \quad \mathbf{C'} = H \cdot \mathbf{C}, \quad \mathbf{D'} = H \cdot \mathbf{D} \end{gathered}
A′=H⋅A,B′=H⋅B,C′=H⋅C,D′=H⋅D
展开上述等式,可以得到以下形式:
[
x
A
′
y
A
′
1
]
=
[
h
11
h
12
h
13
h
21
h
22
h
23
h
31
h
32
h
33
]
[
x
A
y
A
1
]
\begin{gathered} \begin{bmatrix} x_A' \\ y_A' \\ 1 \end{bmatrix} = \begin{bmatrix} h_{11} & h_{12} & h_{13} \\ h_{21} & h_{22} & h_{23} \\ h_{31} & h_{32} & h_{33} \end{bmatrix} \begin{bmatrix} x_A \\ y_A \\ 1 \end{bmatrix} \end{gathered}
xA′yA′1
=
h11h21h31h12h22h32h13h23h33
xAyA1
[
x
B
′
y
B
′
1
]
=
[
h
11
h
12
h
13
h
21
h
22
h
23
h
31
h
32
h
33
]
[
x
B
y
B
1
]
\begin{gathered} \begin{bmatrix} x_B' \\ y_B' \\ 1 \end{bmatrix} = \begin{bmatrix} h_{11} & h_{12} & h_{13} \\ h_{21} & h_{22} & h_{23} \\ h_{31} & h_{32} & h_{33} \end{bmatrix} \begin{bmatrix} x_B \\ y_B \\ 1 \end{bmatrix} \end{gathered}
xB′yB′1
=
h11h21h31h12h22h32h13h23h33
xByB1
[
x
C
′
y
C
′
1
]
=
[
h
11
h
12
h
13
h
21
h
22
h
23
h
31
h
32
h
33
]
[
x
C
y
C
1
]
\begin{gathered} \begin{bmatrix} x_C' \\ y_C' \\ 1 \end{bmatrix} = \begin{bmatrix} h_{11} & h_{12} & h_{13} \\ h_{21} & h_{22} & h_{23} \\ h_{31} & h_{32} & h_{33} \end{bmatrix} \begin{bmatrix} x_C \\ y_C \\ 1 \end{bmatrix} \end{gathered}
xC′yC′1
=
h11h21h31h12h22h32h13h23h33
xCyC1
[
x
D
′
y
D
′
1
]
=
[
h
11
h
12
h
13
h
21
h
22
h
23
h
31
h
32
h
33
]
[
x
D
y
D
1
]
\begin{gathered} \begin{bmatrix} x_D' \\ y_D' \\ 1 \end{bmatrix} = \begin{bmatrix} h_{11} & h_{12} & h_{13} \\ h_{21} & h_{22} & h_{23} \\ h_{31} & h_{32} & h_{33} \end{bmatrix} \begin{bmatrix} x_D \\ y_D \\ 1 \end{bmatrix} \end{gathered}
xD′yD′1
=
h11h21h31h12h22h32h13h23h33
xDyD1
通过这些等式,我们可以得到透视变换矩阵H的形式:
H
=
[
h
11
h
12
h
13
h
21
h
22
h
23
h
31
h
32
h
33
]
\begin{gathered} H = \begin{bmatrix} h_{11} & h_{12} & h_{13} \\ h_{21} & h_{22} & h_{23} \\ h_{31} & h_{32} & h_{33} \end{bmatrix} \end{gathered}
H=
h11h21h31h12h22h32h13h23h33
为了求解矩阵H,我们需要至少四对点的对应关系。然后,可以使用线性方程求解技术,例如最小二乘法,来求解矩阵H的值。
透视变换在计算机视觉和图像处理中有广泛的应用。它可以用于纠正图像的透视畸变,如校正斜视图像、纠正摄像头畸变等。它还可以应用于图像拼接、目标检测和跟踪、虚拟现实等领域。
透视变换的意义在于可以改变图像的视角和形状,使得图像在新的视平面上更符合特定需求。它可以提供更好的图像展示效果、改善图像质量,并为后续的图像处理任务提供更准确的输入。
一些常见的使用场景包括:
- 图像矫正:纠正斜视图像、校正摄像头畸变等。
- 图像拼接:将多张图像拼接成全景图像。
- 虚拟现实:生成虚拟场景,将虚拟物体与实际场景进行融合。
- 目标检测和跟踪:根据目标在图像中的投影变换来跟踪目标。
- 图像处理:应用各种几何变换、形状变换和视角变换等。
总之,透视变换是一种强大的图像处理技术,可以对图像进行透视变换,改变视角和形状,广泛应用于计算机视觉、图像处理和图形学领域。文章来源:https://www.toymoban.com/news/detail-501009.html
代码实现过程如下所示:文章来源地址https://www.toymoban.com/news/detail-501009.html
import cv2
import numpy as np
import matplotlib.pyplot as plt

# class Trans:
# 	def __init__(self,x,y,n):
# 		self.x=x
# 		self.y=y
# 		self.n=n
#
# 	def Trs(self):
# 		r,theta=cv2.cartToPolar(x,y,angleInDegrees=True)
# 		xr,yr=cv2.polarToCart(r,theta,angleInDegrees=1)
# 		print(xr,yr)
#
# 		plt.figure(figsize=(9, 5))
# 		plt.subplot(121), plt.title("Cartesian coordinate"), plt.plot(x, y, 'o')
# 		for i, txt in enumerate(n):
# 			plt.annotate(txt, (x[i], y[i]))
# 		plt.subplot(122), plt.title("Polar coordinate"), plt.plot(r, theta, 'o')
# 		for i, txt in enumerate(n):
# 			plt.annotate(txt, (r[i], theta[i]))
# 		plt.show()
#
#
# x = np.float32([0, 1, 2, 0, 1, 2, 0, 1, 2]) - 1
# y = np.float32([0, 0, 0, 1, 1, 1, 2, 2, 2]) - 1
# n = np.arange(9)
# to=Trans(x,y,n)
# to.Trs()

class Trans:
	def __init__(self,image_path):
		self.image_path=image_path

	def Trs(self):
		img=cv2.imread(self.image_path)

		if img is None:
			print('Unable to load image!')
		else:
			h,w=img.shape[:2]
			cx,cy=int(w/2),int(h/2)
			maxR=max(cx,cy)

			imgPolar = cv2.linearPolar(img, (cx, cy), maxR, cv2.INTER_LINEAR)
			imgPR = cv2.rotate(imgPolar, cv2.ROTATE_90_COUNTERCLOCKWISE)

			self.show_image(img,imgPR)

	def show_image(self,img,imgPR):
		plt.figure(figsize=(10, 6))
		plt.subplot(121), plt.imshow(cv2.cvtColor(img, cv2.COLOR_BGR2RGB)), plt.title("Original"), plt.axis('off')
		plt.subplot(122), plt.imshow(cv2.cvtColor(imgPR, cv2.COLOR_BGR2RGB)), plt.title("PolarTrans"), plt.axis('off')
		plt.show()

imgfile="Images/Atest1.jpg"
to=Trans(imgfile)
to.Trs()
到了这里,关于图像的透视变换的文章就介绍完了。如果您还想了解更多内容,请在右上角搜索TOY模板网以前的文章或继续浏览下面的相关文章,希望大家以后多多支持TOY模板网!


