申请小程序账号
注册小程序点我
引入依赖
<!-- 小程序依赖 -->
<dependency>
    <groupId>com.github.binarywang</groupId>
    <artifactId>weixin-java-miniapp</artifactId>
    <version>4.3.0</version>
</dependency>
<dependency>
    <groupId>com.github.binarywang</groupId>
    <artifactId>weixin-java-common</artifactId>
    <version>4.3.0</version>
</dependency>
<dependency>
    <groupId>commons-fileupload</groupId>
    <artifactId>commons-fileupload</artifactId>
</dependency>
yml配置
wx:
  miniapp:
    configs:
      - appid: 12313#微信小程序的appid
        secret: 1231313#微信小程序的Secret
        token:  #微信小程序消息服务器配置的token
        aesKey:  #微信小程序消息服务器配置的EncodingAESKey
        msgDataFormat: JSON
读取配置文件类WxMaProperties
@Data
@ConfigurationProperties(prefix = "wx.miniapp")
public class WxMaProperties {

    private List<Config> configs;

    @Data
    public static class Config {
        /**
         * 设置微信小程序的appid
         */
        private String appid;

        /**
         * 设置微信小程序的Secret
         */
        private String secret;

        /**
         * 设置微信小程序消息服务器配置的token
         */
        private String token;

        /**
         * 设置微信小程序消息服务器配置的EncodingAESKey
         */
        private String aesKey;

        /**
         * 消息格式,XML或者JSON
         */
        private String msgDataFormat;
    }

}
配置文件加载
@Slf4j
@Configuration
@EnableConfigurationProperties(WxMaProperties.class)
public class WxMaConfiguration {
    private final WxMaProperties properties;

    private static final Map<String, WxMaMessageRouter> routers = Maps.newHashMap();
    private static Map<String, WxMaService> maServices;

    @Autowired
    public WxMaConfiguration(WxMaProperties properties) {
        this.properties = properties;
    }

    public static WxMaService getMaService(String appid) {
        WxMaService wxService = maServices.get(appid);
        if (wxService == null) {
            throw new IllegalArgumentException(String.format("未找到对应appid=[%s]的配置,请核实!", appid));
        }

        return wxService;
    }

    public static WxMaMessageRouter getRouter(String appid) {
        return routers.get(appid);
    }

    @PostConstruct
    public void init() {
        List<WxMaProperties.Config> configs = this.properties.getConfigs();
        if (configs == null) {
            throw new WxRuntimeException("大哥,拜托先看下项目首页的说明(readme文件),添加下相关配置,注意别配错了!");
        }

        maServices = configs.stream()
            .map(a -> {
                WxMaDefaultConfigImpl config = new WxMaDefaultConfigImpl();
//                WxMaDefaultConfigImpl config = new WxMaRedisConfigImpl(new JedisPool());
                // 使用上面的配置时,需要同时引入jedis-lock的依赖,否则会报类无法找到的异常
                config.setAppid(a.getAppid());
                config.setSecret(a.getSecret());
                config.setToken(a.getToken());
                config.setAesKey(a.getAesKey());
                config.setMsgDataFormat(a.getMsgDataFormat());

                WxMaService service = new WxMaServiceImpl();
                service.setWxMaConfig(config);
                routers.put(a.getAppid(), this.newRouter(service));
                return service;
            }).collect(Collectors.toMap(s -> s.getWxMaConfig().getAppid(), a -> a));
    }

    private WxMaMessageRouter newRouter(WxMaService service) {
        final WxMaMessageRouter router = new WxMaMessageRouter(service);
        router
            .rule().handler(logHandler).next()
            .rule().async(false).content("订阅消息").handler(subscribeMsgHandler).end()
            .rule().async(false).content("文本").handler(textHandler).end()
            .rule().async(false).content("图片").handler(picHandler).end()
            .rule().async(false).content("二维码").handler(qrcodeHandler).end();
        return router;
    }

    private final WxMaMessageHandler subscribeMsgHandler = (wxMessage, context, service, sessionManager) -> {
        service.getMsgService().sendSubscribeMsg(WxMaSubscribeMessage.builder()
            .templateId("此处更换为自己的模板id")
            .data(Lists.newArrayList(
                new WxMaSubscribeMessage.MsgData("keyword1", "339208499")))
            .toUser(wxMessage.getFromUser())
            .build());
        return null;
    };

    private final WxMaMessageHandler logHandler = (wxMessage, context, service, sessionManager) -> {
        log.info("收到消息:" + wxMessage.toString());
        service.getMsgService().sendKefuMsg(WxMaKefuMessage.newTextBuilder().content("收到信息为:" + wxMessage.toJson())
            .toUser(wxMessage.getFromUser()).build());
        return null;
    };

    private final WxMaMessageHandler textHandler = (wxMessage, context, service, sessionManager) -> {
        service.getMsgService().sendKefuMsg(WxMaKefuMessage.newTextBuilder().content("回复文本消息")
            .toUser(wxMessage.getFromUser()).build());
        return null;
    };

    private final WxMaMessageHandler picHandler = (wxMessage, context, service, sessionManager) -> {
        try {
            WxMediaUploadResult uploadResult = service.getMediaService()
                .uploadMedia("image", "png",
                    ClassLoader.getSystemResourceAsStream("tmp.png"));
            service.getMsgService().sendKefuMsg(
                WxMaKefuMessage
                    .newImageBuilder()
                    .mediaId(uploadResult.getMediaId())
                    .toUser(wxMessage.getFromUser())
                    .build());
        } catch (WxErrorException e) {
            e.printStackTrace();
        }

        return null;
    };

    private final WxMaMessageHandler qrcodeHandler = (wxMessage, context, service, sessionManager) -> {
        try {
            final File file = service.getQrcodeService().createQrcode("123", 430);
            WxMediaUploadResult uploadResult = service.getMediaService().uploadMedia("image", file);
            service.getMsgService().sendKefuMsg(
                WxMaKefuMessage
                    .newImageBuilder()
                    .mediaId(uploadResult.getMediaId())
                    .toUser(wxMessage.getFromUser())
                    .build());
        } catch (WxErrorException e) {
            e.printStackTrace();
        }

        return null;
    };

}
json返回工具类
public class JsonUtils {
    private static final ObjectMapper JSON = new ObjectMapper();

    static {
        JSON.setSerializationInclusion(Include.NON_NULL);
        JSON.configure(SerializationFeature.INDENT_OUTPUT, Boolean.TRUE);
    }

    public static String toJson(Object obj) {
        try {
            return JSON.writeValueAsString(obj);
        } catch (JsonProcessingException e) {
            e.printStackTrace();
        }

        return null;
    }
}
控制层
小程序临时素材接口
@RestController
@RequestMapping("/wx/media/{appid}")
public class WxMaMediaController {
    private final Logger logger = LoggerFactory.getLogger(this.getClass());

    /**
     * 上传临时素材
     *
     * @return 素材的media_id列表,实际上如果有的话,只会有一个
     */
    @PostMapping("/upload")
    public List<String> uploadMedia(@PathVariable String appid, HttpServletRequest request) throws WxErrorException {
        final WxMaService wxService = WxMaConfiguration.getMaService(appid);

        CommonsMultipartResolver resolver = new CommonsMultipartResolver(request.getSession().getServletContext());

        if (!resolver.isMultipart(request)) {
            return Lists.newArrayList();
        }

        MultipartHttpServletRequest multiRequest = (MultipartHttpServletRequest) request;
        Iterator<String> it = multiRequest.getFileNames();
        List<String> result = Lists.newArrayList();
        while (it.hasNext()) {
            try {
                MultipartFile file = multiRequest.getFile(it.next());
                File newFile = new File(Files.createTempDir(), file.getOriginalFilename());
                this.logger.info("filePath is :" + newFile.toString());
                file.transferTo(newFile);
                WxMediaUploadResult uploadResult = wxService.getMediaService().uploadMedia(WxMaConstants.KefuMsgType.IMAGE, newFile);
                this.logger.info("media_id : " + uploadResult.getMediaId());
                result.add(uploadResult.getMediaId());
            } catch (IOException e) {
                this.logger.error(e.getMessage(), e);
            }
        }

        return result;
    }

    /**
     * 下载临时素材
     */
    @GetMapping("/download/{mediaId}")
    public File getMedia(@PathVariable String appid, @PathVariable String mediaId) throws WxErrorException {
        final WxMaService wxService = WxMaConfiguration.getMaService(appid);

        return wxService.getMediaService().getMedia(mediaId);
    }
}
微信小程序用户接口
@RestController
@RequestMapping("/wx/user/{appid}")
public class WxMaUserController {
    private final Logger logger = LoggerFactory.getLogger(this.getClass());

    /**
     * 登陆接口
     */
    @GetMapping("/login")
    public String login(@PathVariable String appid, String code) {
        if (StringUtils.isBlank(code)) {
            return "empty jscode";
        }

        final WxMaService wxService = WxMaConfiguration.getMaService(appid);

        try {
            WxMaJscode2SessionResult session = wxService.getUserService().getSessionInfo(code);
            this.logger.info(session.getSessionKey());
            this.logger.info(session.getOpenid());
            //TODO 可以增加自己的逻辑,关联业务相关数据
            return JsonUtils.toJson(session);
        } catch (WxErrorException e) {
            this.logger.error(e.getMessage(), e);
            return e.toString();
        }
    }

    /**
     * <pre>
     * 获取用户信息接口
     * </pre>
     */
    @PostMapping("/info")
    public String info(@PathVariable String appid, @RequestBody Map<String, String> map) {
        final WxMaService wxService = WxMaConfiguration.getMaService(appid);
        String sessionKey = map.get("sessionKey");
        String signature = map.get("signature");
        String rawData = map.get("rawData");
        String encryptedData = map.get("encryptedData");
        String iv = map.get("iv");
        // 用户信息校验
        if (!wxService.getUserService().checkUserInfo(sessionKey, rawData, signature)) {
            return "user check failed";
        }

        // 解密用户信息
        WxMaUserInfo userInfo = wxService.getUserService().getUserInfo(sessionKey, encryptedData, iv);

        return JsonUtils.toJson(userInfo);
    }

    /**
     * <pre>
     * 获取用户绑定手机号信息
     * </pre>
     */
    @PostMapping("/phone")
    public String phone(@PathVariable String appid, @RequestBody Map<String, String> map) {
        final WxMaService wxService = WxMaConfiguration.getMaService(appid);
        String sessionKey = map.get("sessionKey");
        String signature = map.get("signature");
        String rawData = map.get("rawData");
        String encryptedData = map.get("encryptedData");
        String iv = map.get("iv");

        // 用户信息校验
        if (!wxService.getUserService().checkUserInfo(sessionKey, rawData, signature)) {
            return "user check failed";
        }

        // 解密
        WxMaPhoneNumberInfo phoneNoInfo = wxService.getUserService().getPhoneNoInfo(sessionKey, encryptedData, iv);

        return JsonUtils.toJson(phoneNoInfo);
    }

}
前端代码-小程序项目哦,hubild直接创建
<template>
	<view class="content">
		<image class="logo" src="/static/logo.png"></image>
		<view class="text-area">
			<text class="title">{{title}}</text>

		</view>
		<view>

			<button @click="login">登录</button>


			<!-- 先点击 登录、获取头像昵称按钮才可以点击下面这两个按钮!!! -->
			<button @click="info">获取用户信息</button>
			<button @click="phone">获取手机号信息</button>

		</view>

		<view class="container">
		  <view class="userinfo">
		    <block>
		      <button @click="getUserProfile"> 获取头像昵称 </button>
		    </block>
		  </view>
		</view>
	</view>
</template>

<script>
	export default {
		data() {
			return {
				title: 'Hello2',
				openId: "",
				session: "",
				userInfo: {},
				hasUserInfo: false,
				canIUseGetUserProfile: false,
				signature:'',
				rawData:'',
				encryptedData:'',
				iv:''
			}
		},
		onLoad() {
		},
		methods: {
			login() {
				let that = this;
				wx.login({
				  success (res) {
					  console.log("res::",res)
				    if (res.code) {
				      //发起网络请求
				      wx.request({
				        url: 'http://localhost:8080/wx/user/wx35784428afa871df/login?code='+res.code,
						method: 'GET',
						success(res) {
							console.log("success res :" ,res)
							that.openId = res.data.openid;
							that.session = res.data.sessionKey;
						},
						fail(res) {
							console.log("fail res : ", res)
						}
				      })
				    } else {
				      console.log('登录失败!' + res.errMsg)
				    }
				  }
				})
			},
			info() {
				console.log("sessionKey::",this.session)
				wx.request({
					url: 'http://localhost:8080/wx/user/wx35784428afa871df/info',
					method: 'POST',
					data:{
						sessionKey: this.session,
						signature: this.signature,
						rawData: this.rawData,
						encryptedData: this.encryptedData,
						iv: this.iv
					},
					success(res) {
						console.log("后端获取:success res :" ,res)
					},
					fail(res) {
						console.log("后端获取:fail res : ", res)
					}
				})
			},
			phone() {
				wx.request({
					url: 'http://localhost:8080/wx/user/wx35784428afa871df/phone',
					method: 'POST',
					data:{
						sessionKey: this.session,
						signature: this.signature,
						rawData: this.rawData,
						encryptedData: this.encryptedData,
						iv: this.iv
					},
					success(res) {
						console.log("后端获取手机号:success res :" ,res)
					},
					fail(res) {
						console.log("后端获取手机号:fail res : ", res)
					}
				})
			},
			getUserProfile(e) {
				let that = this;
			    // 推荐使用 wx.getUserProfile 获取用户信息,开发者每次通过该接口获取用户个人信息均需用户确认
			    // 开发者妥善保管用户快速填写的头像昵称,避免重复弹窗
			    wx.getUserProfile({
			      desc: '用于完善会员资料', // 声明获取用户个人信息后的用途,后续会展示在弹窗中,请谨慎填写
			      success: (res) => {
			        console.log("user info res :", res)
					that.signature = res.signature;
					that.rawData = res.rawData;
					that.encryptedData = res.encryptedData;
					that.iv = res.iv;
			      }
			    })
			  },
			  getUserInfo(e) {
			    // 不推荐使用 getUserInfo 获取用户信息,预计自2021年4月13日起,getUserInfo将不再弹出弹窗,并直接返回匿名的用户个人信息
			    this.setData({
			      userInfo: e.detail.userInfo,
			      hasUserInfo: true
			    })
			  },
		}
	}
</script>

<style>
	.content {
		display: flex;
		flex-direction: column;
		align-items: center;
		justify-content: center;
	}

	.logo {
		height: 200rpx;
		width: 200rpx;
		margin-top: 200rpx;
		margin-left: auto;
		margin-right: auto;
		margin-bottom: 50rpx;
	}

	.text-area {
		display: flex;
		justify-content: center;
	}

	.title {
		font-size: 36rpx;
		color: #8f8f94;
	}
</style>
界面效果图
效果

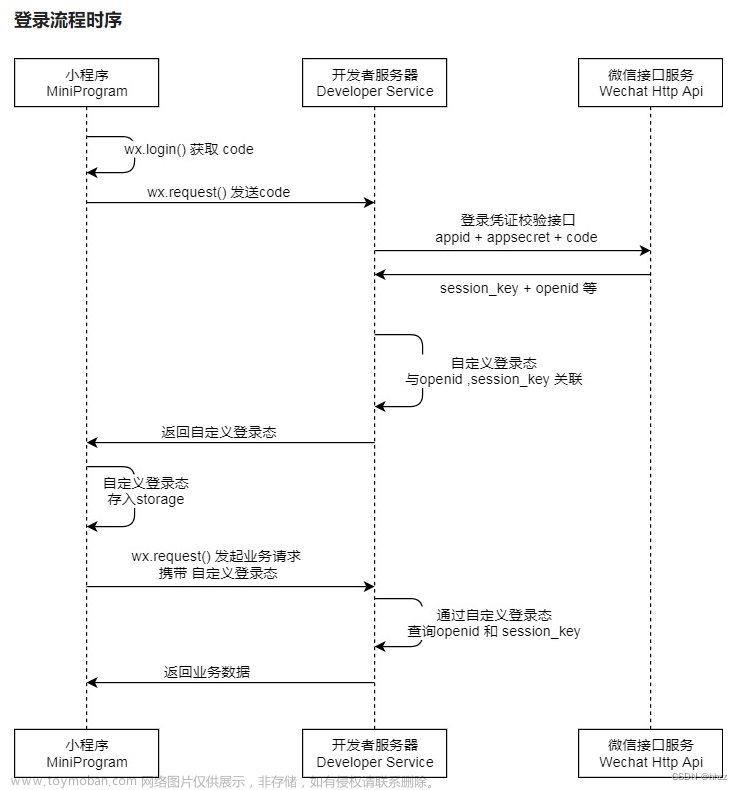
点击登录
返回code码,我们拿code码进行获取openid

获取头像昵称
拿到返回的信息进行获取用户信息

获取用户信息
 文章来源:https://www.toymoban.com/news/detail-507994.html
 文章来源地址https://www.toymoban.com/news/detail-507994.html
以上就完成了哦,简单教程
到了这里,关于java springboot集成微信小程序【详细教程】的文章就介绍完了。如果您还想了解更多内容,请在右上角搜索TOY模板网以前的文章或继续浏览下面的相关文章,希望大家以后多多支持TOY模板网!


