BBOX投影
首先在mmdetection3d/tools/data_converter/nuscenes_converter.py中,get_2d_boxes()可以直接从nuscenes原始sample数据中获取已标注的3D box信息,因此该函数就可以实现整体投影过程。
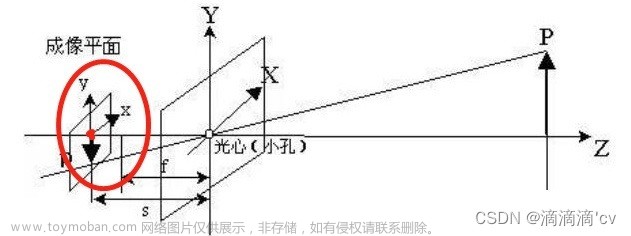
投影原理
投影过程分为以下几步:
-
世界坐标系 ——> Ego坐标系(自身)
- 这里需要世界坐标系原点变换到自身的 平移 T+旋转 R;

- 这里需要世界坐标系原点变换到自身的 平移 T+旋转 R;
-
Ego坐标系 ——> 相机坐标系
- 这里需要自身原点位置变换到相机位置的 平移 T+旋转 R(即相机外参) ;
- 这里需要自身原点位置变换到相机位置的 平移 T+旋转 R(即相机外参) ;
-
相机坐标系 ——> 像素坐标系
- 此处需要相机内参即可;

- 此处需要相机内参即可;
重要概念
- box坐标点的
origin:
在Nuscenes中,默认get_box()函数获取到的中心点为
代码重构
- 重构
get_2d_boxes()函数如下:(改动处均已标注出)
def get_2d_boxes(nusc,
                 sample_data_token: str,
                 visibilities: List[str],
                 mono3d=True):
    """Get the 2D annotation records for a given `sample_data_token`.

    Args:
        sample_data_token (str): Sample data token belonging to a camera
            keyframe.
        visibilities (list[str]): Visibility filter.
        mono3d (bool): Whether to get boxes with mono3d annotation.

    Return:
        list[dict]: List of 2D annotation record that belongs to the input
            `sample_data_token`.
    """

    # Get the sample data and the sample corresponding to that sample data.
    sd_rec = nusc.get('sample_data', sample_data_token)

    assert sd_rec[
        'sensor_modality'] == 'camera', 'Error: get_2d_boxes only works' \
        ' for camera sample_data!'
    if not sd_rec['is_key_frame']:
        raise ValueError(
            'The 2D re-projections are available only for keyframes.')

    s_rec = nusc.get('sample', sd_rec['sample_token'])

    # --------------------------------------------
    # 获取图像,用于可视化
    cam_rec = nusc.get('sample_data', s_rec['data']['CAM_FRONT'])
    imgname = os.path.join('/home/pc/Workspaces/Reaserch/mmdetection3d/data/nuscenes/trainval', \
                                cam_rec['filename'])
	# --------------------------------------------

    # Get the calibrated sensor and ego pose
    # record to get the transformation matrices.
    cs_rec = nusc.get('calibrated_sensor', sd_rec['calibrated_sensor_token'])
    pose_rec = nusc.get('ego_pose', sd_rec['ego_pose_token'])
    camera_intrinsic = np.array(cs_rec['camera_intrinsic'])

    # Get all the annotation with the specified visibilties.
    ann_recs = [
        nusc.get('sample_annotation', token) for token in s_rec['anns']
    ]
    ann_recs = [
        ann_rec for ann_rec in ann_recs
        if (ann_rec['visibility_token'] in visibilities)
    ]

    repro_recs = []
    box_list = []       # visualization
    for ann_rec in ann_recs:
        # Augment sample_annotation with token information.
        ann_rec['sample_annotation_token'] = ann_rec['token']
        ann_rec['sample_data_token'] = sample_data_token

        # Get the box in global coordinates.
        box = nusc.get_box(ann_rec['token'])

        # Move them to the ego-pose frame.
        box.translate(-np.array(pose_rec['translation']))
        box.rotate(Quaternion(pose_rec['rotation']).inverse)

        # Move them to the calibrated sensor frame.
        box.translate(-np.array(cs_rec['translation']))
        box.rotate(Quaternion(cs_rec['rotation']).inverse)

        # Filter out the corners that are not in front of the calibrated
        # sensor.
        corners_3d = box.corners()
        in_front = np.argwhere(corners_3d[2, :] > 0).flatten()
        corners_3d = corners_3d[:, in_front]

        # Project 3d box to 2d.
        corner_coords = view_points(corners_3d, camera_intrinsic,
                                    True).T[:, :2].tolist()

        # Keep only corners that fall within the image.
        final_coords = post_process_coords(corner_coords)

        # Skip if the convex hull of the re-projected corners
        # does not intersect the image canvas.
        if final_coords is None:
            continue
        else:
            min_x, min_y, max_x, max_y = final_coords

        # Generate dictionary record to be included in the .json file.
        repro_rec = generate_record(ann_rec, min_x, min_y, max_x, max_y,
                                    sample_data_token, sd_rec['filename'])

        # If mono3d=True, add 3D annotations in camera coordinates
        if mono3d and (repro_rec is not None):
            loc = box.center.tolist()

            dim = box.wlh
            dim[[0, 1, 2]] = dim[[1, 2, 0]]  # convert wlh to our lhw
            dim = dim.tolist()

            rot = box.orientation.yaw_pitch_roll[0]
            rot = [-rot]  # convert the rot to our cam coordinate

            global_velo2d = nusc.box_velocity(box.token)[:2]
            global_velo3d = np.array([*global_velo2d, 0.0])
            e2g_r_mat = Quaternion(pose_rec['rotation']).rotation_matrix
            c2e_r_mat = Quaternion(cs_rec['rotation']).rotation_matrix
            cam_velo3d = global_velo3d @ np.linalg.inv(
                e2g_r_mat).T @ np.linalg.inv(c2e_r_mat).T
            velo = cam_velo3d[0::2].tolist()

            repro_rec['bbox_cam3d'] = loc + dim + rot
            repro_rec['velo_cam3d'] = velo

            center3d = np.array(loc).reshape([1, 3])


            center2d = points_cam2img(
                center3d, camera_intrinsic, with_depth=False)
            repro_rec['center2d'] = center2d.squeeze().tolist()

            # normalized center2D + depth
            # if samples with depth < 0 will be removed
            # --------------------------------------------
            # if repro_rec['center2d'][2] <= 0:
                # continue
            # --------------------------------------------

            ann_token = nusc.get('sample_annotation',
                                 box.token)['attribute_tokens']
            if len(ann_token) == 0:
                attr_name = 'None'
            else:
                attr_name = nusc.get('attribute', ann_token[0])['name']
            attr_id = nus_attributes.index(attr_name)
            repro_rec['attribute_name'] = attr_name
            repro_rec['attribute_id'] = attr_id
            # --------------------------------------------
            box_list.append(torch.tensor(repro_rec['bbox_cam3d']))
        	# --------------------------------------------
        repro_recs.append(repro_rec)
    # --------------------------------------------
    from mmdet3d.core.visualizer.image_vis import draw_camera_bbox3d_on_img
    import cv2
    img = cv2.imread(imgname)
    from mmdet3d.core.bbox.structures.cam_box3d import CameraInstance3DBoxes
    bbox_cam3d = torch.stack(box_list, dim=0) # repro_rec['bbox_cam3d']
    bbox_cam3d = CameraInstance3DBoxes(bbox_cam3d,origin=(0.5,0.5,0.5))
    draw_camera_bbox3d_on_img(bbox_cam3d,
                        raw_img=img,
                        cam2img=camera_intrinsic,
                        img_metas=None,
                        color=(0, 255, 0),
                        thickness=1)
    # --------------------------------------------
投影效果
 文章来源:https://www.toymoban.com/news/detail-509217.html
点投影
 文章来源地址https://www.toymoban.com/news/detail-509217.html
到了这里,关于Nuscenes——实现世界坐标3D点投影到像素坐标系中的文章就介绍完了。如果您还想了解更多内容,请在右上角搜索TOY模板网以前的文章或继续浏览下面的相关文章,希望大家以后多多支持TOY模板网!