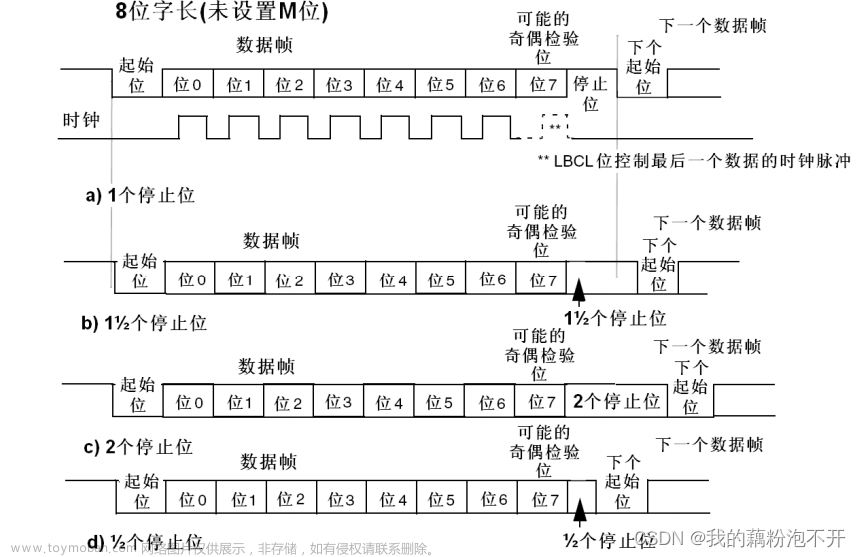
一、在使用EXYNOS4412的串口发送和接收的时候,首先要对EXYNOS4412的串口进行配置,我们使用轮询方式时的配置有哪些?
1、配置GPIO,使对应管脚作为串口的发送和接收管脚
GPA0CON寄存器[7:4][3:0] 0x22
GPA0PUD寄存器[3:0] 0 禁止上下拉电阻
2、配置串口单元本身寄存器
ULCON0 0xE2900000
数据位:8位
停止位:1位
校验位:无
使用的正模式,非红外。
3、UCON0 0xE2900004
串口的收发模式:轮询
串口的时钟使用的PCLK UFCON0 0xE2900008
禁止FIFO
UMCON0 0xE290000C
禁止Modem
UBRp0 0xE2900028
UpSLOT0 0xE290002C
UBRp0 = PCLK或者SCLK_UART/波特率/16 - 1 的整数部分
UpSLOT0 查表,怎么查?
PCLK或者SCLK_UART/波特率/16 - 1 的小数部分 * 16 取整
查表
PCLK=100000000
波特率是115200
UBRp0 = 35
UpSLOT0 = 0x0080
发送数据流程(轮询方式)
uart0_putc()
判断UTRSTAT0的BIT1,如果BIT1是0等待如果BIT1是1,就把要发送的一个字节数据写到发送寄存器(UTXH0,0xE2900020)
接收数据流程(轮询方式)
uart0_getc
判断UTRSTAT0的BIT0,如果BIT0是0等待如果BIT0是1,从URXH0 0xE2900024读取一个字节的数据。
编程时:
0xE2900000地址单元写3
0xE2900004地址单元写5
0xE2900008地址单元写0
0xE290000C地址单元写0
0xE2900028地址单元写35
0xE290002C地址单元写0x80
uart.h
1 #ifndef _UART_H_
2 #define _UART_H_
3
4 #define GPA0CON (*(volatile unsigned int *)0xE0200000)
5 #define GPA0PUD (*(volatile unsigned int *)0xE0200008)
6
7 #define ULCON0 (*(volatile unsigned int *)0xE2900000)
8 #define UCON0 (*(volatile unsigned int *)0xE2900004)
9 #define UFCON0 (*(volatile unsigned int *)0xE2900008)
10 #define UMCON0 (*(volatile unsigned int *)0xE290000C)
11 #define UTRSTAT0 (*(volatile unsigned int *)0xE2900010)
12 #define UTXH0 (*(volatile unsigned int *)0xE2900020)
13 #define URXH0 (*(volatile unsigned int *)0xE2900024)
14 #define UBRp0 (*(volatile unsigned int *)0xE2900028)
15 #define UpSLOT0 (*(volatile unsigned int *)0xE290002C)
16
17 #define PCLK (66500000)
18
19 //函数原型声明
20 extern void uart0_init(void);
21 extern void uart0_puts(const char *);
22 extern void uart0_putc(char);
23 extern char uart0_getc(void);
24 extern void uart0_gets(char *,int);
25
26 #endif // _UART_H_
uart.c
1 #include "uart.h"
2
3 //初始化串口寄存器
4 void uart0_init(void){
5 //配置GPIO口 根据CPU 手册中设置下面的寄存器
6 //GPA0CON GPA0PUD
7 ULCON0 = 3;
8 UCON0 = 5;
9 UFCON0 = 0;
10 UMCON0 = 0;
11 UBRp0 = 35;
12 UpSLOT0 = 0x0080;
13 GPA0CON = 34;
14 GPA0PUD = ~0xF;
15 }
16 //发送一个字符
17 void uart0_putc(char c){
18 //判断状态位
19 while(!(UTRSTAT0 & (1<<1)));
20 //发送字符
21 UTXH0 = c;
22 }
23 //接收一个字符
24 char uart0_getc(void){
25 while(!(UTRSTAT0 & 1));
26
27 return URXH0;
28 }
29
30 //接收一串字符
31 void uart0_gets(char *str,int len){
32 char* tmp = str;
33 int in = len;
34 //int i;
35 while(--len){
36 *tmp = uart0_getc();
37 if(*tmp == '\r'){
38 uart0_putc('\n'); //若此处为 \r 则不会输出,若为 \n 则在下一行跳跃输出字符的长度,然后输出字符串
39 uart0_putc('\r');
40 break;
41 }
42 if(*tmp == 127){ //127 是 ubuntu下 kermit软件中的 BACKSPACE按键 需要实现的效果就是当按下回车键的时候终端的上一个数据会被删掉,
43 len++; //由于此分支的 127 输入到了 *tmp 中,此时的127是无用的,所以要进行 len++ ,但是有一个问题,我们的退格的目的是删除上一个字母,所以127的上一个字符也没用了,需要对len做两次自加进行还原 但是又出现一个问题,如果已经删到第0个元素就不能再自加两次了,这样会造成 len 越来越大。因此要在下面做一个判断
44 if(len < in){
45 len++;
46 }
47 if(tmp == str){
48 continue;
49 }
50
51 uart0_putc('\b');
52 uart0_putc(' ');
53 uart0_putc('\b');
54 --tmp;
55 continue;
56 }
57 uart0_putc(*tmp);
58 tmp++;
59 }
60 *tmp = 0;
61 }
62
63 //发送一串字符
64 void uart0_puts(const char *str){
65 if(str == 0){
66 return;
67 }
68 while(*str){
69 uart0_putc(*str);
70 if(*str == '\n'){
71 uart0_putc('\r');
72 }
73 str++;
74 }
75 }
main.c
1 #include "uart.h"
2
3 void main(void){
4 char val[30];
5 uart0_init();
6 while(1){
7
8 //uart0_gets(val);
9 uart0_puts("\nstart\n");
10 uart0_gets(val,30);
11 uart0_puts(val);
12
13 // uart0_puts(uart0_getc());
14 }
15 }
makefile
1 PROG=uart
2 OBJS=main.o uart.o
3
4 AS=arm-linux-as
5 CC=arm-linux-gcc
6 LD=arm-linux-ld
7 OBJCOPY=arm-linux-objcopy
8 AFLAGS=-march=armv5te
9 CFLAGS=-march=armv5te -nostdlib
10 LDFLAGS=-nostartfiles -nostdlib -Ttext=0x20008000 -e main
11
12 $(PROG): $(OBJS)
13 $(LD) $(LDFLAGS) -o $(PROG) $(OBJS)
14 $(OBJCOPY) -O binary $(PROG) $(PROG).bin
15 cp uart.bin /tftpboot
16
17 %.o:%.s
18 $(AS) $(AFLAGS) -o $@ $<
19
20 %.o:%.c
21 $(CC) $(CFLAGS) -c -o $@ $<
22 clean:
23 @rm -vf $(OBJS) $(PROG) $(PROG).bin文章来源:https://www.toymoban.com/news/detail-511609.html
对嵌入式物联网感兴趣的小伙伴,可以多了解一下相关信息。(看过来)文章来源地址https://www.toymoban.com/news/detail-511609.html
到了这里,关于ARM裸机开发-串口通信的文章就介绍完了。如果您还想了解更多内容,请在右上角搜索TOY模板网以前的文章或继续浏览下面的相关文章,希望大家以后多多支持TOY模板网!


