在Springboot整合ES提供了启动依赖jar。 该jar包封了一个类: RestHighLevelClient 该类可以对象ES中各个接口进行相应的操作。
1.创建springboot工程并导入相关的依赖 2.3.12.RELEASE

2.创建一个配置类,返回 RestHighLevelClient
修改一下版本
创建路径config包下的ESconfig类
@Configuration
public class ESConfig {
    // springboot连接ES提供的一个客户端类.RestHighLevelClient
    @Bean
    public RestHighLevelClient restHighLevelClient(){
        RestHighLevelClient client = new RestHighLevelClient(
                RestClient.builder(new HttpHost("127.0.0.1",9200,"http"))
        );
        return client;
    }
}
3.测试
在Test中测试
@SpringBootTest
class SpringbootESday02ApplicationTests{
    // 注入
    @Autowired
    private RestHighLevelClient client;
    // 创建ES的索引
    @Test
    void createIndex() throws Exception{
        // 创建createIndexRequest请求类---对应到索引的创建需要的参数 都封装到该类中
        CreateIndexRequest indexRequest = new CreateIndexRequest("celebrity");
        // 关于对索引操作的功能都IndiceClient类中
        CreateIndexResponse indexResponse = client.indices().create(indexRequest, RequestOptions.DEFAULT);
        System.out.println("是否创建索引成功:"+indexResponse.isAcknowledged());
    }

}
结果:
判断索引是否存在
 // 判断索引是在否存在
    @Test
    public void isExist() throws Exception {
        GetIndexRequest getIndexRequest = new GetIndexRequest("celebrity");
        boolean exists = client.indices().exists(getIndexRequest,RequestOptions.DEFAULT);
        System.out.println("索引是否存在:"+exists);
    }
结果:
删除索引
 // 删除索引
    @Test
    public void delete() throws IOException {
        DeleteIndexRequest deleteIndexRequest = new DeleteIndexRequest("celebrity");
        AcknowledgedResponse delete = client.indices().delete(deleteIndexRequest, RequestOptions.DEFAULT);
        System.out.println("是否删除成功:"+delete.isAcknowledged());
    }
结果:
在索引中添加文档
添加pom.xml依赖(转JSON数据)
<dependency>
            <groupId>com.alibaba</groupId>
            <artifactId>fastjson</artifactId>
            <version>1.2.62</version>
        </dependency>
在entity包创建celebrity实体类
@Data
@NoArgsConstructor
@AllArgsConstructor
public class Celebrity {
    private String name;
    private String address;
    private String sex;
    private Integer age;
}
  // 索引中添加文档
    @Test
    public void insertDoc()throws Exception{
        IndexRequest indexRequest = new IndexRequest("celebrity");
        // 指定文档id的值
        indexRequest.id("1");
        // 指定文档内容
        Celebrity celebrity = new Celebrity("李四","中国","男",18);
        indexRequest.source(JSON.toJSONString(celebrity), XContentType.JSON);
        IndexResponse index = client.index(indexRequest, RequestOptions.DEFAULT);
        System.out.println("结果:"+index.getResult());

    }
结果:
根据id查询文档内容
  //根据id查询文档内容
    @Test
    public void findByid() throws IOException {
        GetRequest getRequest=new GetRequest("celebrity");
        getRequest.id("1");
        GetResponse getResponse = client.get(getRequest, RequestOptions.DEFAULT);

        Map<String, Object> sourceAsMap = getResponse.getSourceAsMap();
        System.out.println(sourceAsMap.get("name")+"===="+sourceAsMap.get("sex"));


        String sourceAsString = getResponse.getSourceAsString();
        System.out.println(sourceAsString);
    }
结果:
根据id删除文档
 // 根据id删除文档
    @Test
    public void deleteByid() throws Exception{
        DeleteRequest deleteRequest = new DeleteRequest("celebrity");
        deleteRequest.id("1");
        DeleteResponse delete = client.delete(deleteRequest, RequestOptions.DEFAULT);
        System.out.println(delete.getResult());
    }
结果:
根据id修改文档
    @Test
    public void update()throws Exception{
        UpdateRequest updateRequest = new UpdateRequest("celebrity", "2");
        Celebrity celebrity = new Celebrity();
        celebrity.setName("张学友");
        updateRequest.doc(JSON.toJSONString(celebrity),XContentType.JSON);
        UpdateResponse update = client.update(updateRequest, RequestOptions.DEFAULT);
    }
结果:根据上面根据id查询一下
批量添加文档
// 批量添加文档
    @Test
    public void batchInsert() throws Exception{
        BulkRequest bulkRequest = new BulkRequest("celebrity");
        List<Celebrity> list = new ArrayList<>();
        list.add(new Celebrity("张三","北京","男",19));
        list.add(new Celebrity("李四","天津","男",19));
        list.add(new Celebrity("王五","湖北","男",19));
        list.add(new Celebrity("赵六","湖南","男",19));

        for (Celebrity li : list){
            bulkRequest.add(new IndexRequest().source(JSON.toJSONString(li),XContentType.JSON));
        }
        client.bulk(bulkRequest,RequestOptions.DEFAULT);
    }
结果: 文章来源:https://www.toymoban.com/news/detail-516603.html
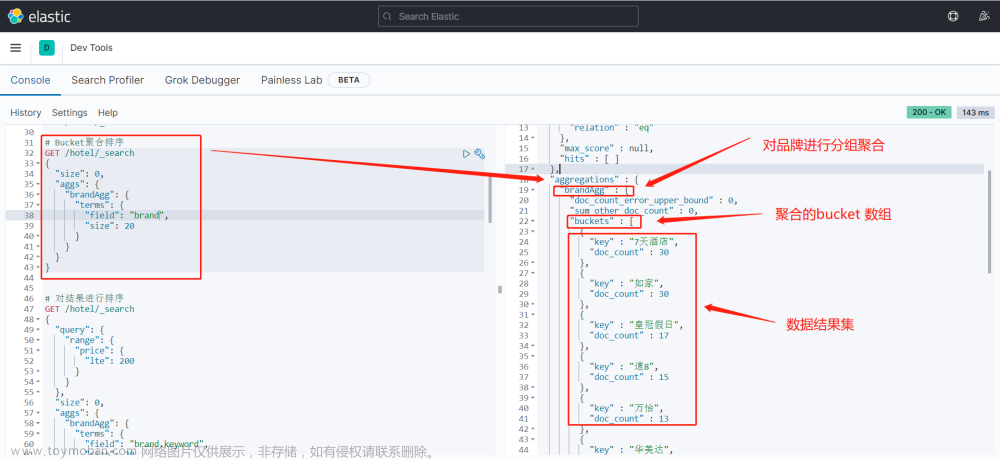
复杂查询:
@Test
    public void search() throws IOException {
    // 创建一个搜索请求对象
    SearchRequest searchRequest = new SearchRequest("celebrity");
    // 构建一个搜索条件对象
    SearchSourceBuilder searchSourceBuilder = new SearchSourceBuilder();
    // 为条件对象添加query查询字段
    MatchQueryBuilder matchQuery = QueryBuilders.matchQuery("name", "张");
    searchSourceBuilder.query(matchQuery);
    // 搜索对象设置分页参数
    searchSourceBuilder.from(0);
    searchSourceBuilder.size(3);
    // 设置高亮
    HighlightBuilder highlightBuilder = new HighlightBuilder();
    highlightBuilder.field("name");
    highlightBuilder.preTags("<font color='red'>");
    highlightBuilder.postTags("</font>");
    searchSourceBuilder.highlighter(highlightBuilder);

    // 条件对象放入请求对象中
    searchRequest.source(searchSourceBuilder);

    SearchResponse searchResponse = client.search(searchRequest, RequestOptions.DEFAULT);
    SearchHits hits = searchResponse.getHits();
    System.out.println("总条数:"+hits.getTotalHits().value);

    System.out.println("===============记录内容============");
    SearchHit[] hits1 = hits.getHits();
    for (SearchHit hit : hits1){
        System.out.println(hit.getId()+"-->"+hit.getSourceAsMap());
    }
    System.out.println("============高亮内容=============");
    for (SearchHit hit : hits1){
        System.out.println(hit.getHighlightFields().get("name").getFragments()[0]);
    }
    }
结果: 文章来源地址https://www.toymoban.com/news/detail-516603.html
到了这里,关于springboot整合ES索引引擎的文章就介绍完了。如果您还想了解更多内容,请在右上角搜索TOY模板网以前的文章或继续浏览下面的相关文章,希望大家以后多多支持TOY模板网!