一:要用Echarts实现3D地球 除了 echarts还是远远不够的 ,除了echarts外 我们 还得引用 echarts-gl jquery 也是需要的 不然会有多次报错
1.收首先在 main.js中分别引入所需的插件,
import ElementUI, { install } from 'element-ui'
import 'element-ui/lib/theme-chalk/index.css'
import * as echarts from 'echarts'
import 'echarts-gl'
import jquery from 'jquery'

Vue.use(ElementUI)
Vue.prototype.$ = jquery
// vue全局注入Echarts
Vue.prototype.$echarts = echarts
此外 除了在main.js中 在相应.vue 中也需要引用
import 'echarts-gl'
import $ from 'jquery' // 引入jQuery
import 'echarts/map/js/world.js' // 必须引入世界地图
使用echarts的3D功能 全局引入Echarts-gl 一般建议装最低版本 不然容易报错,命令安装
npm install echarts-gl@1.1.0 --save当效果实现前 还需给一个有宽高的盒子
<div id="main" style="width:100%;height:500px;padding:0px;"></div>js代码
import 'echarts-gl'
import $ from 'jquery' // 引入jQuery
import 'echarts/map/js/world.js' // 必须引入世界地图
// import * as echarts from 'echarts'
export default {
  name: 'login_new',
  methods: {
    // 绘制3D路径图
    draw () {
      var ROOT_PATH = 'https://cdn.jsdelivr.net/gh/apache/echarts-website@asf-site/examples'
      var myChart = this.$echarts.init(document.getElementById('main'))
      // eslint-disable-next-line no-unused-vars
      var option

      var uploadedDataURL = ROOT_PATH + '/data-gl/asset/data/flights.json'
      myChart.showLoading()
      $.getJSON(uploadedDataURL, function (data) {
        myChart.hideLoading()

        function getAirportCoord (idx) {
          return [data.airports[idx][3], data.airports[idx][4]]
        }

        var routes = data.routes.map(function (airline) {
          return [getAirportCoord(airline[1]), getAirportCoord(airline[2])]
        })
        myChart.setOption({
          geo3D: {
            map: 'world',
            shading: 'realistic',
            silent: false, // 鼠标设置为不触发事件
            environment: '#333', // 背景色
            realisticMaterial: {
              roughness: 0.8,
              metalness: 0
            },
            postEffect: {
              enable: true
            },
            groundPlane: {
              show: false
            },
            light: {
              main: {
                intensity: 1,
                alpha: 30
              },
              ambient: {
                intensity: 0
              }
            },
            viewControl: {
              distance: 70, // 地图缩放程度
              alpha: 89, // 地图翻转程度
              panMouseButton: 'left',
              rotateMouseButton: 'right',

              rotateSensitivity: false, // 地图是否能旋转
              zoomSensitivity: false // 地图是否能缩放
            },
            itemStyle: {
              color: '#000' // 地图的颜色
            },
            regionHeight: 0.5 // 地图高度
          },
          series: [
            {
              type: 'lines3D',
              coordinateSystem: 'geo3D',
              effect: { // 特效线的配置
                show: true,
                trailWidth: 1,
                trailOpacity: 0.5,
                trailLength: 0.2,
                constantSpeed: 5 // 特效固定速度
              },
              blendMode: 'lighter',
              lineStyle: { // 特效线
                width: 0.2,
                opacity: 0.05
              },
              data: routes
            }
          ]
        })
        // addEventListener监听事件处理函数
        window.addEventListener('keydown', function () {
          myChart.dispatchAction({
            type: 'lines3DToggleEffect',
            seriesIndex: 0
          })
        })
      })
    }
  },
  mounted () {
    this.draw()
  }
}
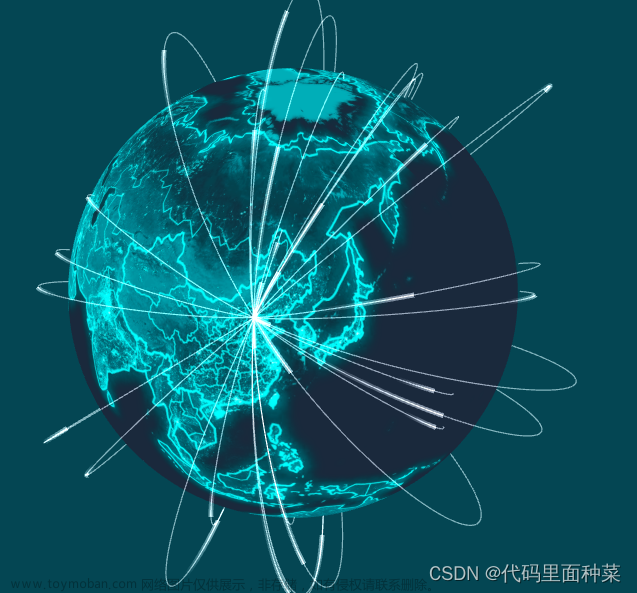
注意: 我这是在vue项目中实现的,这样就完成了一个小型的关系图 ;
下面就是效果图了:
 文章来源:https://www.toymoban.com/news/detail-522980.html
文章来源地址https://www.toymoban.com/news/detail-522980.html
到了这里,关于Vue 中使用Echarts构建3D地球的文章就介绍完了。如果您还想了解更多内容,请在右上角搜索TOY模板网以前的文章或继续浏览下面的相关文章,希望大家以后多多支持TOY模板网!

