一、背景
项目中需要建立客户端与服务端之间的长链接,首先就考虑用WebSocket,再来SpringBoot原来整合WebSocket方式并不高效,因此找到了netty-websocket-spring-boot-starter 这款脚手架,它能让我们在SpringBoot中使用Netty来开发WebSocket服务器,并像spring-websocket的注解开发一样简单
二、netty-websocket-spring-boot-starter 入门介绍
2.1 核心注解
2.1.1 @ServerEndpoint
当ServerEndpointExporter类通过Spring配置进行声明并被使用,它将会去扫描带有@ServerEndpoint注解的类 被注解的类将被注册成为一个WebSocket端点 所有的配置项都在这个注解的属性中 ( 如:@ServerEndpoint(“/ws”) )
2.1.2 @OnOpen
当有新的WebSocket连接完成时,对该方法进行回调 注入参数的类型:Session、HttpHeaders…
2.1.3 @OnClose
当有WebSocket连接关闭时,对该方法进行回调 注入参数的类型:Session
2.1.4 @OnError
当有WebSocket抛出异常时,对该方法进行回调 注入参数的类型:Session、Throwable
2.1.5 @OnMessage
当接收到字符串消息时,对该方法进行回调 注入参数的类型:Session、String
2.2 核心配置
| 属性 | 属性说明 |
|---|---|
| path | WebSocket的path,也可以用value来设置 |
| host | WebSocket的host,"0.0.0.0"即是所有本地地址 |
| port | WebSocket绑定端口号。如果为0,则使用随机端口(端口获取可见 多端点服务) |
| maxFramePayloadLength | 最大允许帧载荷长度 |
| allIdleTimeSeconds | 与IdleStateHandler中的allIdleTimeSeconds一致,并且当它不为0时,将在pipeline中添加IdleStateHandler |
三、实践netty-websocket-spring-boot-starter
3.1引入POM文件
主要添加包括以下依赖
<dependency>
    <groupId>org.springframework.boot</groupId>
    <artifactId>spring-boot-starter</artifactId>
</dependency>

<dependency>
    <groupId>org.springframework.boot</groupId>
    <artifactId>spring-boot-starter-test</artifactId>
    <scope>test</scope>
</dependency>

<dependency>
    <groupId>org.springframework.boot</groupId>
    <artifactId>spring-boot-starter-data-redis</artifactId>
</dependency>

<dependency>
    <groupId>org.yeauty</groupId>
    <artifactId>netty-websocket-spring-boot-starter</artifactId>
    <version>0.9.5</version>
</dependency>

<dependency>
    <groupId>cn.hutool</groupId>
    <artifactId>hutool-all</artifactId>
    <version>5.4.6</version>
</dependency>
3.2 在主程序类中排除数据库使用
/**
 * 主程序启动类
 */
@SpringBootApplication(exclude = {DataSourceAutoConfiguration.class})
public class WebsocketApplication {

    public static void main(String[] args) {
        SpringApplication.run(WebsocketApplication.class, args);
    }

}
3.3 开启WebSocket支持
@Configuration
public class WebSocketConfig {
    @Bean
    public ServerEndpointExporter serverEndpointExporter() {
        return new ServerEndpointExporter();
    }
}
3.4 定义WebSocketServer服务器(核心代码)
在端点类上加上@ServerEndpoint注解,并在相应的方法上加上@OnOpen、@OnMessage、@OnError、@OnClose注解, 代码如下:
@ServerEndpoint(port = "${ws.port}", path = "/demo/{version}", maxFramePayloadLength = "6553600", allIdleTimeSeconds = "300")
public class WebSocketServer {

    private static Log LOGGER = LogFactory.get();

    // concurrent包的线程安全Set,用来存放每个客户端对应的MyWebSocket对象。
    private static CopyOnWriteArraySet<WebSocketServer> webSocketSet = new CopyOnWriteArraySet<WebSocketServer>();
    // 与某个客户端的连接会话,需要通过它来给客户端发送数据
    private Session session;
    // 接收用户ID
    protected StringBuilder userInfo = new StringBuilder();

    @Autowired
    private RedisTemplate<String, String> redisTemplate;

    /**
     * 连接建立成功调用的方法
     */
    @OnOpen
    public void onOpen(Session session,
                       HttpHeaders headers,
                       @RequestParam String req,
                       @RequestParam MultiValueMap<String, Object> reqMap,
                       @PathVariable String arg,
                       @PathVariable Map<String, Object> pathMap) {
        this.session = session;
        // 加入set中
        webSocketSet.add(this);
        // 在线数加1
        addOnlineCount();
        LOGGER.debug("UserId = {}, 通道ID={}, 当前连接人数={}", userInfo.toString(), getSessionId(session), getOnlineCount());
    }

    /**
     * 收到客户端消息后调用的方法
     */
    @OnMessage
    public void onMessage(Session session, String message) {
        JSONObject jsonData = JSONUtil.parseObj(message);
        if (!jsonData.containsKey("command")) {
            LOGGER.debug("UserId = {}, 通道ID={}, 上行内容={}, 上行请求非法,缺少command参数, 处理结束",
                    userInfo.toString(), getSessionId(session), message);
            return;
        }
        String userId = jsonData.getStr("userId");
        this.userInfo = new StringBuilder(userId);
        String command = jsonData.getStr("command");
        Class<?> service = Command.getService(command);
        if (Objects.isNull(service)) {
            errorMessage(command);
            LOGGER.error("UserId = {}, 通道ID={}, 解析指令执行出错!", userInfo.toString(), getSessionId(session));
            return;
        }
        LOGGER.info("UserId = {}, 通道ID={}, 处理类={}, 开始处理,请求内容={}",
                userInfo.toString(), getSessionId(session), service, jsonData.toString());
        BaseMessage baseMessage = getBaseMessage(service, session, command);
        if (baseMessage == null) {
            return;
        }
        try {
            jsonData.set("SessionId", getSessionId(session));
            JSON resp = baseMessage.handlerMessage(userInfo, jsonData);
            resp.putByPath("command", command);
            resp.putByPath("userId", userId);
            String value = resp.toString();
            //将结果写回客户端, 实现服务器主动推送
            ChannelFuture future = sendMessage(value);
            LOGGER.info("UserId = {}, 通道ID = {}, 返回内容 = {}, future = {}, 处理结束",
                    userInfo.toString(), getSessionId(session), value, future.toString());
        } catch (Exception e) {
            LOGGER.error("UserId = {}, 通道ID={}, 解析执行出错信息={}", userInfo.toString(), getSessionId(session), e.getMessage());
        }
    }

    /**
     * 连接关闭调用的方法
     */
    @OnClose
    public void onClose(Session session) {
        // 从set中删除
        webSocketSet.remove(this);
        // 在线数减1
        subOnlineCount();
        String userId = this.userInfo.toString();
        LOGGER.warn("UserId = {}, 通道ID = {}, 有一连接关闭!当前在线人数={}", userId, getSessionId(session), getOnlineCount());
        userInfo.delete(0, userInfo.length());
        if (ObjectUtil.isNotNull(userId)) {
            String keyStr = ConstDef.ONLINE_USER_TYPE + userId;
            redisTemplate.delete(keyStr);
        }
        session.close();
    }
    /**
     * 出错方法
     */
    @OnError
    public void onError(Session session, Throwable cause) {
        if (Objects.nonNull(this.session) && Objects.nonNull(cause) && !(cause instanceof EOFException)) {
            LOGGER.error("UserId = {}, 通道ID={}, 出错信息={}", userInfo.toString(), this.session.id(), cause.toString());
        }
        if (Objects.nonNull(session) && session.isOpen()) {
            session.close();
        }
    }
    /**
     * 通过class获取Bean
     */
    private BaseMessage getBaseMessage(Class<?> service, Session session, String command) {
        BaseMessage baseMessage;
        try {
            baseMessage = (BaseMessage) SpringUtils.getBean(service);
        } catch (Exception e) {
            LOGGER.error("UserId = {}, 通道ID = {}, 未找到协议头 = {} 的处理类", userInfo.toString(), getSessionId(session), service);
            errorMessage(command);
            return null;
        }
        return baseMessage;
    }
    /**
     * 获取通道ID
     */
    private String getSessionId(Session session) {
        return session.id().asShortText();
    }
    /**
     * 协议错误
     */
    public void errorMessage(String command) {
        JSONObject retObj = new JSONObject();
        retObj.set("code", ConstDef.ERROR_CODE_10001);
        retObj.set("msg", ConstDef.ERROR_CODE_10001_DESP);
        retObj.set("command", command);
        try {
            sendMessage(retObj.toString());
        } catch (IOException e) {
            LOGGER.error("UserId = {}, 通道ID={}, 解析执行出错信息={}", userInfo.toString(), getSessionId(session), e.getMessage());
        }
    }
    /**
     * 实现服务器主动推送
     */
    public ChannelFuture sendMessage(String message) throws IOException {
        return this.session.sendText(message);
    }
    /**
     * 在线用户数
     */
    public long getOnlineCount() {
        String onlineCountValue = redisTemplate.opsForValue().get(ConstDef.ONLINE_COUNT_KEY);
        if (StrUtil.isBlank(onlineCountValue) || !NumberUtil.isNumber(onlineCountValue)) {
            return 0L;
        }
        return Long.parseLong(onlineCountValue);
    }
    /**
     * 在线数+1
     */
    private void addOnlineCount() {
        redisTemplate.opsForValue().increment(ConstDef.ONLINE_COUNT_KEY);
    }
    /**
     * 在线数-1
     */
    private void subOnlineCount() {
        redisTemplate.opsForValue().decrement(ConstDef.ONLINE_COUNT_KEY);
    }
}
3.5 定义接口
/**
 * 消息处理接口
 */
public interface BaseMessage {
    Log LOGGER = LogFactory.get();
    /**
     * 处理类、处理方法
     */
    JSON handlerMessage(StringBuilder vin, JSONObject jsonData);
}
3.6 定义接口实现类 (业务处理逻辑)
该类是各业务的处理逻辑类,是接口类的具体实现。
@Component
@Configuration
public class QueryAllActivityListMessage implements BaseMessage {
    @Override
    public JSON handlerMessage(StringBuilder userId, JSONObject jsonData) {
        LOGGER.debug("开始处理QueryAllActivityListMessage请求, 参数={}", JSONUtil.toJsonStr(jsonData));
        String resp = "我是服务器端返回的处理结果!";
        LOGGER.info("UserId = {}, param={}, QueryAllActivityListMessage回复 = {}", userId.toString(), jsonData, resp);
        JSONObject respStr = new JSONObject();
        return respStr.set("handleResult", resp);
    }
}
3.7 定义枚举Command
每增加一个业务接口的实现,就需要在这个枚举类注册一下。
/**
 * 指令-服务 枚举
 */
public enum Command {
    /**
     * 业务1处理逻辑
     */
    queryAllActivityList("queryAllActivityList", QueryAllActivityListMessage.class, "业务1处理逻辑");
     /**
     * 业务2处理逻辑
     */
     //略
     /**
     * 业务3处理逻辑
     */
     //略
    /**
     * 服务编码
     */
    private String processCode;
    /**
     * 服务接口类
     */
    private Class<?> service;
    /**
     * 接口描述
     */
    private String desc;

    Command(String processCode, Class<?> service, String desc) {
        this.processCode = processCode;
        this.service = service;
        this.desc = desc;
    }

    public Class<?> getService() {
        return service;
    }

    public static Class<?> getService(String processCode) {
        for (Command command : Command.values()) {
            if (command.processCode.equals(processCode)) {
                return command.getService();
            }
        }
        return null;
    }
}
3.8 编写SpringUtils 工具类
用于搜索Bean, 通过class获取Bean
/**
 * SpringUtils 工具类,用于搜索
 */
@Component
public class SpringUtils implements ApplicationContextAware {

    private static ApplicationContext applicationContext;

    @Override
    public void setApplicationContext(ApplicationContext applicationContext) throws BeansException {
        if (SpringUtils.applicationContext == null) {
            SpringUtils.applicationContext = applicationContext;
        }
    }

    /**
     * 获取applicationContext
     */
    public static ApplicationContext getApplicationContext() {
        return applicationContext;
    }

    /**
     * 通过class获取Bean
     */
    public static <T> T getBean(Class<T> clazz) {
        return getApplicationContext().getBean(clazz);
    }

    /**
     * 通过name获取 Bean.
     */
    public static Object getBean(String name) {
        return getApplicationContext().getBean(name);
    }

    /**
     * 通过name,以及Clazz返回指定的Bean
     */
    public static <T> T getBean(String name, Class<T> clazz) {
        return getApplicationContext().getBean(name, clazz);
    }

}
3.9 定义常量定义类 + 返回码
/**
 * 常量定义类 + 返回码
 */
public class ConstDef {
    /**
     * 返回码
     */
    public static final int ERROR_CODE_10001 = 10001;
    public static final String ERROR_CODE_10001_DESP = "请求参数不合法";
    /**
     * 按UserId决定,用户在线类型,车机或者手机
     */
    public static final String ONLINE_USER_TYPE = "ONLINE_USER_TYPE_";
    /**
     * 在线用户数
     */
    public static final String ONLINE_COUNT_KEY = "ONLINE_COUNT_KEY";
}
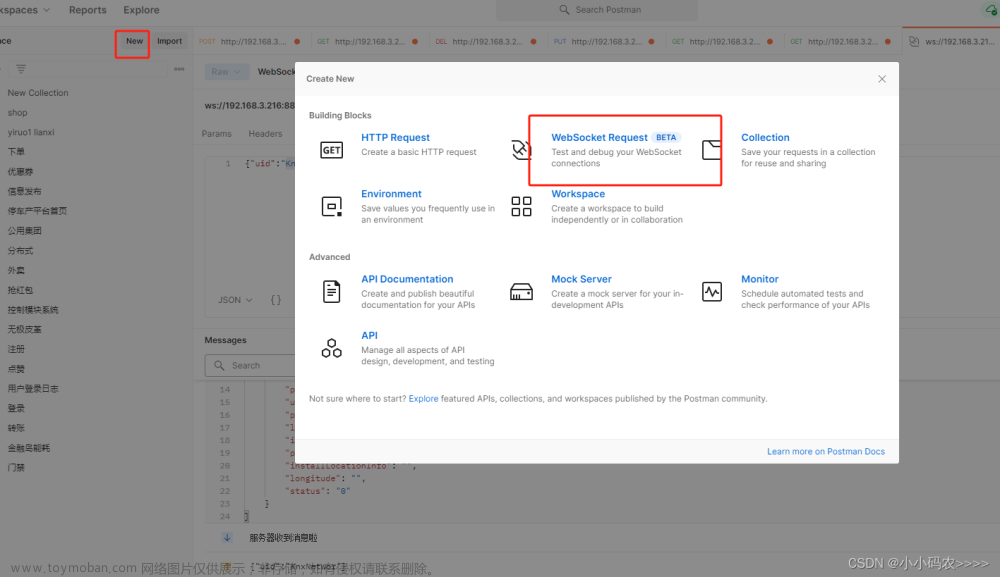
四、功能验证
打开WebSocket客户端,连接到ws://127.0.0.1:9095/demo/1
从截图来看,WebSocket服务端能正常接受并处理来自客户端的请求,验证成功!文章来源:https://www.toymoban.com/news/detail-526719.html
 文章来源地址https://www.toymoban.com/news/detail-526719.html
到了这里,关于【项目实战】基于netty-websocket-spring-boot-starter实现WebSocket服务器长链接处理的文章就介绍完了。如果您还想了解更多内容,请在右上角搜索TOY模板网以前的文章或继续浏览下面的相关文章,希望大家以后多多支持TOY模板网!