介绍
whisper介绍
Whisper由OpenAI发布于2022/9/21相较于ChatGPT(2022/11/30)早了两个半月。虽然影响力无法匹敌ChatGPT,但是其内在价值仍不可忽视。
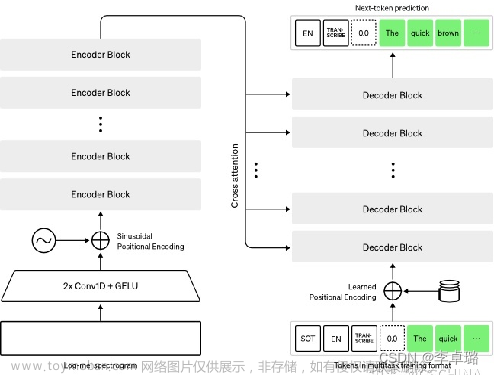
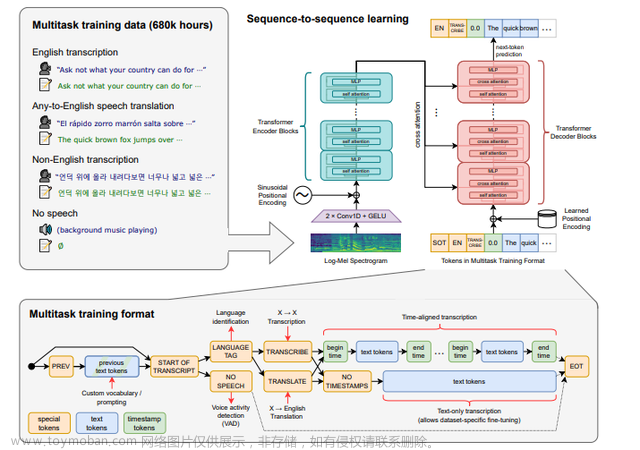
Whisper的核心功能是语音识别,对应生活中可以有很多应用场景。虽然效果显著,但是其核心仅仅简单粗暴的使用了Transformer。具体细节这里不展开,可以通过阅读论文或源码的方式了解。下面简单介绍Whisper的训练和使用。
github链接:openai/whisper: Robust Speech Recognition via Large-Scale Weak Supervision (github.com)
论文:[[https://arxiv.org/abs/2212.04356]]
安装
Whisper主要基于pytorch实现,所以需要在安装有pytorch的环境中使用。
环境准备
在安装之前需要准备ffmpeg、Rust
Linux:
sudo apt update && sudo apt install ffmpeg
window:
可以直接https://www.ffmpeg.org/官网下载或者github)下载(ffmpeg-N-110946-g859c34706d-win64-gpl.zip)。下载之后解压,并配置环境。
然后安装Rust
pip install setuptools-rust
安装
pip install -U openai-whisper
或者
pip install git+https://github.com/openai/whisper.git
更新
pip install --upgrade --no-deps --force-reinstall git+https://github.com/openai/whisper.git
使用
方式一:Command-line
# 帮助信息
whisper --help

# 根据官网使用教程可以有以下常用方式
whisper music.mp3 --model tiny.en --language en --device cuda:0
方式二:Python
# 基本使用
import whisper

if __name__ == '__main__':
    model = whisper.load_model("large-v2", download_root='Model', device="cuda:0")
    result = model.transcribe("data/dayOne.mp3", language='zh')
    key = result.keys()
    v = result.values()
    print("key:", key)
    print("values:" ,v)
    print(result["text"])
附录
模型下载链接
tiny.en":“https://openaipublic.azureedge.net/main/whisper/models/d3dd57d32accea0b295c96e26691aa14d8822fac7d9d27d5dc00b4ca2826dd03/tiny.en.pt”, “tiny”:“https://openaipublic.azureedge.net/main/whisper/models/65147644a518d12f04e32d6f3b26facc3f8dd46e5390956a9424a650c0ce22b9/tiny.pt”,
“base.en”: “https://openaipublic.azureedge.net/main/whisper/models/25a8566e1d0c1e2231d1c762132cd20e0f96a85d16145c3a00adf5d1ac670ead/base.en.pt”,
“base”: “https://openaipublic.azureedge.net/main/whisper/models/ed3a0b6b1c0edf879ad9b11b1af5a0e6ab5db9205f891f668f8b0e6c6326e34e/base.pt”,
“small.en”: “https://openaipublic.azureedge.net/main/whisper/models/f953ad0fd29cacd07d5a9eda5624af0f6bcf2258be67c92b79389873d91e0872/small.en.pt”,
“small”: “https://openaipublic.azureedge.net/main/whisper/models/9ecf779972d90ba49c06d968637d720dd632c55bbf19d441fb42bf17a411e794/small.pt”,
“medium.en”: “https://openaipublic.azureedge.net/main/whisper/models/d7440d1dc186f76616474e0ff0b3b6b879abc9d1a4926b7adfa41db2d497ab4f/medium.en.pt”,
“medium”: “https://openaipublic.azureedge.net/main/whisper/models/345ae4da62f9b3d59415adc60127b97c714f32e89e936602e85993674d08dcb1/medium.pt”,
“large-v1”: “https://openaipublic.azureedge.net/main/whisper/models/e4b87e7e0bf463eb8e6956e646f1e277e901512310def2c24bf0e11bd3c28e9a/large-v1.pt”,
“large-v2”: “https://openaipublic.azureedge.net/main/whisper/models/81f7c96c852ee8fc832187b0132e569d6c3065a3252ed18e56effd0b6a73e524/large-v2.pt”,
“large”: “https://openaipublic.azureedge.net/main/whisper/models/81f7c96c852ee8fc832187b0132e569d6c3065a3252ed18e56effd0b6a73e524/large-v2.pt”,
遇到的报错
1. 系统找不到指定的文件
答:找到系统里面的subprocess.py,
找到class Popen(object):
将shell=False 改为 shell=True
参考链接:https://blog.csdn.net/qq_24118527/article/details/90579328
2. UnicodeDecodeError: ‘utf-8’ codec can’t decode byte 0xb2 in position 9: invalid start byte
这个问题表面上就是ffmpeg造成的,好像在读取文件的时候某个位置的编码有问题。
实际上是由于上面的代码修改后,需要重新启动(在windows系统有这个问题)。文章来源:https://www.toymoban.com/news/detail-546207.html
支持的语言
region{
“en”: “english”,
“zh”: “chinese”,
“de”: “german”,
“es”: “spanish”,
“ru”: “russian”,
“ko”: “korean”,
“fr”: “french”,
“ja”: “japanese”,
“pt”: “portuguese”,
“tr”: “turkish”,
“pl”: “polish”,
“ca”: “catalan”,
“nl”: “dutch”,
“ar”: “arabic”,
“sv”: “swedish”,
“it”: “italian”,
“id”: “indonesian”,
“hi”: “hindi”,
“fi”: “finnish”,
“vi”: “vietnamese”,
“he”: “hebrew”,
“uk”: “ukrainian”,
“el”: “greek”,
“ms”: “malay”,
“cs”: “czech”,
“ro”: “romanian”,
“da”: “danish”,
“hu”: “hungarian”,
“ta”: “tamil”,
“no”: “norwegian”,
“th”: “thai”,
“ur”: “urdu”,
“hr”: “croatian”,
“bg”: “bulgarian”,
“lt”: “lithuanian”,
“la”: “latin”,
“mi”: “maori”,
“ml”: “malayalam”,
“cy”: “welsh”,
“sk”: “slovak”,
“te”: “telugu”,
“fa”: “persian”,
“lv”: “latvian”,
“bn”: “bengali”,
“sr”: “serbian”,
“az”: “azerbaijani”,
“sl”: “slovenian”,
“kn”: “kannada”,
“et”: “estonian”,
“mk”: “macedonian”,
“br”: “breton”,
“eu”: “basque”,
“is”: “icelandic”,
“hy”: “armenian”,
“ne”: “nepali”,
“mn”: “mongolian”,
“bs”: “bosnian”,
“kk”: “kazakh”,
“sq”: “albanian”,
“sw”: “swahili”,
“gl”: “galician”,
“mr”: “marathi”,
“pa”: “punjabi”,
“si”: “sinhala”,
“km”: “khmer”,
“sn”: “shona”,
“yo”: “yoruba”,
“so”: “somali”,
“af”: “afrikaans”,
“oc”: “occitan”,
“ka”: “georgian”,
“be”: “belarusian”,
“tg”: “tajik”,
“sd”: “sindhi”,
“gu”: “gujarati”,
“am”: “amharic”,
“yi”: “yiddish”,
“lo”: “lao”,
“uz”: “uzbek”,
“fo”: “faroese”,
“ht”: “haitian creole”,
“ps”: “pashto”,
“tk”: “turkmen”,
“nn”: “nynorsk”,
“mt”: “maltese”,
“sa”: “sanskrit”,
“lb”: “luxembourgish”,
“my”: “myanmar”,
“bo”: “tibetan”,
“tl”: “tagalog”,
“mg”: “malagasy”,
“as”: “assamese”,
“tt”: “tatar”,
“haw”: “hawaiian”,
“ln”: “lingala”,
“ha”: “hausa”,
“ba”: “bashkir”,
“jw”: “javanese”,
“su”: “sundanese”,
}region文章来源地址https://www.toymoban.com/news/detail-546207.html
到了这里,关于whisper部署与使用的文章就介绍完了。如果您还想了解更多内容,请在右上角搜索TOY模板网以前的文章或继续浏览下面的相关文章,希望大家以后多多支持TOY模板网!


