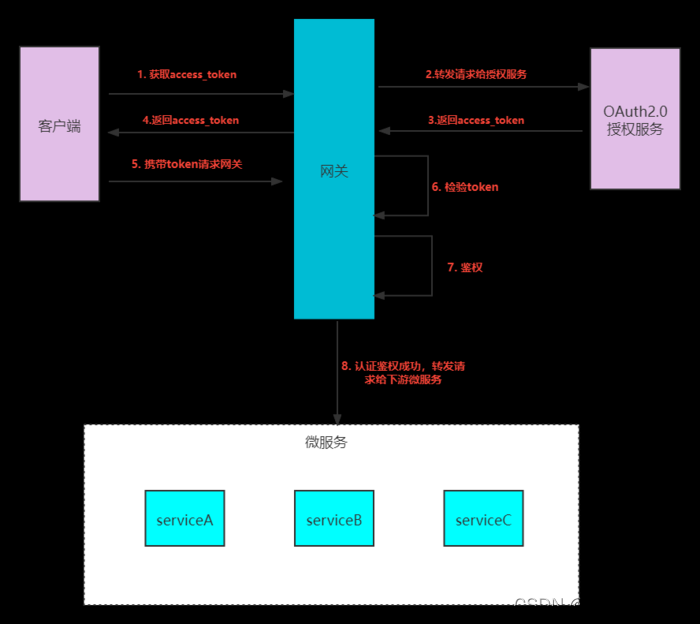
1. OAuth2介绍
OAuth(Open Authorization)是一个关于授权(authorization)的开放网络标准,允许用户授权第三方应用访问他们存储在另外的服务提供者上的信息,而不需要将用户名和密码提供给第三方移动应用或分享他们数据的所有内容。OAuth 在全世界得到广泛应用,目前的版本是 2.0 版。
协议特点
-
简单:不管是 OAuth 服务提供者还是应用开发者,都很易于理解与使用。
-
安全:没有涉及到用户密钥等信息,更安全更灵活。
-
开放:任何服务提供商都可以实现 OAuth,任何软件开发商都可以使用 OAuth。
应用场景
- 原生 app 授权:app 登录请求后台接口,为了安全认证,所有请求都带 token 信息,需要登录验证、请求后台数据。
- 前后端分离单页面应用:前后端分离框架,前端请求后台数据,需要进行 OAuth 2.0 安全认证,比如使用 vue、react 或者 h5 开发的 app。
- 第三方应用授权登录,比如 QQ,微博,微信的授权登录。
2. OAuth相关概念
四种角色:
-
Resource owner:资源所有者,也叫用户
-
Resource server:资源服务器,服务提供商用来存储资源,以及处理对资源的请求的服务器
-
Client:客户端,也叫第三方应用,通过获取用户的授权,继而访问用户在资源服务器上的资源
-
Authorization server:认证服务器,服务提供商用来处理认证的服务器,物理上与资源服务器可以是同一台服务器
两种实体:
-
HTTP service:服务提供商
-
User Agent:用户代理,通常指浏览器
3. OAuth2授权过程
这是OAuth 2一个大致的授权流程图,具体步骤如下:
- 客户端(第三方应用)向用户请求授权。
- 用户单击客户端所呈现的服务授权页面的同意授权按钮后,服务端返回一个授权许可凭证给客户端
- 客户端拿着授权许可凭证去授权服务器申请令牌。
- 授权服务器验证信息无误后,发放令牌给客户端。
- 客户端拿着令牌去资源服务器访问资源。
- 资源服务器验证令牌无误后开放资源。
大致流程图

4. 授权模式
OAuth 协议的授权模式共分为4种, 分别说明如下:
1️⃣授权码模式(常用)
授权码模式( authorization code)是功能最完整、流程最严谨的授权模式。它的特点就是通过客户端的服务器与授权服务器进行交互,国内常见的第三方平台登录功能基本都是使用这种模式。
授权码模式是功能最齐全、流程最严谨,也是最常用的授权模式。
※流程图※
     +----------+
     | Resource |
     |   Owner  |
     |          |
     +----------+
          ^
          |
         (B)
     +----|-----+          Client Identifier      +---------------+
     |         -+----(A)-- & Redirection URI ---->|               |
     |  User-   |                                 | Authorization |
     |  Agent  -+----(B)-- User authenticates --->|     Server    |
     |          |                                 |               |
     |         -+----(C)-- Authorization Code ---<|               |
     +-|----|---+                                 +---------------+
       |    |                                         ^      v
      (A)  (C)                                        |      |
       |    |                                         |      |
       ^    v                                         |      |
     +---------+                                      |      |
     |         |>---(D)-- Authorization Code ---------'      |
     |  Client |          & Redirection URI                  |
     |         |                                             |
     |         |<---(E)----- Access Token -------------------'
     +---------+       (w/ Optional Refresh Token)
流程A
用户访问客户端,客户端将用户导向认证服务器,并且携带重定向URI
https://authorization-server.com/auth?
response_type=code
&client_id=CLIENT_ID
&redirect_uri=REDIRECT_URI
&scope=photos
&state=1234zyx
&code_challenge=CODE_CHALLENGE
&code_challenge_method=S256
解释
- response_type=code 表示授权类型为授权码模式
- client_id 表示客户端ID, 第一次创建应用的时候获得
- redirect_uri 表示重定向URI用户在认证完成之后将用户返回到特定URI
- scope 表示申请的权限范围,例如READ
- state 应用随机指定的值,用于后期验证
- code_challenge code_challenge=transform(code_verifier,[Plain|S256])
- 如果method=Plain,那么code-challenge=code_verifier
- 如果method=S256,那么code_challenge等于code_verifier的Sha256哈希
在授权码请求中带上code_challenge以及method,这两者与服务器颁发的授权码绑定。
code_verifier为客户端生成一个的随机字符串
客户端在用授权码换取token时,带上初始生成的code verifier,根据绑定的方法进行计算,计算结果与code_challenge相比,如果一致再颁发token
code_challenge_method=S256 标明使用S256 Hashing方法
流程B
用户选择是否对客户端授权
流程C
授权之后,认证服务器将用户导向之前传入的重定向URI,并且附上授权码

如果用户点击了Allow了,那么服务器将重定向并且附上授权码
https://example-app.com/cb?code=AUTH_CODE_HERE&state=1234zyx
code即为授权码,授权码有效期很短,一般为10分钟,并且客户端只能使用一次。该码与客户端ID和重定向URI是一对一关系。
state之前传入的state,我们首先要比较传入的state与之前的state是否相同(之前的state可以存在cookie中),用于确认没有被劫持。
流程D
客户端收到授权码后,附上重定向URI以及授权码,向认证服务器申请token(这一步是在客户端的后台服务器上完成,对用户不可见)
客户端向认证服务器发送申请token的HTTP请求
POST https://api.authorization-server.com/token?
grant_type=authorization_code
&code=AUTH_CODE_HERE
&redirect_uri=REDIRECT_URI
&client_id=CLIENT_ID
&code_verifier=CODE_VERIFIER
解释
- grant_tyoe 标明为授权码模式
- code 之前收到的授权码
- redirect_uri 重定向URI,必须与一开始发送的重定向URI一样
- client_id 客户端ID,也必须和之前发送的一样
- code_verifier 之前随机生成的字符串,服务器根据之前传入的code-challenge的method进行计算,看是否以之前传入的code_challenge相同,相同才会颁发token
流程E
认证服务器认证授权码等信息,确认无误后向客户端发送token和refresh token(可选)
通过认证后,服务器发送包含token的HTTPResponse
服务器响应
{
    "access_token":"2YotnFZFEjr1zCsicMWpAA",
    "token_type":"bear",
    "expires_in":3600,
    "refresh_token":"tGzv3JOkF0XG5Qx2TlKWIA",
}
- access_token 表示访问令牌
- token_type 表示token类型,可以是bear也可以是mac
- expires_in 表示过期时间,单位为秒
- refresh_token 表示更新令牌,用来获取下次的访问令牌。即当token过期的时候,向服务器发送请求,告知token过期并且将token更新为refresh_token中的值
2️⃣简化模式
简化模式不需要客户端服务器参与,直接在浏览器中向授权服务器申请令牌,一般若网站是纯静态页面,则可以采用这种方式。
3️⃣密码模式
密码模式是用户把用户名密码直接告诉客户端,客户端使用这些信息向授权服务器申请令牌。这需要用户对客户端高度信任,例如客户端应用和服务提供商是同一家公司。
4️⃣客户端模式
客户端模式是指客户端使用自己的名义而不是用户的名义向服务提供者申请授权。严格来说,客户端模式并不能算作OAuth协议要解决的问题的一种解决方案,但是,对于开发者而言,在一些前后端分离应用或者为移动端提供的认证授权服务器上使用这种模式还是非常方便的。
4.1 授权码模式(Authorization Code)

用QQ登录CSDN来解释
- 用户访问页面CSDN并点击使用QQ登录
- CSDN将请求重定向到认证服务器(QQ)
- 认证服务器向用户展示授权页面,等待用户授权
- 用户授权,认证服务器生成一个code和带上client_id发给CSDN
- 应用服务器将code、client_id、client_secret传给认证服务器换取access_token和refresh_token
- 应用服务器用得到的access_token去访问QQ
- QQ去认证服务器验证Token的合法性,如果没问题就允许访问部分可控资源
这个模式的特点是流程复杂,多次通讯性能会有所降低,但是是比较安全的一种模式
1. 用户通过用户代理访问客户端,客户端将其重定向到认证服务器
-
response_type:表示授权类型,必选项,此种模式固定为 “code”
-
client_id:表示客户端 ID,必选项
-
redirect_uri:表示重定向 URI,可选项
-
scope:表示申请的权限范围,可选项
-
state:表示客户端当前状态,可选项
-
简化模式/隐式授权模式(implicit)
4.2 简化模式/隐式授权模式(implicit)

简化模式相对于授权码模式,少了获取code以及用code换token这一步,用户授权后,认证服务器直接返回CSDN一个token.
4.3 密码模式(password)

这个模式流程简单,但很不安全,一般用在强信任的两个系统,QQ和CSDN肯定不会采用这种方式,如果说能够通过QQ登录微信,或许会采用这种方式。
4.4 客户端模式(client credentials)

这个模式在很多内部系统之间验证会用,比如影像系统去接医院的HIS,需要拿到HIS的一些资源,比如获取用户历史的影像记录,但HIS又需要控制影像系统只能拿到部分允许的资源,比如控制影像系统只允许访问用户的影像记录,而不允许访问用户的手机号,家庭住址等信息。
5. SpringSecurity+OAuth(密码模式)
实现的是密码模式
5.1 项目结构

5.2 引入依赖
 <dependency>
            <groupId>org.springframework.boot</groupId>
            <artifactId>spring-boot-starter</artifactId>
        </dependency>

        <dependency>
            <groupId>org.springframework.boot</groupId>
            <artifactId>spring-boot-starter-test</artifactId>
            <scope>test</scope>
            <exclusions>
                <exclusion>
                    <groupId>org.junit.vintage</groupId>
                    <artifactId>junit-vintage-engine</artifactId>
                </exclusion>
            </exclusions>
        </dependency>

        <dependency>
            <groupId>org.springframework.boot</groupId>
            <artifactId>spring-boot-starter-security</artifactId>
        </dependency>
        <dependency>
            <groupId>org.springframework.boot</groupId>
            <artifactId>spring-boot-starter-web</artifactId>
        </dependency>
	   <!--		oauth2依赖-->
        <dependency>
            <groupId>org.springframework.security.oauth</groupId>
            <artifactId>spring-security-oauth2</artifactId>
            <version>2.3.6.RELEASE</version>
        </dependency>
        <dependency>
            <groupId>org.springframework.boot</groupId>
            <artifactId>spring-boot-starter-web</artifactId>
        </dependency>
        <!--		redis依赖start-->
        <dependency>
            <groupId>org.springframework.boot</groupId>
            <artifactId>spring-boot-starter-data-redis</artifactId>
        </dependency>
        <dependency>
            <groupId>redis.clients</groupId>
            <artifactId>jedis</artifactId>
        </dependency>
        <dependency>
            <groupId>io.lettuce</groupId>
            <artifactId>lettuce-core</artifactId>
        </dependency>
添加redis是为了存储令牌
5.3 配置Redis
# 应用名称
server.port=8888

spring.application.name=oauth_learn
spring.redis.database=0
spring.redis.host=localhost
spring.redis.port=6379
spring.redis.jedis.pool.max-active=8
spring.redis.jedis.pool.max-wait=-1ms
spring.redis.jedis.pool.max-idle=8
spring.redis.jedis.pool.min-idle=0
5.4 配置授权服务器
import org.springframework.beans.factory.annotation.Autowired;
import org.springframework.context.annotation.Bean;
import org.springframework.context.annotation.Configuration;
import org.springframework.data.redis.connection.RedisConnectionFactory;
import org.springframework.security.authentication.AuthenticationManager;
import org.springframework.security.core.userdetails.UserDetailsService;
import org.springframework.security.crypto.bcrypt.BCryptPasswordEncoder;
import org.springframework.security.crypto.password.PasswordEncoder;
import org.springframework.security.oauth2.config.annotation.configurers.ClientDetailsServiceConfigurer;
import org.springframework.security.oauth2.config.annotation.web.configuration.AuthorizationServerConfigurerAdapter;
import org.springframework.security.oauth2.config.annotation.web.configuration.EnableAuthorizationServer;
import org.springframework.security.oauth2.config.annotation.web.configurers.AuthorizationServerEndpointsConfigurer;
import org.springframework.security.oauth2.config.annotation.web.configurers.AuthorizationServerSecurityConfigurer;
import org.springframework.security.oauth2.provider.token.store.redis.RedisTokenStore;

@Configuration
@EnableAuthorizationServer //开启授权服务器
public class AuthorizationServerConfig extends AuthorizationServerConfigurerAdapter {

    /**
     * 用于支持password模式
     * 如启动时报AuthenticationManager无法注入的错误,可能是spring security配置类中没有配置这个
     *    @Bean
     *     @Override
     *     public AuthenticationManager authenticationManagerBean() throws Exception {
     *         return super.authenticationManagerBean();
     *     }
     */
    @Autowired
    private AuthenticationManager authenticationManager;

    /**
     * 调用redis的,将令牌缓存到redis中,以便微服务之间获取信息
     */
    @Autowired
    RedisConnectionFactory redisConnectionFactory;

    /**
     * 该对象用于刷新token提供支持,
     * 如启动时报UserDetailsService注入错误,可能是spring security配置类中没有配置这个
     *     @Bean
     *     @Override
     *     public UserDetailsService userDetailsService(){
     *         return super.userDetailsService();
     *     }
     */
    @Autowired
    UserDetailsService userDetailsService;

    @Bean
    PasswordEncoder passwordEncoder() {
        return new BCryptPasswordEncoder();
    }

    //第一步-------------------------------------------------------------

    /**
     * authorizedGrantTypes--授权模式为password,refresh_token
     * accessTokenValiditySeconds--配置了过期时间
     * resourceIds--配置了资源id
     * secret--配置了加密后的密码
     *
     * @param clients
     * @throws Exception
     */
    @Override
    public void configure(ClientDetailsServiceConfigurer clients) throws Exception {
        clients.inMemory()
                // 认证模式:password模式
                .withClient("password")
                // 授权模式
                .authorizedGrantTypes("password", "refresh_token")
                // token的过期时间
                .accessTokenValiditySeconds(1800)
                // 资源id
                .resourceIds("rids")
                .scopes("all")
                // secret密码
                .secret(passwordEncoder().encode("123456"));
    }

// 第二步---------------------------------------
    /**
     * 令牌的存储,用于支持password模式以及令牌刷新
     *
     * @param endpoints
     * @throws Exception
     */
    @Override
    public void configure(AuthorizationServerEndpointsConfigurer endpoints) throws Exception {
        endpoints
                // 配置令牌的存储
                .tokenStore(new RedisTokenStore(redisConnectionFactory))
                .authenticationManager(authenticationManager)
                .userDetailsService(userDetailsService);
    }

    //第三步--------------------------------------------------------
    /**
     * 支持client_id和client_secret做登录认证
     *
     * @param security
     * @throws Exception
     */
    @Override
    public void configure(AuthorizationServerSecurityConfigurer security) throws Exception {
        security.allowFormAuthenticationForClients();
    }

}
5.5 配置资源服务器
import org.springframework.context.annotation.Configuration;
import org.springframework.security.config.annotation.web.builders.HttpSecurity;
import org.springframework.security.oauth2.config.annotation.web.configuration.EnableResourceServer;
import org.springframework.security.oauth2.config.annotation.web.configuration.ResourceServerConfigurerAdapter;
import org.springframework.security.oauth2.config.annotation.web.configurers.ResourceServerSecurityConfigurer;

@Configuration
@EnableResourceServer //开启资源服务器
public class ResourceServerConfig extends ResourceServerConfigurerAdapter {

    // 第一步---------------------------------
    @Override
    public void configure(ResourceServerSecurityConfigurer resources) throws Exception {
        resources.resourceId("rids").stateless(true);//配置资源id,与授权服务器配置的资源id一致,基于令牌认证
    }

    // 第二步-----------------------------------------------
    @Override
    public void configure(HttpSecurity http) throws Exception {
        http.authorizeRequests()
                .antMatchers("/admin/**").hasRole("admin")
                .antMatchers("/user/**").hasRole("user")
                .anyRequest().authenticated();
    }
}
5.6 SpringSecurity配置
import org.springframework.context.annotation.Bean;
import org.springframework.context.annotation.Configuration;
import org.springframework.security.authentication.AuthenticationManager;
import org.springframework.security.config.annotation.authentication.builders.AuthenticationManagerBuilder;
import org.springframework.security.config.annotation.web.builders.HttpSecurity;
import org.springframework.security.config.annotation.web.configuration.WebSecurityConfigurerAdapter;
import org.springframework.security.core.userdetails.UserDetailsService;
import org.springframework.security.crypto.bcrypt.BCryptPasswordEncoder;


@Configuration
public class WebSecurityConfig extends WebSecurityConfigurerAdapter {

//    @Bean
//    @Override
//    public AuthenticationManager authenticationManagerBean() throws Exception {
//        return super.authenticationManagerBean();
//    }

    @Bean
    @Override
    protected AuthenticationManager authenticationManager() throws Exception {
        return super.authenticationManager();
    }

    @Bean
    @Override
    public UserDetailsService userDetailsService(){
        return super.userDetailsService();
    }

    @Override
    protected void configure(AuthenticationManagerBuilder auth) throws Exception {
        auth.inMemoryAuthentication()
                .withUser("admin")
                .password(new BCryptPasswordEncoder().encode("123456"))
                .roles("admin")
                .and()
                .withUser("yan")
                .password(new BCryptPasswordEncoder().encode("123456"))
                .roles("user");

    }

    /**
     * 主要是对/oauth/**的请求放行,此处配置优先级高于资源服务器中的HttpSecurity配置,即请求路径先路过这
     * @param http
     * @throws Exception
     */
    @Override
    public void configure(HttpSecurity http) throws Exception {
        http.antMatcher("/oauth/**").authorizeRequests()
                .antMatchers("/oauth/**").permitAll()
                .and().csrf().disable();
    }
}
5.7 测试
import org.springframework.web.bind.annotation.GetMapping;
import org.springframework.web.bind.annotation.RestController;

/**
 * @date: 2022/7/6
 * @FileName: TestController
 * @author: Yan
 * @Des:
 */
@RestController
public class TestController {
    @GetMapping("/admin/test")
    public String admin(){
        return "test admin";
    }
    @GetMapping("/user/test")
    public String user(){
        return "test user";
    }
    @GetMapping("/hello")
    public String hello(){
        return "test hello";
    }

}
发送请求获取Token
访问POST:localhost:8888/oauth/token

结果
{
	"access_token": "ab3c3500-fa69-4192-84e1-6f6fae3df56c",
	"token_type": "bearer",
	"refresh_token": "bed85096-672e-4636-812e-4efbcd886736",
	"expires_in": 1799,
	"scope": "all"
}
访问资源
访问 GET:localhost:8888/admin/test?access_token=ab3c3500-fa69-4192-84e1-6f6fae3df56c

因为我们是以admin身份登录的有权访问该资源,正确响应
test admin
如果是以访问user身份的资源,则无法访问
访问GET:localhost:8888/user/test?access_token=ab3c3500-fa69-4192-84e1-6f6fae3df56c
 文章来源:https://www.toymoban.com/news/detail-549367.html
没有权限,无法访问文章来源地址https://www.toymoban.com/news/detail-549367.html
{
	"error": "access_denied",
	"error_description": "Access is denied"
}
到了这里,关于SpringSecurity+OAuth2.0的文章就介绍完了。如果您还想了解更多内容,请在右上角搜索TOY模板网以前的文章或继续浏览下面的相关文章,希望大家以后多多支持TOY模板网!


