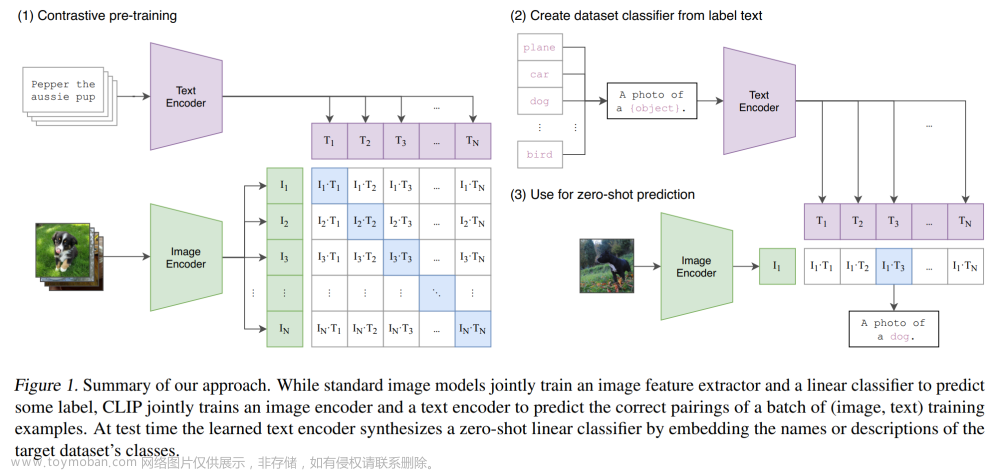
CLIP:Contrastive Language–Image Pre-training(可对比语言-图像预训练算法)是OpenAI提出的多模态预训练的算法,在各种各样的**样本对(图像、文本)**上训练的神经网络。
具体参考:CLIP、OpenCLIP

其中,流程:

loss_i和loss_t的具体源码如下,参考 model.py:
    def forward(self, image, text):
        image_features = self.encode_image(image)
        text_features = self.encode_text(text)

        # normalized features
        image_features = image_features / image_features.norm(dim=1, keepdim=True)
        text_features = text_features / text_features.norm(dim=1, keepdim=True)

        # cosine similarity as logits
        logit_scale = self.logit_scale.exp()
        logits_per_image = logit_scale * image_features @ text_features.t()
        logits_per_text = logits_per_image.t()

        # shape = [global_batch_size, global_batch_size]
        return logits_per_image, logits_per_text
其中,labels是torch.arange(batch_size, device=device).long(),参考train.py,具体如下
        with torch.no_grad():
            for i, batch in enumerate(dataloader):
                images, texts = batch
                images = images.to(device=device, non_blocking=True)
                texts = texts.to(device=device, non_blocking=True)

                with autocast():
                    image_features, text_features, logit_scale = model(images, texts)
                    # features are accumulated in CPU tensors, otherwise GPU memory exhausted quickly
                    # however, system RAM is easily exceeded and compute time becomes problematic
                    all_image_features.append(image_features.cpu())
                    all_text_features.append(text_features.cpu())
                    logit_scale = logit_scale.mean()
                    logits_per_image = logit_scale * image_features @ text_features.t()
                    logits_per_text = logits_per_image.t()

                    batch_size = images.shape[0]
                    labels = torch.arange(batch_size, device=device).long()
                    total_loss = (
                        F.cross_entropy(logits_per_image, labels) +
                        F.cross_entropy(logits_per_text, labels)
                    ) / 2
交叉熵函数:y就是label,x_softmax[i][y[i]],表示在x_softmax中筛选第i个sample的第y[i]个值,作为log的输入,全部log负向求和,再求均值。
- y所对应的就是CLIP的np.arange(n),也就是依次是第0个位置~第n-1个位置,计算log。
# 定义softmax函数
def softmax(x):
    return np.exp(x) / np.sum(np.exp(x))

# 利用numpy计算
def cross_entropy_np(x, y):
    x_softmax = [softmax(x[i]) for i in range(len(x))]
    x_log = [np.log(x_softmax[i][y[i]]) for i in range(len(y))]
    loss = - np.sum(x_log) / len(y)
    return loss

# 测试逻辑
x = [[1.9269, 1.4873, 0.9007, -2.1055]]
y = [[2]]
v1 = cross_entropy_np(x, y)
print(f"v1: {v1}")

x = torch.unsqueeze(torch.Tensor(x), dim=0)
x = x.transpose(1, 2)  # CrossEntropy输入期望: Class放在第2维,Batch放在第1维

y = torch.Tensor(y)
y = y.to(torch.long)  # label的类型为long

v2 = F.cross_entropy(x, y, reduction="none")
print(f"v2: {v2}")
输出:文章来源:https://www.toymoban.com/news/detail-554723.html
v1: 1.729491540989093
v2: tensor([[1.7295]])
参考:文章来源地址https://www.toymoban.com/news/detail-554723.html
- arxiv文章下载很慢怎么办?
- CLIP-对比图文多模态预训练的读后感
- CrossEntropy的numpy实现和Pytorch调用
到了这里,关于CLIP算法的Loss详解 和 交叉熵CrossEntropy实现的文章就介绍完了。如果您还想了解更多内容,请在右上角搜索TOY模板网以前的文章或继续浏览下面的相关文章,希望大家以后多多支持TOY模板网!


