项目中有遇到在小程序上实现手动签名功能,今天给大家分享下代码
wxml 文件代码如下,catchtouchmove属性一定要加上,否则移动起来连笔非常不流畅
<view class="content" catchtouchmove="true">
  <view class="canvasBox">
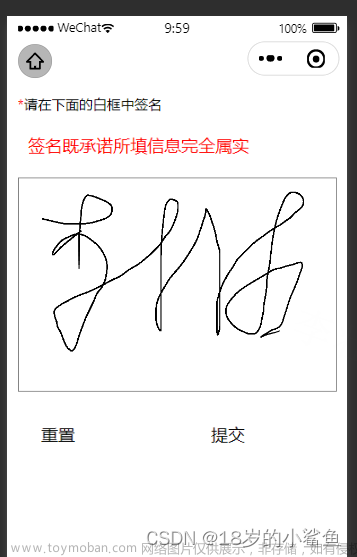
    <text class="title">请在下面的白框中签名</text>
    <text class="tips">签名既承诺所填信息完全属实</text>
    <view class="sign-canvas-view">
      <canvas
        type="2d"
        id="myCanvas"
        style="width:702rpx;height:200px;"
        disable-scroll
        capture-bind:touchstart="touchStart"
        capture-bind:touchmove="touchMove">
      </canvas>
    </view>
  </view>
  <view class="submitBtn">
    <van-button plain  block style="width: 30vw;" bindtap="reset">重置</van-button>
    <van-button bindtap="sure" block style="width: 30vw;" type="primary">提交</van-button>
  </view>
</view>
wxss代码
.content {
  width: 100vw;
  height: 100vh;
}

.canvasBox {
  margin-top: 10px;
  background-color: #fff;
  width: 100%;
  border-radius: 10px;
  display: flex;
  flex-direction: column;
  justify-content: space-around;
}
.title {
  font-size: 32rpx;
  padding: 0 24rpx;
}
.title::before {
  content: '*';
  color: red;
}
.tips {
  width: 100%;
  color: red;
  padding: 20px;
  box-sizing: border-box;
}
.sign-canvas-view {
  box-sizing: border-box;
  border: 2rpx solid grey;
  margin: 0 24rpx;
}

.submitBtn {
  width: 100%;
  display: flex;
  justify-content: space-around;
  align-items: center;
  margin-top: 30px;
}
js代码文章来源:https://www.toymoban.com/news/detail-562428.html
import appConfig from "../../../utils/globalConfig.js";
const {
    payAfterTreatmentSignUp
  } = require("../../../utils/api.js")
const globalConfig = require('../../../utils/globalConfig.js');
Page({
  data:{
      signPath:[],
      cardNo:'',
      preX:'',
      preY:'',
      apiUrl:appConfig.getLocalConfig().apiUrl,
  },
  onLoad(options){
    this.setData({
      cardNo:options.cardNo
    })
    wx.createSelectorQuery().select('#myCanvas').fields({node: true,size: true}).exec(this.init.bind(this))
  },
  init(data){
    console.log(data);
    const width = data[0].width;
    const height=data[0].height;
    const canvas = data[0].node;
    const ctx = canvas.getContext('2d');
    const dpr = wx.getSystemInfoSync().pixelRatio

    canvas.width = width * dpr
    canvas.height =  height * dpr
    ctx.scale(dpr,dpr)

    this._dpr = dpr
    this._ctx = ctx
    this._canvas = canvas
  },
  touchStart(e){
      console.log(e)
      const { _ctx:ctx } = this
      const { clientX:x ,clientY:y } = e.touches[0]
      ctx.beginPath()
      // ctx.moveTo(x-e.target.offsetLeft, y-e.target.offsetTop)
      ctx.moveTo(x-e.target.offsetLeft, y-e.target.offsetTop)
      this.setData({
        preX:x-e.target.offsetLeft,
        preY:y-e.target.offsetTop,
    })
  },
  touchMove(e){
      const { _ctx:ctx } = this
      const { clientX:x ,clientY:y } = e.touches[0]
      this.data.signPath.push([x,y])
      this.setData({
          signPath:this.data.signPath
      })
      let preX = this.data.preX
      let preY = this.data.preY
      let curX = x-e.target.offsetLeft
      let curY = y-e.target.offsetTop
      let deltaX = Math.abs(preX - curX)
      let deltaY = Math.abs(preY - curY)
      if (deltaX >= 3 || deltaY >= 3) {
        // 前后两点中心点
        let centerX = (preX + curX) / 2
        let centerY = (preY + curY) / 2

        //这里以前一点作为控制点,中心点作为终点,起始点为上一次的中点,很流畅啊!
        ctx.quadraticCurveTo(preX, preY, centerX, centerY);
        ctx.stroke();
        this.setData({
          preX:curX,
          preY:curY,
      })
      }
      // ctx.lineTo(x-e.target.offsetLeft, y-e.target.offsetTop)
      // ctx.lineTo(x, y)
      // ctx.stroke()

  },
  //重绘
  reset(){
      const { _ctx:ctx,_canvas:canvas } = this

      this.setData({
          signPath:[]
      })
      ctx.clearRect(0, 0, canvas.width, canvas.height)
  },
  //提交签名图片
  sure(){

      if(this.data.signPath.length <= 0){
          wx.showToast({
            title: '签名不能为空',
            icon:'none'
          })
          return
      }

      //导出图片
      this.outImage()
  },
  sureSignature(){
    if(this.data.signPath.length <= 0){
        wx.showToast({
          title: '签名不能为空',
          icon:'none'
        })
        return
    }
  },
  outImage(){
      const { _canvas:canvas,_dpr:dpr } = this
      var image = canvas.toDataURL("image/png"); // 得到生成后的签名base64位  url 地址
      payAfterTreatmentSignUp({
        cardNo:this.data.cardNo,
        signBase64:image
      },globalConfig.getLocalConfig().zyUrl).then(res=>{
          console.log(res);
          wx.showToast({
            title: '签约成功',
          })
          setTimeout(()=>{
            wx.navigateBack({
                delta: 1
              })
          },2000)

      })
  }
})
效果如下 文章来源地址https://www.toymoban.com/news/detail-562428.html
到了这里,关于原生微信小程序实现手写签名功能的文章就介绍完了。如果您还想了解更多内容,请在右上角搜索TOY模板网以前的文章或继续浏览下面的相关文章,希望大家以后多多支持TOY模板网!


