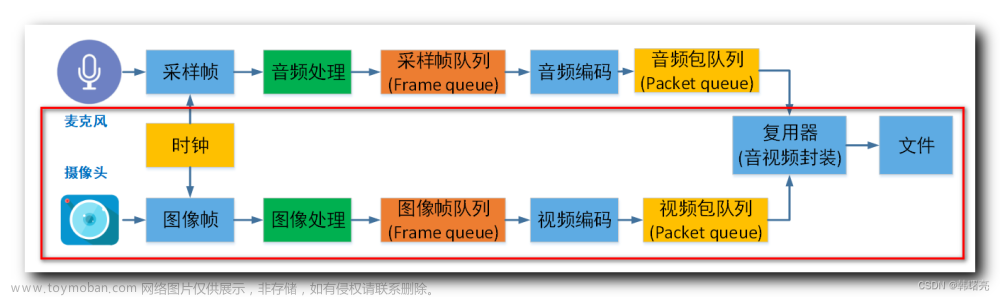
为什么要重采样
- 从设备采集的音频数据与编码器要求的数据不一致
- 扬声器要求的音频数据与要播放的音频数据不一致
- 更方便运算(回音消除须使用单声道,需要先转换)
比如说语音识别,需要很低的采样率就可以了,高了增加了数据量,毫无用处,这时候就需要进行音频重采样,重采样可以改变音频采样值或采样格式。
swr_init()
/*
 设置用户参数后初始化上下文。 @note必须使用AVOption API配置上下文。
 *
 * @see av_opt_set_int()
 * @see av_opt_set_dict()
 *
 * @param[in,out]   s Swr context to initialize
 * @return AVERROR error code in case of failure.
 */
int swr_init(struct SwrContext *s);
swr_free()
/**
 * 释放给定的SwrContext并将指针设置为NULL。
 *
 * @param[in] s a pointer to a pointer to Swr context
 */
void swr_free(struct SwrContext **s);
swr_alloc_set_opts()
/**
 * 如果需要,分配SwrContext并设置/重置公共参数。 * * 此函数不要求使用swr_alloc()分配% s。关于 * 另一方面,swr_alloc()可以使用swr_alloc_set_opts()来设置参数 * 在分配的上下文上
 *
 * @param s               existing Swr context if available, or NULL if not
 * @param out_ch_layout   output channel layout (AV_CH_LAYOUT_*)
 * @param out_sample_fmt  output sample format (AV_SAMPLE_FMT_*).
 * @param out_sample_rate output sample rate (frequency in Hz)
 * @param in_ch_layout    input channel layout (AV_CH_LAYOUT_*)
 * @param in_sample_fmt   input sample format (AV_SAMPLE_FMT_*).
 * @param in_sample_rate  input sample rate (frequency in Hz)
 * @param log_offset      logging level offset
 * @param log_ctx         parent logging context, can be NULL
 *
 * @see swr_init(), swr_free()
 * @return NULL on error, allocated context otherwise
 */
struct SwrContext *swr_alloc_set_opts(struct SwrContext *s,
                                      int64_t out_ch_layout, enum AVSampleFormat out_sample_fmt, int out_sample_rate,
                                      int64_t  in_ch_layout, enum AVSampleFormat  in_sample_fmt, int  in_sample_rate,
                                      int log_offset, void *log_ctx);
av_samples_alloc_array_and_samples()
/**
 为nb_samples分配一个数据指针数组,samples缓冲区 采样,并相应地填充数据指针和行大小。
 *
 * This is the same as av_samples_alloc(), but also allocates the data
 * pointers array.
 *
 * @see av_samples_alloc()
 */
int av_samples_alloc_array_and_samples(uint8_t ***audio_data, int *linesize, int nb_channels,
                                       int nb_samples, enum AVSampleFormat sample_fmt, int align);
swr_convert()
/** Convert audio.
 *
 * in和in_count可以设置为0,
 * 如果提供的输入空间多于输出空间,则输入将被缓冲。
 * 您可以使用swr_get_out_samples()检索
 * 对于给定数量的输出样本的所需数量的上限
 * 输入样本。只要可能,转换将直接运行而不进行复制。
 *
 * @param s         allocated Swr context, with parameters set
 * @param out       output buffers, only the first one need be set in case of packed audio
 * @param out_count amount of space available for output in samples per channel
 * @param in        input buffers, only the first one need to be set in case of packed audio
 * @param in_count  number of input samples available in one channel
 *
 * @return number of samples output per channel, negative value on error
 */
int swr_convert(struct SwrContext *s, uint8_t **out, int out_count,
                                const uint8_t **in , int in_count);
例子:
#include <string.h>
#include <stdio.h>
extern "C"{
    #include "libavutil/avutil.h"
    #include "libavdevice/avdevice.h"
    #include "libavformat/avformat.h"
    #include "libavcodec/avcodec.h"
    #include "libswresample/swresample.h"
}
#include <string>
#include <iostream>
using namespace std;
static int rec_status = 0;

void set_status(int status){
    rec_status = status;
}

SwrContext* init_swr(){

    SwrContext *swr_ctx = NULL;

    //channel, number/
    swr_ctx = swr_alloc_set_opts(NULL,                //ctx
                                 AV_CH_LAYOUT_STEREO, //输出channel布局
                                 AV_SAMPLE_FMT_S16,   //输出的采样格式
                                 44100,               //采样率
                                 AV_CH_LAYOUT_STEREO, //输入channel布局
                                 AV_SAMPLE_FMT_FLT,   //输入的采样格式
                                 44100,               //输入的采样率
                                 0, NULL);

    if(!swr_ctx){

    }

    if(swr_init(swr_ctx) < 0){

    }

    return swr_ctx;
}

void rec_audio() {

    int ret = 0;
    char errors[1024] = {0, };

    // 原地址缓冲区
    uint8_t **src_data = NULL;
    int src_linesize = 0;

    // 目标地址缓冲区
    uint8_t **dst_data = NULL;
    int dst_linesize = 0;

    //ctx
    AVFormatContext *fmt_ctx = NULL;
    AVDictionary *options = NULL;

    //pakcet
    AVPacket pkt;

    //[[video device]:[audio device]]
    char *devicename = "hw:1";

    //set log level
    av_log_set_level(AV_LOG_DEBUG);

    //start record
    rec_status = 1;

    //register audio device
    avdevice_register_all();

    //get format
    AVInputFormat *iformat = av_find_input_format("alsa");

    //open device
    if((ret = avformat_open_input(&fmt_ctx, devicename, iformat, &options)) < 0 ){
        av_strerror(ret, errors, 1024);
        fprintf(stderr, "Failed to open audio device, [%d]%s\n", ret, errors);
        return;
    }

    //create file
    char *out = "../source/audio.pcm";
    FILE *outfile = fopen(out, "wb+");

    SwrContext* swr_ctx = init_swr();

    //4096/4=1024/2=512
    //创建输入缓冲区
    av_samples_alloc_array_and_samples(&src_data,         //输出缓冲区地址
                                       &src_linesize,     //缓冲区的大小
                                       2,                 //通道个数
                                       512,               //单通道采样个数
                                       AV_SAMPLE_FMT_FLT, //采样格式
                                       0);

    //创建输出缓冲区
    av_samples_alloc_array_and_samples(&dst_data,         //输出缓冲区地址
                                       &dst_linesize,     //缓冲区的大小
                                       1,                 //通道个数
                                       512,               //单通道采样个数
                                       AV_SAMPLE_FMT_S16, //采样格式
                                       0);
    cout << "src_linesize" << src_linesize << endl;
    cout << "dst_linesize" << dst_linesize << endl;
    //read data from device
    while((ret = av_read_frame(fmt_ctx, &pkt)) == 0 &&
          rec_status) {

        av_log(NULL, AV_LOG_INFO,
               "packet size is %d(%p)\n",
               pkt.size, pkt.data);

        //进行内存拷贝,按字节拷贝的
        memcpy((void*)src_data[0], (void*)pkt.data, pkt.size);-

        //重采样
        swr_convert(swr_ctx,                    //重采样的上下文
                    dst_data,                   //输出结果缓冲区
                    512,                        //每个通道的采样数
                    (const uint8_t **)src_data, //输入缓冲区
                    512);                       //输入单个通道的采样数

        //write file
        //fwrite(pkt.data, 1, pkt.size, outfile);
        fwrite(dst_data[0], 1, dst_linesize, outfile);
        fflush(outfile);
        av_packet_unref(&pkt); //release pkt
    }

    //close file
    fclose(outfile);

    //释放输入输出缓冲区
    if(src_data){
        av_freep(&src_data[0]);
    }
    av_freep(src_data);

    if(dst_data){
        av_freep(&dst_data[0]);
    }
    av_freep(dst_data);

    //释放重采样的上下文
    swr_free(&swr_ctx);

    //close device and release ctx
    avformat_close_input(&fmt_ctx);

    av_log(NULL, AV_LOG_DEBUG, "finish!\n");

    return;
}


int main(int argc, char *argv[])
{
    rec_audio();
    return 0;
}
对应的编译文件为:文章来源:https://www.toymoban.com/news/detail-573430.html
cmake_minimum_required(VERSION 3.5)

project(ffmpeg_learn)


#设置编译选项
set(CMAKE_CXX_FLAGS "${CMAKE_CXX_FLAGS} -std=c++11")

set(ffmpeg_libs_DIR /usr/lib/x86_64-linux-gnu)
set(ffmpeg_headers_DIR /usr/include/x86_64-linux-gnu)

set(EXECUTABLE_OUTPUT_PATH ${PROJECT_SOURCE_DIR}/bin)

#对于find_package找不到的外部依赖库,可以用add_library添加
# SHARED表示添加的是动态库
# IMPORTED表示是引入已经存在的动态库
add_library( avcodec SHARED IMPORTED )

#指定所添加依赖库的导入路径
set_target_properties( avcodec PROPERTIES IMPORTED_LOCATION ${ffmpeg_libs_DIR}/libavcodec.so )

add_library( avfilter SHARED IMPORTED )
set_target_properties( avfilter PROPERTIES IMPORTED_LOCATION ${ffmpeg_libs_DIR}/libavfilter.so )

add_library( avdevice SHARED IMPORTED )
set_target_properties( avdevice PROPERTIES IMPORTED_LOCATION ${ffmpeg_libs_DIR}/libavdevice.so )


add_library( swresample SHARED IMPORTED )
set_target_properties( swresample PROPERTIES IMPORTED_LOCATION ${ffmpeg_libs_DIR}/libswresample.so )

add_library( swscale SHARED IMPORTED )
set_target_properties( swscale PROPERTIES IMPORTED_LOCATION ${ffmpeg_libs_DIR}/libswscale.so )

add_library( avformat SHARED IMPORTED )
set_target_properties( avformat PROPERTIES IMPORTED_LOCATION ${ffmpeg_libs_DIR}/libavformat.so )

add_library( avutil SHARED IMPORTED )
set_target_properties( avutil PROPERTIES IMPORTED_LOCATION ${ffmpeg_libs_DIR}/libavutil.so )


# 添加头文件路径到编译器的头文件搜索路径下,多个路径以空格分隔
include_directories( ${ffmpeg_headers_DIR} )

# 添加一个可执行目标,名称可自己指定,本例是直接用工程名称命名的
# 该可执行目标是由SRC_LIST中所列出的源文件生成
add_executable(${PROJECT_NAME} src/samlpel_audio1.cpp)
# directory of opencv library
# link_directories(${ffmpeg_libs_DIR} )

# 链接目标文件与依赖库
target_link_libraries( ${PROJECT_NAME}  avcodec avformat avutil swresample swscale  avfilter avdevice)


add_executable(resample_audio src/resample_audio.cpp)
# directory of opencv library
# link_directories(${ffmpeg_libs_DIR} )

# 链接目标文件与依赖库
target_link_libraries( resample_audio  avcodec avformat avutil swresample swscale  avfilter avdevice)
文章来源地址https://www.toymoban.com/news/detail-573430.html
到了这里,关于FFmpeg之音频重采样的文章就介绍完了。如果您还想了解更多内容,请在右上角搜索TOY模板网以前的文章或继续浏览下面的相关文章,希望大家以后多多支持TOY模板网!