1、Prometheus实现钉钉报警
1.1 Prometheus环境
# my global config
global:
  scrape_interval: 15s # Set the scrape interval to every 15 seconds. Default is every 1 minute.
  evaluation_interval: 15s # Evaluate rules every 15 seconds. The default is every 1 minute.
  # scrape_timeout is set to the global default (10s).

# Alertmanager configuration
alerting:
  alertmanagers:
    - static_configs:
        - targets:
           - 192.168.204.195:9093

# Load rules once and periodically evaluate them according to the global 'evaluation_interval'.
rule_files:
  # - "first_rules.yml"
  # - "second_rules.yml"
  - "rule/*.yml"

# A scrape configuration containing exactly one endpoint to scrape:
# Here it's Prometheus itself.
scrape_configs:
  # The job name is added as a label `job=<job_name>` to any timeseries scraped from this config.
  - job_name: "prometheus"
    # metrics_path defaults to '/metrics'
    # scheme defaults to 'http'.
    static_configs:
      - targets: ["localhost:9090"]

  # 采集JVM监控数据
  - job_name: pushgateway
    static_configs:
      - targets: ['192.168.204.195:9091']
        labels:
          instance: pushgateway
groups:
- name: node_rule
  rules:
  - alert: node memory usages
    expr: node_memory_usages > 20
    for: 10s
    labels:
      severity: high
    annotations:
      summary: "【监控告警】{{ $labels.exported_instance }}: 空间使用率异常"
      description: "【监控告警】{{ $labels.exported_instance }}: 空间使用率异常,请及时处理。"
启动情况:

1.2 pushgateway环境
启动情况:

1.3 自定义机器人并获取自定义机器人Webhook地址
1、首先创建一个群聊。
进入到钉钉软件的主页面后,点击右上角的加号按钮。
弹出加号里面的选项后,点击上面的发起群聊按钮。
进入到发起群聊界面后选择内部项目群,选择属于个人,点击上面的选择联系人选项。
进入到联系人界面后,选择要加入群聊的好友,最后点击右下角确定即可。
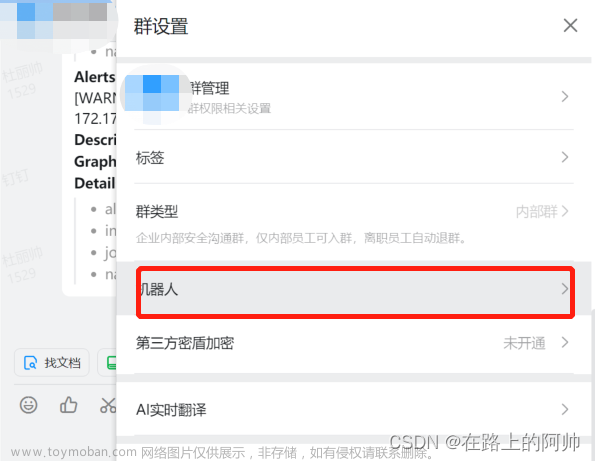
2、选择需要添加机器人的群聊,然后依次单击群设置 > 智能群助手 > 添加机器人。
3、点击添加机器人。

4、选择自定义。

5、点击添加。

6、输入相关信息,点击完成。


加签生成的随机码需要保存,后面会使用到。
7、点击完成。

这样我们就成功添加了自定义钉钉机器人并获取了 Webhook 地址。
获取到的Webhook的地址如下:
https://oapi.dingtalk.com/robot/send?access_token=57af98ce4cea66cb829df72c531efe093c6a254134ecf555f1
1.4 钉钉报警插件
访问github下载最新的插件(prometheus-webhook-dingtalk):
https://github.com/timonwong/prometheus-webhook-dingtalk/
这里下载 prometheus-webhook-dingtalk-2.1.0.linux-amd64.tar.gz:
https://github.com/timonwong/prometheus-webhook-dingtalk/releases/download/v2.1.0/prometheus-webhook-dingtalk-2.1.0.linux-amd64.tar.gz
上传到服务器进步解压:
$ tar -xvf prometheus-webhook-dingtalk-2.1.0.linux-amd64.tar.gz
修改配置文件:
$ vim config.example.yml
# 将内容修改为
# Targets, previously was known as "profiles"
targets:
  webhook1:
    url: https://oapi.dingtalk.com/robot/send?access_token=57af98ce4cea66cb829df72c531efe093c6a254134ecf555f1
    # secret for signature
    secret: SEC5d2ad4bd4cea26830145472cdd7c8dda5b8bea57a029f4f7db7524
  webhook_mention_users:
    url: https://oapi.dingtalk.com/robot/send?access_token=57af98ce4cea66cb829df72c531efe093c6a254134ecf555f1
    mention:
      mobiles: ['18210820213']
启动:
$ nohup ./prometheus-webhook-dingtalk --config.file="config.example.yml" >> nohup.out 2>&1 &
1.5 alertmanager环境
global:
  resolve_timeout: 5m
route:
  group_by: ['alertname']
  group_wait: 15s
  group_interval: 30s
  repeat_interval: 2m
  receiver: 'web.hook'
receivers:
  - name: 'web.hook'
    webhook_configs:
      # prometheus-webhook-dingtalk的地址
      - url: 'http://192.168.204.195:8060/dingtalk/webhook1/send'
        send_resolved: true
inhibit_rules:
  - source_match:
      severity: 'critical'
    target_match:
      severity: 'warning'
    equal: ['alertname', 'dev', 'instance']
启动情况:

1.6 触发报警
触发告警前:

# 执行该脚本触发告警
cat <<EOF | curl --data-binary @- http://192.168.204.195:9091/metrics/job/test_job/instance/test_instance
node_memory_usages 36
node_memory_total 36000
EOF
触发告警后:


钉钉接收到的消息:

如果恢复告警也会收到信息:
 文章来源:https://www.toymoban.com/news/detail-578049.html
至此钉钉告警完成。文章来源地址https://www.toymoban.com/news/detail-578049.html
到了这里,关于Prometheus实现钉钉报警的文章就介绍完了。如果您还想了解更多内容,请在右上角搜索TOY模板网以前的文章或继续浏览下面的相关文章,希望大家以后多多支持TOY模板网!


