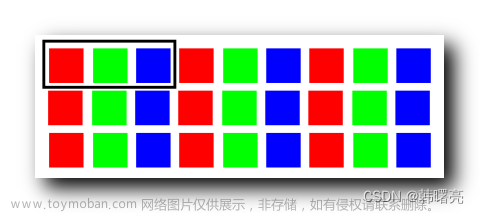
yuv420是用4个byte存储4个Y的信息,用1个Byte存储U的信息,一个Byte存储V的信息,
这4个Y共用这2个U和V ,也就是用6个Byte 存储4个像素信息,也就是一个像素需要12个Bits(6*8/4),也就是12bpp。
注意yuv420p里面的p是指planar,也就是分层存储,先存全部Y的信息,然后是U的信息,最后是V的信息,
或者这样说: 如果把一个图片按yuv420p的格式保存为二进制数据文件,那么把这个文件均分为6份,那么前面的4份是Y,第5份是U,第6份是V。
以下程序的流程是:
1 使用 ffmpeg 先将一张图片保存为 yuv420p的数据文件。
2 使用下面的程序读取此文件,然后将yuv数据转为rgb,最后使用opencv保存为jpg格式的图片。
3 主要是熟悉yuv420p的数据格式,以及熟悉yuv如何转为RGB。
4 最后就是使用opencv将RGB数据保存为图片,注意opencv是需要BGR的数据.文章来源:https://www.toymoban.com/news/detail-578163.html
#include <iostream>
#include <stdio.h>
#include <stdlib.h>
#include <unistd.h>
#include <fcntl.h>
#include <sys/ioctl.h>
#include <linux/videodev2.h>
#include <string.h>
#include <sys/mman.h>
#include <assert.h>
#include <opencv2/opencv.hpp>
#include <opencv2/core.hpp>
#include <opencv2/imgcodecs.hpp>
#include <opencv2/highgui.hpp>

using namespace std;
using namespace cv;

#define  IMAGE_W 1280
#define  IMAGE_H 720

#define  FILE_NAME "output420.yuv"

int convert_yuv_to_rgb_pixel(int y, int u, int v) {
	unsigned int pixel32 = 0;
	unsigned char *pixel = (unsigned char*) &pixel32;
	int r, g, b;
	r = y + (1.370705 * (v - 128));
	g = y - (0.698001 * (v - 128)) - (0.337633 * (u - 128));
	b = y + (1.732446 * (u - 128));

	if (r > 255)
		r = 255;
	if (g > 255)
		g = 255;
	if (b > 255)
		b = 255;
	if (r < 0)
		r = 0;
	if (g < 0)
		g = 0;
	if (b < 0)
		b = 0;
   //注意opencv是需要BGR的数据
	pixel[0] = b;  // blue
	pixel[1] = g;  // green
	pixel[2] = r;  //red
	return pixel32;
}

int convert_yuv420p_to_rgb888_buffer(unsigned char *yuv, unsigned char *rgb,
		unsigned int width, unsigned int height) {
	unsigned int pixel32;
	unsigned char *ptr = rgb;
	int y0, y1, y2, y3, u, v;
	int i = 0;
	unsigned char *a = yuv + width * height * 0;
	unsigned char *b = yuv + width * height * 1;
	unsigned char *c = yuv + (int) (width * height * 1.25);

	while (i < width * height) {
		i += 4;
		u = *(b++);
		v = *(c++);
		for (int j = 0; j < 4; j++) {
			y0 = *(a++);
			pixel32 = convert_yuv_to_rgb_pixel(y0, u, v);
			*(ptr++) = (pixel32 & 0x000000ff);
			*(ptr++) = (pixel32 & 0x0000ff00) >> 8;
			*(ptr++) = (pixel32 & 0x00ff0000) >> 16;
		}

	}
	return 0;
}

/**
 * 	 yuyv420p to rgb to jpg.
 *   ffmpeg -i in.jpg -pix_fmt yuv420p output420.yuv -y
 *   ffmpeg  -pix_fmts
 *   yuyv420 use 12bits to store 1 pixes.
 *
 */
int main() {
	int ret;
	int fd = open(FILE_NAME, O_RDWR);
	if (ret == -1) {
		perror("open");
		return -1;
	}
	unsigned char yuv[IMAGE_W * IMAGE_H * 3 + 1000];

	ret = read(fd, yuv, IMAGE_W * IMAGE_H * 3 + 1000);
	if (ret == -1) {
		perror("read");
		return -1;
	}

	assert(ret == IMAGE_W * IMAGE_H * 12 / 8);
	char rgb24[IMAGE_W * IMAGE_H * 3];
	convert_yuv420p_to_rgb888_buffer((unsigned char*) yuv,
			(unsigned char*) rgb24,
			IMAGE_W, IMAGE_H);
	Mat image(IMAGE_H, IMAGE_W, CV_8UC3, rgb24);
	imwrite("output.jpg", image);
	cout << "success" << endl;
	return 0;
}
如果有任何问题,欢迎评论。文章来源地址https://www.toymoban.com/news/detail-578163.html
到了这里,关于如何将yuv420p图像数据转换为RGB数据并使用opencv保存为jpg图片的文章就介绍完了。如果您还想了解更多内容,请在右上角搜索TOY模板网以前的文章或继续浏览下面的相关文章,希望大家以后多多支持TOY模板网!