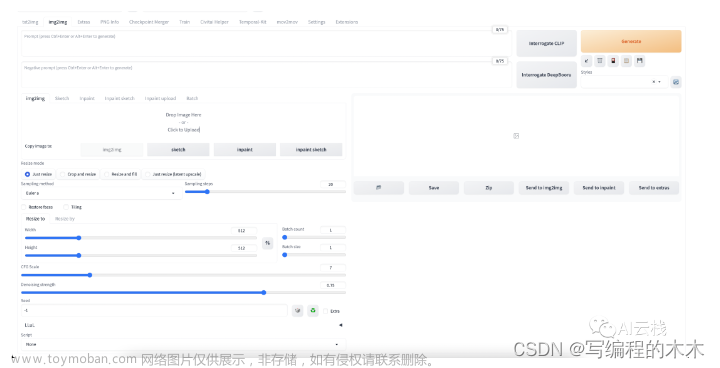
从webui中抽离出txt2img的接口:
1.参数
id_task="task",
prompt="a highly detailed tower designed by Zaha hadid with few metal and lots of glass,roads around with much traffic,in a city with a lot of greenery,aerial view, stunning sunny lighting, foggy atmosphere, vivid colors, Photo-grade rendering, Realistic style,8k,high res,highly detialed, ray tracing,vray render,masterpiece, best quality,rendered by Mir. and Brick visual",
negative_prompt="", # v2模型才支持
prompt_styles=[],
steps=20, # sampling steps,去噪过长的采样步骤数,25
sampler_index=0, # sampling method,采样方法
restore_faces=False, # 应用了额外模型,该模型可以恢复面部缺陷
tiling=False, # 生成可以平铺的周期性图像
n_iter=1, # batch count,推理的次数
batch_size=1, # 一次推理生成的图片,batch count*batch_size是总生成图片数目
cfg_scale=7, # classifier free guidance scale,控制模型和prompt的匹配程度,1.忽视prompt,
3.更有创意,7,在prompt和freedom中取得平衡,15,遵守prompt,30,严格按照prompt
seed=-1, # 用于在潜空间中生成最张量的种子,控制图像的内容,每生成一个图像都有自己的种子值
subseed=-1, # 附加种子值,在extra中
subseed_strength=0, # 种子和variation seed之间的差值程度,如果生成了两张图,可以通过第一个
图为seed,第二个图为subseed,然后设置subseed strength在0-1之间的强度变化,那么会生成逐渐
过渡的两个图。
seed_resize_from_h=0, # 即便使用相同的seed,如果更改图片大小,图像也会发生变化,
因此在这里调整图片,图片内容变化不会太大
seed_resize_from_w=0,
seed_enable_extras=False, # True,subseed到seed_resize_from_w之间的都要填值
height=512, # v1模型一边至少是512
width=512,
enable_hr=False, # 使用high-resolution fix放大图片,sdv1.4是512,v2是768图片太小,
如果将宽度和高度设置的更高,比如1024,偏离原始分辨率会影响构图,例如生成带有两个头像的图片
denoising_strength=0.7, # 仅用于latent upscalers,该参数与image-to-image含义相同,
它控制在之星hires采样步骤之前添加到潜空间中的噪声,必须大于0.5,否则会尝产生模糊的图像,
使用latent的好处是没有像esrgan这种一样可能引入放大伪像,sd的解码器生成图像,确保风格一致,
缺点是在一定程度改变图像,这取决于去噪强度的值
hr_scale=0,  # 放大的倍数
hr_upscaler="Latent",  # 在潜空间中缩放图像,它是在文本到图像生成的采样步骤之后完成的,
类似于图像到图像
hr_second_pass_steps=0, # 采样步数
hr_resize_x=0, # 制定尺寸
hr_resize_y=0,
override_settings_texts=[],![[linux-sd-webui]之txt2img,大模型、多模态和生成,人工智能,深度学习,git](https://imgs.yssmx.com/Uploads/2023/07/580665-1.png)
![[linux-sd-webui]之txt2img,大模型、多模态和生成,人工智能,深度学习,git](https://imgs.yssmx.com/Uploads/2023/07/580665-2.png)
photo of woman, dress, city night background
![[linux-sd-webui]之txt2img,大模型、多模态和生成,人工智能,深度学习,git](https://imgs.yssmx.com/Uploads/2023/07/580665-3.png)
![[linux-sd-webui]之txt2img,大模型、多模态和生成,人工智能,深度学习,git](https://imgs.yssmx.com/Uploads/2023/07/580665-4.png)
![[linux-sd-webui]之txt2img,大模型、多模态和生成,人工智能,深度学习,git](https://imgs.yssmx.com/Uploads/2023/07/580665-5.png)
photo of woman, dress, city night background, bracelet
![[linux-sd-webui]之txt2img,大模型、多模态和生成,人工智能,深度学习,git](https://imgs.yssmx.com/Uploads/2023/07/580665-6.png)
![[linux-sd-webui]之txt2img,大模型、多模态和生成,人工智能,深度学习,git](https://imgs.yssmx.com/Uploads/2023/07/580665-7.png)
![[linux-sd-webui]之txt2img,大模型、多模态和生成,人工智能,深度学习,git](https://imgs.yssmx.com/Uploads/2023/07/580665-8.png)
![[linux-sd-webui]之txt2img,大模型、多模态和生成,人工智能,深度学习,git](https://imgs.yssmx.com/Uploads/2023/07/580665-9.png)
seed 1
![[linux-sd-webui]之txt2img,大模型、多模态和生成,人工智能,深度学习,git](https://imgs.yssmx.com/Uploads/2023/07/580665-10.png)
seed 3
![[linux-sd-webui]之txt2img,大模型、多模态和生成,人工智能,深度学习,git](https://imgs.yssmx.com/Uploads/2023/07/580665-11.png)
![[linux-sd-webui]之txt2img,大模型、多模态和生成,人工智能,深度学习,git](https://imgs.yssmx.com/Uploads/2023/07/580665-12.png)
1.代码流程
modules.sd_models.setup_model()->
list_models()->cmd_ckpt=shared.cmd_opts.ckpt加载模型->
modules.txt2img.txt2img->
modules.scripts.ScriptRunner.run()-> 实际上在挑scripts,txt2img有三个scripts,一些工具
modules/txt2img.py->process_image(p) 58
modules/processing.py->process_images_inner(p) 503
modules/processing.py->sampler.sample() 871
modules/sd_samplers_kdiffusion.py->sample->launch_sampling() 359
repositories/k-diffusion/k_diffusion/sampling.py->model() 146
modules/sd_samplers_kdiffusion.py->CFGDenoiser->forward()->inner_model 126
repositories/k-diffusion/k_diffusion/external.py->DiscreteEpsDDPMDenoiser->forward() 112
repositories/k-diffudion/k_diffusion/external.py->
moudles/sd_hijack_utils.py->
repositories/stable-diffusion-stability-ai/ldm/models/diffusion/ddpm.py->self.model() 858
ddpm.py DiffusionWrapper diffusion_model 1330
- modules/diffusionmodules/openaimodel.py->
repositories/k-diffudion/k_diffusion/external.py->forward()
modules/sd_samplers_kdiffusion.py->CFGDenoiser->forward()->denoised:[4,4,64,64]
modules/sampling/sample_euler_ancestral->self.model()
modules/processing/StableDiffusionProcessingText2Img().sample() return samples 874
modules/processing->decode_first_stage()->
repositories/stable-diffusion-stability-ai/ldm/models/diffusion/ddpm.py decode_first_stage
- ldm/models/autoencoder.py AutoencoderKL.decode->self.post_quant_conv()->
extensions-builtin/lora/lora.py->lora_conv2d_forward()->
repositories/stable-diffusion-stability-ai/ldm/modules/diffusionmodules/model.py Decoder 621->
x_sample_ddim
Euler a
Euler
LMS
Heun
DPM2
DPM2 a
DPM++ 2S a
DPM++ 2M
DPM++ SDE
DPM fast
DPM adaptive
LMS Karras
DPM2 Karras
DPM2 a Karras
DPM++ 2S a Karras
DPM++ 2M Karras
DPM++ SDE Karras
DDIM
PLMSmain.py
import sys
import cv2
import torch
import logging

logging.getLogger("xformers").addFilter(lambda record: 'A matching Triton is not available' not in record.getMessage())
import numpy as np
from modules import paths, timer, import_hook, errors

startup_timer = timer.Timer()

from modules import shared, devices, sd_samplers, upscaler, extensions, localization, ui_tempdir, ui_extra_networks
import modules.scripts
import modules.sd_models
import modules.txt2img

from modules.shared import cmd_opts
from torchvision.utils import save_image

def initialize():

    extensions.list_extensions()
    localization.list_localizations(cmd_opts.localizations_dir)
    startup_timer.record("list extensions")

    modules.sd_models.setup_model() # 加载模型
    startup_timer.record("list SD models")

    modules.scripts.load_scripts()
    startup_timer.record("load scripts")

    try:
        modules.sd_models.load_model()
    except Exception as e:
        errors.display(e, "loading stable diffusion model")
        print("", file=sys.stderr)
        print("Stable diffusion model failed to load, exiting", file=sys.stderr)
        exit(1)
    startup_timer.record("load SD checkpoint")


def webui():
    initialize()

    image, _, _, _ = modules.txt2img.txt2img(
        id_task="task",
        prompt="a highly detailed tower designed by Zaha hadid with few metal and lots of glass,roads around with much traffic,in a city with a lot of greenery,aerial view, stunning sunny lighting, foggy atmosphere, vivid colors, Photo-grade rendering, Realistic style,8k,high res,highly detialed, ray tracing,vray render,masterpiece, best quality,rendered by Mir. and Brick visual",
        negative_prompt="",
        prompt_styles=[],
        steps=20,
        sampler_index=0,
        restore_faces=False,
        tiling=False,
        n_iter=1,
        batch_size=1,
        cfg_scale=7,
        seed=-1,
        subseed=-1,
        subseed_strength=0,
        seed_resize_from_h=0,
        seed_resize_from_w=0,
        seed_enable_extras=False,
        height=512,
        width=512,
        enable_hr=False,
        denoising_strength=0.7,
        hr_scale=0,
        hr_upscaler="Latent",
        hr_second_pass_steps=0,
        hr_resize_x=0,
        hr_resize_y=0,
        override_settings_texts=[],
    )

    for i in range(len(image)):
        image[i].save(f"{i}.png")

if __name__ == "__main__":
    webui()
modules/txt2img.py文章来源:https://www.toymoban.com/news/detail-580665.html
import modules.scripts
from modules import sd_samplers
from modules.generation_parameters_copypaste import create_override_settings_dict
from modules.processing import StableDiffusionProcessing, Processed, StableDiffusionProcessingTxt2Img, \
    StableDiffusionProcessingImg2Img, process_images
from modules.shared import opts, cmd_opts
import modules.shared as shared
import modules.processing as processing
from modules.ui import plaintext_to_html


def txt2img(id_task: str, prompt: str, negative_prompt: str, prompt_styles, steps: int, sampler_index: int,
            restore_faces: bool, tiling: bool, n_iter: int, batch_size: int, cfg_scale: float, seed: int, subseed: int,
            subseed_strength: float, seed_resize_from_h: int, seed_resize_from_w: int, seed_enable_extras: bool,
            height: int, width: int, enable_hr: bool, denoising_strength: float, hr_scale: float, hr_upscaler: str,
            hr_second_pass_steps: int, hr_resize_x: int, hr_resize_y: int, override_settings_texts, *args):
    args = (
    0, False, False, 'positive', 'comma', 0, False, False, '', 1, '', 0, '', 0, '', True, False, False, False, 0)
    override_settings = create_override_settings_dict(override_settings_texts)

    p = StableDiffusionProcessingTxt2Img(
        sd_model=shared.sd_model,
        outpath_samples=opts.outdir_samples or opts.outdir_txt2img_samples,
        outpath_grids=opts.outdir_grids or opts.outdir_txt2img_grids,
        prompt=prompt,
        styles=prompt_styles,
        negative_prompt=negative_prompt,
        seed=seed,
        subseed=subseed,
        subseed_strength=subseed_strength,
        seed_resize_from_h=seed_resize_from_h,
        seed_resize_from_w=seed_resize_from_w,
        seed_enable_extras=seed_enable_extras,
        sampler_name=sd_samplers.samplers[sampler_index].name,
        batch_size=batch_size,
        n_iter=n_iter,
        steps=steps,
        cfg_scale=cfg_scale,
        width=width,
        height=height,
        restore_faces=restore_faces,
        tiling=tiling,
        enable_hr=enable_hr,
        denoising_strength=denoising_strength if enable_hr else None,
        hr_scale=hr_scale,
        hr_upscaler=hr_upscaler,
        hr_second_pass_steps=hr_second_pass_steps,
        hr_resize_x=hr_resize_x,
        hr_resize_y=hr_resize_y,
        override_settings=override_settings,
    )

    p.scripts = modules.scripts.scripts_txt2img
    p.script_args = args

    if cmd_opts.enable_console_prompts:
        print(f"\ntxt2img: {prompt}", file=shared.progress_print_out)

    processed = modules.scripts.scripts_txt2img.run(p, *args)
    #     processed = None

    if processed is None:
        processed = process_images(p)

    p.close()

    shared.total_tqdm.clear()

    generation_info_js = processed.js()
    if opts.samples_log_stdout:
        print(generation_info_js)

    if opts.do_not_show_images:
        processed.images = []

    return processed.images, generation_info_js, plaintext_to_html(processed.info), plaintext_to_html(
        processed.comments)
![[linux-sd-webui]之txt2img,大模型、多模态和生成,人工智能,深度学习,git](https://imgs.yssmx.com/Uploads/2023/07/580665-13.png) 文章来源地址https://www.toymoban.com/news/detail-580665.html
文章来源地址https://www.toymoban.com/news/detail-580665.html
到了这里,关于[linux-sd-webui]之txt2img的文章就介绍完了。如果您还想了解更多内容,请在右上角搜索TOY模板网以前的文章或继续浏览下面的相关文章,希望大家以后多多支持TOY模板网!


