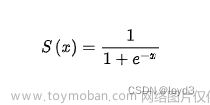
为了更清晰地学习Pytorch中的激活函数,并对比它们之间的不同,这里对最新版本的Pytorch中的激活函数进行了汇总,主要介绍激活函数的公式、图像以及使用方法,具体细节可查看官方文档。
目录
1、ELU
2、Hardshrink
3、Hardsigmoid
4、Hardtanh
5、Hardswish
6、LeakyReLU
7、LogSigmoid
8、PReLU
9、ReLU
10、ReLU6
11、RReLU
12、SELU
13、CELU
14、GELU
15、Sigmoid
16、SiLU
17、Mish
18、Softplus
19、Softshrink
20、Softsign
21、Tanh
22、Tanhshrink
23、Threshold
24、GLU
25、Softmin
26、Softmax
27、LogSoftmax
28、其它
1、ELU
公式:
图像:

示例:
m = nn.ELU()
input = torch.randn(2)
output = m(input)
2、Hardshrink
公式:
图像:

示例:文章来源:https://www.toymoban.com/news/detail-603121.html
m = nn.Hardshrink()
input = torch.randn(2)
output = m(input)
3、Hardsigmoid
公式:
图像:

示例:
m = nn.Hardsigmoid()
input = torch.randn(2)
output = m(input)
4、Hardtanh
公式:
图像:

示例:
m = nn.Hardtanh(-2, 2)
input = torch.randn(2)
output = m(input)
5、Hardswish
公式:
图像:

示例:
m = nn.Hardwish()
input = torch.randn(2)
output = m(input)
6、LeakyReLU
公式:
图像:

示例:
m = nn.LeakyReLU(0.1)
input = torch.randn(2)
output = m(input)
7、LogSigmoid
公式:
图像:

示例;
m = nn.LogSigmoid()
input = torch.randn(2)
output = m(input)
8、PReLU
公式:
其中,a是可学习的参数。
图像:

示例:
m = nn.PReLU()
input = torch.randn(2)
output = m(input)
9、ReLU
公式:
图像:

示例:
m = nn.ReLU()
input = torch.randn(2)
output = m(input)
10、ReLU6
公式:
图像:

示例:
m = nn.ReLU6()
input = torch.randn(2)
output = m(input)
11、RReLU
公式:
其中,a从均匀分布U(lower,upper)随机采样得到。
图像:

示例:
m = nn.RReLU(0.1, 0.3)
input = torch.randn(2)
output = m(input)
12、SELU
公式:
其中,a=1.6732632423543772848170429916717,scale=1.0507009873554804934193349852946。
图像:

示例:
m = nn.SELU()
input = torch.randn(2)
output = m(input)
13、CELU
公式:
图像:

示例:
m = nn.CELU()
input = torch.randn(2)
output = m(input)
14、GELU
公式:
图像:

示例:
m = nn.GELU()
input = torch.randn(2)
output = m(input)
15、Sigmoid
公式:
图像:

示例:
m = nn. Sigmoid()
input = torch.randn(2)
output = m(input)
16、SiLU
公式:
图像:

示例:
m = nn.SiLU()
input = torch.randn(2)
output = m(input)
17、Mish
公式:
图像:

示例:
m = nn.Mish()
input = torch.randn(2)
output = m(input)
18、Softplus
公式:
对于数值稳定性,当时,恢复到线性函数。
图像:

示例:
m = nn.Softplus()
input = torch.randn(2)
output = m(input)
19、Softshrink
公式:
图像:

示例:
m = nn.Softshrink()
input = torch.randn(2)
output = m(input)
20、Softsign
公式:
图像:

示例:
m = nn.Softsign()
input = torch.randn(2)
output = m(input)
21、Tanh
公式:
图像:

示例:
m = nn.Tanh()
input = torch.randn(2)
output = m(input)
22、Tanhshrink
公式:
图像:

示例:
m = nn.Tanhshrink()
input = torch.randn(2)
output = m(input)
23、Threshold
公式:
示例:
m = nn.Threshold(0.1, 20)
input = torch.randn(2)
output = m(input)
24、GLU
公式:
其中,a是输入矩阵的前半部分,b是后半部分。
示例:
m = nn.GLU()
input = torch.randn(4, 2)
output = m(input)
25、Softmin
公式:
示例:
m = nn.Softmin(dim=1)
input = torch.randn(2, 3)
output = m(input)
26、Softmax
公式:
示例:
m = nn.Softmax(dim=1)
input = torch.randn(2, 3)
output = m(input)
27、LogSoftmax
公式:
示例:
m = nn.LogSoftmiax(dim=1)
input = torch.randn(2, 3)
output = m(input)
28、其它
还有MultiheadAttention、Softmax2d、AdaptiveLogSoftmaxWithLoss相对复杂一些没有添加,可去官网文档查看。文章来源地址https://www.toymoban.com/news/detail-603121.html
到了这里,关于Pytorch激活函数最全汇总的文章就介绍完了。如果您还想了解更多内容,请在右上角搜索TOY模板网以前的文章或继续浏览下面的相关文章,希望大家以后多多支持TOY模板网!


![[深度学习入门]什么是神经网络?[神经网络的架构、工作、激活函数]](https://imgs.yssmx.com/Uploads/2024/02/584734-1.png)


