轮廓的最大外接矩形,Opencv有提供的现成的算法,最大内接圆也有提供的算法。但是没有现成的内接矩形的算法。本文使用C++实现了取轮廓最大内接矩形的方式,供大家参考。
实现的基本思路是:
-
处理图片为灰度图
其实实现的代码,直接就读入的是一张灰度图图片这一步省略了。当然如果实现起来,opencv也很容易实现。 -
坐标转换
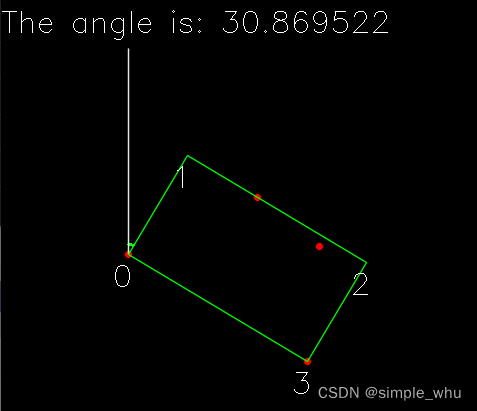
寻找轮廓的边缘,找到轮廓的主方向的角度。通过仿射转换,主方向作为x轴。 -
统计有效栅格。
在转换完的图形中找到灰度值位255的区域,为了处理的效率,没有按照像素直接处理,而是将区域分为一个一个的小栅格区域。每个区域记录是否是有效值,同事记录该区域左侧有多少个同样有效的区域。当前直接处理像素也是一样的。本例只是提供一种思路,因为有些情况,噪点是希望被忽略掉的,那么小于一定大小的栅格就不会影响找出的最大外接矩形。 -
直方图方式统计最大面积
经过上述处理后,得到了每行有效区域的信息,有行号,和每行有效区域的数据,就可以假设这是个直方图,用直方图的方式找最大面积。如下图:
用数据结构栈就可以统计出局部最大峰值,很容易实现。
-
找矩形顶点
通过上述的方式就能找到直方图的最大面积对应的四个区域的坐标,即为内接矩形的四个顶点。
- 将坐标再通过仿射转换,转为原图的坐标。
源码
void InnerRect::getInnerRect(const cv::Mat& image, std::vector<cv::Point2f>& Rect_points, const double grid_spacing_in_pixel)
{
	const int grid_spacing_as_int = std::floor(grid_spacing_in_pixel);
	const int half_grid_spacing_as_int = std::floor(grid_spacing_in_pixel*0.5);

	// *********************** I. Find the main directions of the map and rotate it in this manner. ***********************
	cv::Mat R;
	cv::Rect bbox;
	cv::Mat rotated_image;
	Rotator image_rotation;
	image_rotation.computeImageRotationMatrix(image, R, bbox);
	image_rotation.rotateImage(image, rotated_image, R, bbox);

	// compute min/max room coordinates
	cv::Point min_room(1000000, 1000000), max_room(0, 0);
	for (int v=0; v<rotated_image.rows; ++v)
	{
		for (int u=0; u<rotated_image.cols; ++u)
		{
			if (rotated_image.at<uchar>(v,u)==255)
			{
				min_room.x = std::min(min_room.x, u);
				min_room.y = std::min(min_room.y, v);
				max_room.x = std::max(max_room.x, u);
				max_room.y = std::max(max_room.y, v);
			}
		}
	}

	cv::Mat inflated_rotated_image;
	cv::erode(rotated_image, inflated_rotated_image, cv::Mat(), cv::Point(-1, -1), half_grid_spacing_as_int);

	// *********************** II. Find the nodes and their neighbors ***********************
	// get the nodes in the free space
	std::vector<std::vector<InnerExploratorNode> > nodes; // 2-dimensional vector to easily find the neighbors
	int number_of_nodes = 0;


	// todo: create grid in external class - it is the same in all approaches
	// todo: if first/last row or column in grid has accessible areas but center is inaccessible, create a node in the accessible area
	for(int y=min_room.y+half_grid_spacing_as_int; y<max_room.y; y+=grid_spacing_as_int)
	{
		// for the current row create a new set of neurons to span the network over time
		std::vector<InnerExploratorNode> current_row;
		for(int x=min_room.x+half_grid_spacing_as_int; x<max_room.x; x+=grid_spacing_as_int)
		{
			// create node if the current point is in the free space
			InnerExploratorNode current_node;
			current_node.center_ = cv::Point(x,y);
			//if(rotated_image.at<uchar>(y,x) == 255)
			// could make sense to test all pixels of the cell, not only the center
			if (completeCellTest(inflated_rotated_image, current_node.center_, grid_spacing_as_int) == true)
			{
				//如果是第一个元素,则为0,否则是前一个元素计数基础上加1
				current_node.leftCount = (x == (min_room.x+half_grid_spacing_as_int) ? 0 : (current_row.back().leftCount +1));
				++number_of_nodes;
			}
			// add the obstacle nodes as already visited
			else
			{
				current_node.leftCount = 0;
				++number_of_nodes;
			}
			current_row.push_back(current_node);
		}

		// insert the current row into grid
		nodes.push_back(current_row);
	}
	std::cout << "found " << number_of_nodes <<  " nodes" << std::endl;

	if(nodes.empty())
	{
		return;
	}

	//采用柱状直方图统计方式,对每一列找最大面积
	int max_area = 0;
	int max_up = 0;
	int max_down = 0;
	int max_left = 0;
	int max_right = 0;
	int m = nodes.size();
	int n = nodes[0].size();
	for(int j = 0; j < n; j++)
	{
		std::vector<int> up(m, 0), down(m, 0);

		std::stack<int> stk;
		for(int i = 0; i < m; i++)
		{
			while(!stk.empty() && nodes[stk.top()][j].leftCount >= nodes[i][j].leftCount)
			{
				stk.pop();
			}
			up[i] = stk.empty() ? -1 : stk.top();
			stk.push(i);
		}
		stk = std::stack<int>();
		for (int i = m-1; i >= 0; i--){
			while(!stk.empty() && nodes[stk.top()][j].leftCount >= nodes[i][j].leftCount)
			{
				stk.pop();
			}
			down[i] = stk.empty() ? m : stk.top();
			stk.push(i);
		}


		for(int i = 0; i < m; i++)
		{
			int height = down[i] - up[i] -1;
			int area = height * nodes[i][j].leftCount;
			if(max_area < area)
			{
				max_area = area;
				max_up = up[i] + 1;
				max_down = down[i];
				max_left = j - nodes[i][j].leftCount + 1;
				max_right = j;
			}
		}
	}

	int min_x = min_room.x + max_left * grid_spacing_as_int + half_grid_spacing_as_int;
	int min_y = min_room.y + max_up * grid_spacing_as_int + half_grid_spacing_as_int;
	int max_x = min_room.x + max_right * grid_spacing_as_int + half_grid_spacing_as_int;
	int max_y = min_room.y + max_down * grid_spacing_as_int;


	//transform the calculated path back to the originally rotated map
	std::vector<cv::Point2f> fov_poses;
	std::vector<cv::Point2f> fov_coverage_path;

	fov_coverage_path.push_back(cv::Point2f(min_x, min_y));
	fov_coverage_path.push_back(cv::Point2f(max_x, min_y));
	fov_coverage_path.push_back(cv::Point2f(max_x, max_y));
	fov_coverage_path.push_back(cv::Point2f(min_x, max_y));
	fov_coverage_path.push_back(cv::Point2f(min_x, min_y));

	image_rotation.transformPathBackToOriginalRotation(fov_coverage_path, fov_poses, R);

	Rect_points.clear();
	Rect_points.insert(Rect_points.end(), fov_poses.begin(), fov_poses.end());

}
完整的源码上传到github上了,可以直接下载:
求最大内接矩形文章来源:https://www.toymoban.com/news/detail-609563.html
实现效果:
原图:
实现找到的内接矩形效果: 文章来源地址https://www.toymoban.com/news/detail-609563.html
到了这里,关于OPENCV 寻找图形最大内接矩形的文章就介绍完了。如果您还想了解更多内容,请在右上角搜索TOY模板网以前的文章或继续浏览下面的相关文章,希望大家以后多多支持TOY模板网!