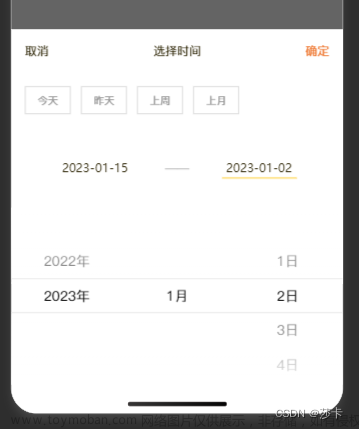
微信小程序TDesign封装的日期选择器
可以选中今天、昨天、上周、上月等功能。
确定返回日期时,会判断时间戳大小,返回createdTime,endTime
组件图片展示
 文章来源地址https://www.toymoban.com/news/detail-612861.html
父组件使用组件
//json中引入
{
...
  "usingComponents": {
    ...
    //此处根据自己的路径
    "select-time": "../../components/select-time/index",
    '''
  }
}


//wxml中使用
<select-time status="{{selectStatus}}" bind:close="closeSelect" bind:confirm="confirmSelect" />


//js中的事件等
  closeSelect() {
    this.setData({
      selectStatus: false
    })
  },
  confirmSelect(data) {
      console.log(data.detail.createdTime,data.detail.endTime)
  },
以下为子组件代码
组件wxml
<t-date-time-picker header="{{false}}" title="选择日期" visible="{{status}}" mode="date" defaultValue="{{today}}" value="{{valueTime}}" format="YYYY-MM-DD" bindchange="onConfirm" bindpick="onColumnChange" bindcancel="hidePicker" start="2022-11-01" end="{{today}}">
  <view slot="header">
    <view class="select-time-box">
      <view class="flex items jcsb">
        <view catchtap="onVisibleChange">取消</view>
        <view>选择时间</view>
        <view catchtap="confirm" style="color: #EF7B36;">确定</view>
      </view>
      <view class="flex items" style="margin-top: 60rpx;">
        <view catchtap="selectToday" class="{{btn_state === 1?'btn-active':'btn'}}">今天</view>
        <view catchtap="selectYesterday" class="{{btn_state === 2?'btn-active':'btn'}}">昨天</view>
        <view catchtap="lastWeek" class="{{btn_state === 3?'btn-active':'btn'}}">上周</view>
        <view catchtap="lastMonth" class="{{btn_state === 4?'btn-active':'btn'}}">上月</view>
      </view>
      <view class="flex jcsb items" style="margin-top: 100rpx;">
        <view class="flex1 textc flex jcc">
          <input type="text" catchtap="select1" value="{{createdTime}}" class="{{selectState === 1?'border_bottom':'border_none'}}" disabled placeholder="点击选择开始时间" style="width:170rpx" />
        </view>
        <view style="color: #B4B4B4;">——</view>
        <view class="flex1 textc flex jcc">
          <input type="text" catchtap="select2" value="{{endTime}}" class="{{selectState === 2?'border_bottom':'border_none'}}" disabled placeholder="点击选择开始时间" style="width:170rpx" />
        </view>
      </view>
    </view>
  </view>
</t-date-time-picker>
组件wxss
.select-time-box {
  padding: 32rpx 32rpx;
  padding-bottom: constant(safe-area-inset-bottom);
  padding-bottom: env(safe-area-inset-bottom);
  background-color: #ffffff;
  border-radius: 32rpx 32rpx 0 0;
  font-size: 28rpx;
  color: #2E2606;
}

.btn-active {
  border: 1px solid #FEC50A;
  height: 60rpx;
  width: 100rpx;
  font-size: 24rpx;
  margin-right: 24rpx;
  text-align: center;
  background-color: #FEC50A;
  color: #2E2606;
  font-weight: 700;
  line-height: 60rpx;
}

.btn {

  border: 1px solid #D9D9D9;
  height: 60rpx;
  width: 100rpx;
  font-size: 24rpx;
  margin-right: 24rpx;
  text-align: center;
  color: #999999;
  line-height: 60rpx;
}


.border_bottom {
  border-bottom: 2px solid #FFE284;
}
.border_none {
  border-bottom: 2px solid transparent;
}

.flex {
  display: flex !important;
}

.jcsb {
  justify-content: space-between !important;
}

.jcc {
  justify-content: center !important;
}

.items {
  align-items: center !important;
}

.flex-col {
  flex-direction: column !important;
}

.flex1 {
  flex: 1 !important;
}

.fwrap {
  flex-wrap: wrap !important;
}

.textc {
  text-align: center !important;
}

.textl {
  text-align: left !important;
}

.textr {
  text-align: right !important;
}
.f36{
  font-size: 36rpx;
}
.f34{
  font-size: 34rpx;
}
.f32{
  font-size: 32rpx;
}
.f30{
  font-size: 30rpx;
}
.f28 {
  font-size: 28rpx;
}
.f26 {
  font-size: 26rpx;
}
.f24{
  font-size: 24rpx;
}
.f22 {
  font-size: 22rpx;
}

.f20 {
  font-size: 20rpx;
}

.hidden {
  overflow: hidden !important;
}
.f700{
  font-weight: 700 !important;
}
.wfull {
  width: 100% !important;
}

.hfull {
  height: 100% !important;
}

.posr {
  position: relative !important;
}
input{
  height: 24rpx;
}
组件JSON
{
  "component": true,
  "usingComponents": {
    "t-popup": "tdesign-miniprogram/popup/popup",
    "t-date-time-picker": "tdesign-miniprogram/date-time-picker/date-time-picker",
    "t-picker": "tdesign-miniprogram/picker/picker",
    "t-picker-item": "tdesign-miniprogram/picker/picker-item"
  }
}
组件js
// components/select-time/index.js
Component({
  /**
   * 组件的属性列表
   */
  properties: {
    status: {
      type: Boolean,
      value: false,
    }
  },

  /**
   * 组件的初始数据
   */
  data: {
    btn_state: 0,
    today: '',
    selectState: 1,
    createdTime: '',
    endTime: '',
    valueTime: '',
  },

  /**
   * 组件的方法列表
   */
  ready() {
    const time = this.timestampToTime(new Date())
    this.setData({
      today: `${time.Y}-${time.M}-${time.D}`,
      valueTime: `${time.Y}-${time.M}-${time.D}`,
      createdTime: `${time.Y}-${time.M}-${time.D}`,
      endTime: `${time.Y}-${time.M}-${time.D}`
    })
  },
  methods: {
    onColumnChange(e) {
      if (this.data.selectState === 1) {
        this.setData({
          createdTime: e.detail.value,
          valueTime: e.detail.value,
          btn_state: 0
        })
      } else {
        this.setData({
          endTime: e.detail.value,
          valueTime: e.detail.value,
          btn_state: 0
        })
      }
    },
    select1() {
      this.setData({
        selectState: 1
      })
    },
    select2() {
      this.setData({
        selectState: 2
      })
    },
    timestampToTime(timestamp) {
      const date = new Date(timestamp)
      const Y = date.getFullYear()
      const M = (date.getMonth() + 1 < 10 ? '0' + (date.getMonth() + 1) : date.getMonth() + 1)
      const D = (date.getDate() < 10 ? '0' + date.getDate() : date.getDate())
      const h = (date.getHours() < 10 ? '0' + date.getHours() : date.getHours())
      const m = (date.getMinutes() < 10 ? '0' + date.getMinutes() : date.getMinutes())
      const s = (date.getSeconds() < 10 ? '0' + date.getSeconds() : date.getSeconds())
      return {
        Y,
        M,
        D,
        h,
        m,
        s
      }
    },
    onVisibleChange() {
      this.triggerEvent('close')
    },
    confirm() {
      const createdTime = new Date(this.data.createdTime).getTime() <= new Date(this.data.endTime).getTime() ? this.data.createdTime : this.data.endTime
      const endTime = new Date(this.data.endTime).getTime() > new Date(this.data.createdTime).getTime() ? this.data.endTime : this.data.createdTime
      this.triggerEvent('confirm', {
        createdTime,
        endTime
      })
    },
    selectToday() {
      this.setData({
        valueTime: this.data.today,
        createdTime: this.data.today,
        endTime: this.data.today,
        btn_state: 1,
      })
    },
    selectYesterday() {
      const time = this.timestampToTime((new Date().getTime() - 86400000))
      this.setData({
        valueTime: `${time.Y}-${time.M}-${time.D}`,
        createdTime: `${time.Y}-${time.M}-${time.D}`,
        endTime: `${time.Y}-${time.M}-${time.D}`,
        btn_state: 2,
      })
    },
    lastWeek() {
      const created = this.timestampToTime(this.getBeginLastWeek())
      const end = this.timestampToTime(this.getEndLastWeek())
      this.setData({
        valueTime: this.data.selectState ? `${created.Y}-${created.M}-${created.D}` : `${end.Y}-${end.M}-${end.D}`,
        createdTime: `${created.Y}-${created.M}-${created.D}`,
        endTime: `${end.Y}-${end.M}-${end.D}`,
        btn_state: 3,
      })
    },
    lastMonth() {
      const created = this.timestampToTime(this.getBeginLastMonth())
      const end = this.timestampToTime(this.getEndLastMonth())
      this.setData({
        valueTime: this.data.selectState ? `${created.Y}-${created.M}-${created.D}` : `${end.Y}-${end.M}-${end.D}`,
        createdTime: `${created.Y}-${created.M}-${created.D}`,
        endTime: `${end.Y}-${end.M}-${end.D}`,
        btn_state: 4,
      })
    },
    getBeginLastWeek() {
      var currentDate = this.getCurrentDate();
      var first = currentDate.getDate() - currentDate.getDay() - 6;
      var startDate = new Date(currentDate.setDate(first));
      return this.startTime(startDate);
    },
    getEndLastWeek() {
      var currentDate = this.getCurrentDate();
      var first = currentDate.getDate() - currentDate.getDay() - 6;
      var last = first + 6;
      var endDate = new Date(currentDate.setDate(last));
      return this.endTime(endDate);
    },
    startTime(time) {
      const nowTimeDate = new Date(time)
      return nowTimeDate.setHours(0, 0, 0, 0)
    },
    endTime(time) {
      const nowTimeDate = new Date(time)
      return nowTimeDate.setHours(23, 59, 59, 999)
    },
    getCurrentDate() {
      return new Date();
    },
    getBeginLastMonth() {
      //获取当前时间
      var currentDate = this.getCurrentDate();
      //获得当前月份0-11
      var currentMonth = currentDate.getMonth();
      //获得当前年份4位年
      var currentYear = currentDate.getFullYear();
      //获得上一个月的第一天
      var priorMonthFirstDay = this.getPriorMonthFirstDay(currentYear, currentMonth);
      return priorMonthFirstDay;
    },
    getEndLastMonth() {
      //获取当前时间
      var currentDate = this.getCurrentDate();
      //获得当前月份0-11
      var currentMonth = currentDate.getMonth();
      //获得当前年份4位年
      var currentYear = currentDate.getFullYear();

      //当为12月的时候年份需要加1
      //月份需要更新为0 也就是下一年的第一个月
      if (currentMonth == 11) {
        currentYear++;
        currentMonth = 0; //就为
      } else {
        //否则只是月份增加,以便求的下一月的第一天
        currentMonth++;
      }

      //一天的毫秒数
      var millisecond = 1000 * 60 * 60 * 24;
      //求出上月的最后一天
      var lastDay = new Date(this.getBeginMonth().getTime() - millisecond);

      return this.endTime(lastDay);
    },
    getBeginMonth() {
      var currentDate = this.getCurrentDate();
      var currentMonth = currentDate.getMonth();
      //获得当前年份4位年
      var currentYear = currentDate.getFullYear();
      //求出本月第一天
      var firstDay = new Date(currentYear, currentMonth, 1);

      return firstDay;
    },
    getPriorMonthFirstDay(year, month) {
      //年份为0代表,是本年的第一月,所以不能减
      if (month == 0) {
        month = 11; //月份为上年的最后月份
        year--; //年份减1
        return new Date(year, month, 1);
      }
      //否则,只减去月份
      month--;
      return new Date(year, month, 1);;
    }

  }
})
文章来源:https://www.toymoban.com/news/detail-612861.html
到了这里,关于微信小程序TDesign封装的时间选择器,可以选中今天、昨天、上周、上月等功能的文章就介绍完了。如果您还想了解更多内容,请在右上角搜索TOY模板网以前的文章或继续浏览下面的相关文章,希望大家以后多多支持TOY模板网!


