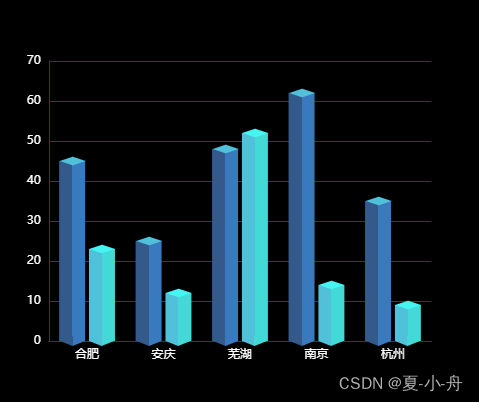
Echarts 3D立体柱状图(源码+例图)

这篇具有很好参考价值的文章主要介绍了Echarts 3D立体柱状图(源码+例图)。希望对大家有所帮助。如果存在错误或未考虑完全的地方,请大家不吝赐教,您也可以点击"举报违法"按钮提交疑问。

Echarts 3D立体柱状图,3D长方体柱状图,直接cope源码可用(源码+例图)

废话不多说,直接上代码!!! 

echarts graphic 立方体,ECharts图表,Vue,前端,echarts,vue,vue.js,1024程序员节文章来源地址https://www.toymoban.com/news/detail-616161.html

// HTML 代码
<div id="litiBar" style="width:100%;height:400px" ></div>

// JS 代码
data(){
  return {
    chart:null
  }
};
mounted(){
    // 3D立体柱状图
    this.litiBar();
},
methods:{
    litiBar() {
            this.chart = echarts.init(document.getElementById('litiBar'));
            // 创建立方体正面图形
            const cubeShape1 = echarts.graphic.extendShape({
                shape: {
                x: 0,
                y: 0,
                width: 110, // 长方体宽度
                zWidth: 8, // 阴影折角高
                zHeight: 4 // 阴影折角宽
                },
                buildPath: (ctx, shape) => {
                const api = shape.api;
                const xAxisPoint = api.coord([shape.xValue, 0]);
                const p0 = [shape.x, shape.y];
                const p1 = [shape.x - shape.width / this.xAxisText.length, shape.y];
                const p4 = [shape.x + shape.width / this.xAxisText.length, shape.y];
                const p2 = [xAxisPoint[0] - shape.width / this.xAxisText.length, xAxisPoint[1]];
                const p3 = [xAxisPoint[0] + shape.width / this.xAxisText.length, xAxisPoint[1]];
        
                // 绘制正面
                ctx.moveTo(p0[0], p0[1]); //0
                ctx.lineTo(p1[0], p1[1]); //1
                ctx.lineTo(p2[0], p2[1]); //2
                ctx.lineTo(p3[0], p3[1]); //3
                ctx.lineTo(p4[0], p4[1]); //4
                ctx.lineTo(p0[0], p0[1]); //0
                ctx.closePath();
                }
            })

            // 创建立方体的顶和侧面
            const cubeShape2 = echarts.graphic.extendShape({
                shape: {
                x: 0,
                y: 0,
                width: 110,
                zWidth: 8,
                zHeight: 4
                },
                buildPath: (ctx, shape) => {
                const api = shape.api;
                const xAxisPoint = api.coord([shape.xValue, 0]);
                const p1 = [shape.x - shape.width / this.xAxisText.length, shape.y];
                const p4 = [shape.x + shape.width / this.xAxisText.length, shape.y];
                const p6 = [shape.x + shape.width / this.xAxisText.length + shape.zWidth, shape.y - shape.zHeight];
                const p7 = [shape.x - shape.width / this.xAxisText.length + shape.zWidth, shape.y - shape.zHeight];
                const p3 = [xAxisPoint[0] + shape.width / this.xAxisText.length, xAxisPoint[1]];
                const p5 = [xAxisPoint[0] + shape.width / this.xAxisText.length + shape.zWidth, xAxisPoint[1] - shape.zHeight];
        
                // 绘制侧面
                ctx.moveTo(p4[0], p4[1]); //4
                ctx.lineTo(p3[0], p3[1]); //3
                ctx.lineTo(p5[0]+6, p5[1]-6); //5
                ctx.lineTo(p6[0]+7, p6[1]-8); //6
                ctx.lineTo(p4[0], p4[1]); //4
        
                // 绘制顶部
                ctx.moveTo(p4[0], p4[1]); //4
                ctx.lineTo(p6[0]+7, p6[1]-8); //6
                ctx.lineTo(p7[0]+7, p7[1]-8); //7
                ctx.lineTo(p1[0], p1[1]); //1
                ctx.lineTo(p4[0], p4[1]); //4
                ctx.closePath();
                }
            })

            echarts.graphic.registerShape('cubeShape1', cubeShape1)
            echarts.graphic.registerShape('cubeShape2', cubeShape2)
            this.initECharts()
        },
   initECharts() {
            const option = {
                title: {
                    left: 20,
                    top: 20
                },
                textStyle:{
                    fontSize:15,
                    color: '#10D5DF'
                },
                tooltip: {},
                xAxis: {
                    type: 'category',
                    //  max: 'dataMax',// 柱状图以数据最大的为顶点
                    data: this.xAxisText,
                    interval: 0,
                    axisLabel: {
                        color: '#44f0ff'
                    },
                    axisTick: {
                        show: false,
                    },// 隐藏X刻度线
                    axisLine: {
                        show: true,
                        lineStyle: {
                            color: 'rgba(28, 180, 215,0.5)'
                        }
                    }
                },
                yAxis: {
                    type: 'value',
                    splitLine: {
                        lineStyle:{
                            color: 'rgba(224,224,224,0.1)'// 分割轴线的颜色
                        }
                    },
                    axisLine: {
                        show: true,
                        lineStyle: {
                            color: 'rgba(28, 180, 215,0.5)'
                        }
                    }
                },
                 grid: {
                    top: 80,
                    bottom: 30
                },
                series: [{
                    // name: '销量统计',
                    type: 'custom',
                    label: {
                        show: true,
                        position: 'top',
                    },
                    // barWidth:20,
                    renderItem: (params, api) => {
                        let location = api.coord([api.value(0), api.value(1)])
                        return {
                            type: 'group',
                            children: [{
                                type: 'cubeShape1', // 正方体正面
                                shape: {
                                api,
                                xValue: api.value(0),
                                yValue: api.value(1),
                                x: location[0],
                                y: location[1]
                                },
                                style: {
                                fill: new echarts.graphic.LinearGradient(0,0,0,1, [{
                                    offset: 0.1,
                                    color: 'rgba(27, 202, 242, 1)'
                                    
                                },{
                                    offset: 1,
                                    color: 'rgba(29, 111, 130, 1)'
                                }])
                                }
                            }, {
                                type: 'cubeShape2', // 正方体侧面和顶
                                shape: {
                                api,
                                xValue: api.value(0),
                                yValue: api.value(1),
                                x: location[0],
                                y: location[1]
                                },
                                style: {
                                fill: new echarts.graphic.LinearGradient(0,0,0,1, [{
                                    offset: 0.1,
                                    color: 'rgba(29, 111, 130, 1)'
                                },{
                                    offset: 1,
                                    color: 'rgba(27, 202, 242, 1)'
                                }])
                                }
                            }]
                        }
                    },
                    data: this.yAxisData
                }]
            }
            this.chart.setOption(option)
        },
}

到了这里,关于Echarts 3D立体柱状图(源码+例图)的文章就介绍完了。如果您还想了解更多内容,请在右上角搜索TOY模板网以前的文章或继续浏览下面的相关文章,希望大家以后多多支持TOY模板网!

本文来自互联网用户投稿,该文观点仅代表作者本人,不代表本站立场。本站仅提供信息存储空间服务,不拥有所有权,不承担相关法律责任。如若转载,请注明出处: 如若内容造成侵权/违法违规/事实不符,请点击违法举报进行投诉反馈,一经查实,立即删除!

领支付宝红包 赞助服务器费用

相关文章

  • echarts-3D立体饼图(1)

    先看效果图 1、echarts的版本使用的是: script src=\\\"https://cdn.bootcdn.net/ajax/libs/echarts/5.4.1/echarts.min.js\\\"/script script src=\\\"https://cdn.bootcdn.net/ajax/libs/echarts-gl/2.0.8/echarts-gl.js\\\"/script 2、饼图可自旋转,鼠标移上也可转动,不想让旋转grid3D:{viewControl:{autoRotate:false}} 3、 3D饼图主义echarts的

    2024年02月09日
    浏览(25)
  • echarts 3D立体图(江苏版)

    npm install echarts@4.9.0 echarts-gl@1.0.1 --legacy-peer-deps 安装echarts插件和echarts 3D地图插件 配置main.js 新建vue文件 如需改样式点这里 npm install echarts@4.9.0 echarts-gl@1.0.1 --legacy-peer-deps 安装echarts插件和echarts 3D地图插件 配置main.js 新建vue文件 如需改样式点这里

    2024年02月12日
    浏览(28)
  • Echarts-3D柱状图

    通过Echarts的echarts.graphic.extendShape实现真正的3D柱状图 思路就是通过调整顶部面(CubeTop)、左侧面(CubeLeft)、右侧面(CubeRight)来决定柱状图的宽窄 建议优先调整顶部面,一般c1不需要动 然后在build-bar-option中引用即可 这里主要就是把series中的内容复制过来直接用就行了

    2024年02月08日
    浏览(29)
  • echarts 3D 柱状图

    注意: 这里主要就是基于各类图表,更多的使用 Echarts 的各类配置项; 以下代码都可以复制到 Echarts 官网,直接预览; 注意: 以下背景图来源于网络,如果失效请自行替换; echarts 环形图:多层嵌套,自定义 legend 位置、颜色,中间插入数据及文字,颜色渐变; 文字链接:

    2024年02月11日
    浏览(29)
  • echarts 实现 3d 柱状图

    实现要求 能够调整大小 实现3d效果,可以改变颜色 前置环境 效果 调整大小和颜色 代码 baseCharts.vue 使用 10.12 更新 效果 代码 使用

    2024年02月11日
    浏览(34)
  • echarts5 3D柱状图

    div ref=\\\"echartsQinggan\\\" style=\\\"width: 100%;height: 100%;\\\"/div     async getData() { ///调用接口获取数据    this.Count1=[1,2,3]  this.Count2=[4,5,6]  this.Count3=[7,null,8] this.$nextTick(() = {         this.qinganFun()       })     },     qinganFun() {       // 获取DOM节点并初始化       const hotTheme = this.$echarts.i

    2024年03月18日
    浏览(40)
  • vue使用echarts与echarts-gl实现3d地图与 3d柱状图

    目录 前言 一、下载echarts与echarts gl 二、vue引入与页面使用 1.引入 2.页面引入echarts-gl 三、下载地图数据 四、使用地图 1、html初始化地图放入位置: 2、data创建变量 3、创建地图 4、钩子函数渲染地图 5、渲染完成效果 总结 提示:本项目使用vue,请提前搭建好vue项目 本次需求

    2024年02月12日
    浏览(29)
  • echarts实现3D柱状图(视觉层面)和3D饼图

    原理: 立体图形从一个方向只能看到三个面,于是我们通过echarts图表实现 顶部,明面,和暗面。 效果图如下: 需要四份数据, 两个柱子的数据+X轴数据+颜色数据, 通过 setData 和 setColor 生成需要的数据,横向柱状图同理,参照代码中注释。 以下是完整案例代码: 3D饼图没

    2024年02月16日
    浏览(29)
  • echarts3d柱状图


    2024年02月21日
    浏览(31)
  • vue echarts实现3D效果柱状图

    在vue2项目里面,研究了哈,这里记录下eacharts 实现3D效果柱状图 在main.js引入eacharts 展示效果:大屏demo

    2024年02月15日
    浏览(35)

觉得文章有用就打赏一下文章作者

支付宝扫一扫打赏

博客赞助

微信扫一扫打赏

请作者喝杯咖啡吧~博客赞助

支付宝扫一扫领取红包,优惠每天领

二维码1

领取红包

二维码2

领红包