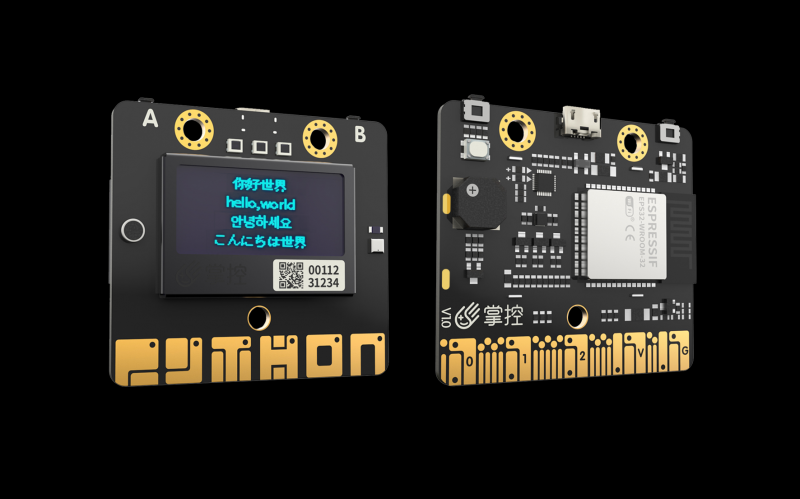
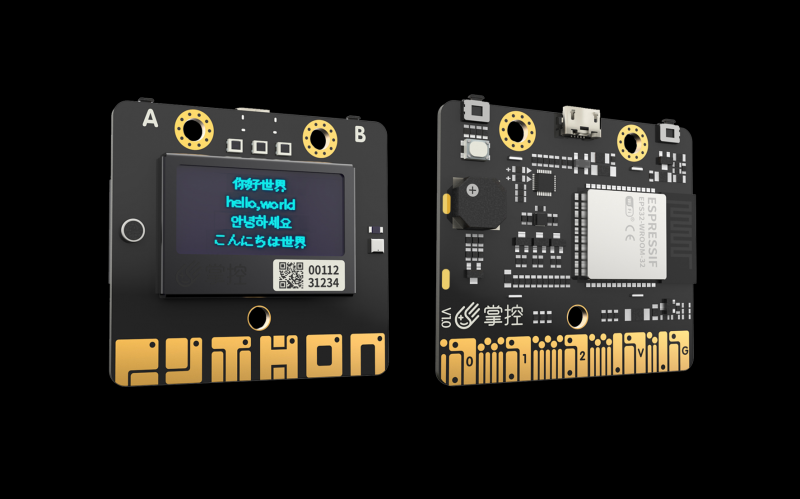
知识点:什么是掌控板?
掌控板是一块普及STEAM创客教育、人工智能教育、机器人编程教育的开源智能硬件。它集成ESP-32高性能双核芯片,支持WiFi和蓝牙双模通信,可作为物联网节点,实现物联网应用。同时掌控板上集成了OLED显示屏、RGB灯、加速度计、麦克风、光线传感器、蜂鸣器、按键开关、触摸开关、金手指外部拓展接口,支持图形化及MicroPython代码编程,可实现智能机器人、创客智造作品等智能控制类应用。


掌控板硬件特性:
ESP-32主控
处理器:Tensilica LX6双核处理器(一核处理高速连接;一核独立应用开发)
主频:高达240MHz的时钟频率
SRAM:520KB
Flash:8MB
Wi-Fi标准:FCC/CE/TELEC/KCC
Wi-Fi协议:802.11 b/g/n/d/e/i/k/r (802.11n,速度高达150 Mbps),A-MPDU和A-MSDU聚合,支持0.4us防护间隔
频率范围:2.4~2.5 GHz
蓝牙协议:符合蓝牙v4.2 BR/EDR和BLE标准
蓝牙音频:CVSD和SBC音频低功耗:10uA
供电方式:Micro USB供电
工作电压:3.3V
最大工作电流:200mA
最大负载电流:1000mA
掌控板载
三轴加速度计MSA300,测量范围:±2/4/8/16G
地磁传感器MMC5983MA,测量范围:±8 Gauss;精度0.4mGz,电子罗盘误差±0.5°
光线传感器
麦克风
3 颗全彩ws2812灯珠
1.3英寸OLED显示屏,支持16*16字符显示,分辨率128x64
无源蜂鸣器
支持2个物理按键(A/B)、6个触摸按键
支持1路鳄鱼夹接口,可方便接入各种阻性传感器
拓展接口
20通道数字I/O, (其中支持12路PWM,6路触摸输入)
5通道12bit模拟输入ADC,P0~P4
1路的外部输入鳄鱼夹接口:EXT/GND
支持I2C、UART、SPI通讯协议


11、24位弹跳RGB彩虹灯环程序之二
#MicroPython动手做(13)——掌控板之RGB三色灯
#24位弹跳RGB彩虹灯环程序之二

from mpython import *
import neopixel
np = neopixel.NeoPixel(Pin(Pin.P8), n=24,bpp=3,timing=1)


def wheel(pos):
    # 通过改变在0和255之间的每个颜色参数产生彩虹色光谱
    # Input a value 0 to 255 to get a color value.
    # The colours are a transition r - g - b - back to r.
    if pos < 0 or pos > 255:
        r = g = b = 0
    elif pos < 85:
        r = int(pos * 3)
        g = int(255 - pos*3)
        b = 0
    elif pos < 170:
        pos -= 85
        r = int(255 - pos*3)
        g = 0
        b = int(pos*3)
    else:
        pos -= 170
        r = 0
        g = int(pos*3)
        b = int(255 - pos*3)
    return (r, g, b)

def cycle(np,r,g,b,wait=20):
    # 循环效果,有一个像素在所有灯带位置上运行,而其他像素关闭。
    for i in range(4 * np.n):
        for j in range(np.n):
            np[j] = (0, 0, 0)
        np[i % np.n] = (r, g, b)
        np.write()
        sleep_ms(wait)


def bounce(np,r,g,b,wait=20):
    # 弹跳效果,等待时间决定了弹跳效果的速度
    n=np.n
    for i in range(4 * n):
        for j in range(n):
            np[j] = (r, g, b)
        if (i // n) % 2 == 0:
            np[i % n] = (0, 0, 0)
        else:
            np[n - 1 - (i % n)] = (0, 0, 0)
        np.write()
        sleep_ms(wait)


def rainbow_cycle(np,wait_us):
    # 彩虹效果
    n=np.n
    for j in range(255):
        for i in range(n):
            pixel_index = (i * 256 // n) + j
            np = wheel(pixel_index & 255)
        np.write()
        sleep_us(wait_us)

while True:
    cycle(np,50,50,50,wait=20)
    bounce(np,50,0,0,wait=20)
    rainbow_cycle(np,20)
板载RGB
RGB LED控制类指令,用于控制掌控板的3颗RGB ws2812灯珠,rgb对象为neopixel的衍生类,继承neopixel的方法
rgb[n] = (r, g, b)
描述: 设置对应灯珠的颜色,n 为板载RGB灯的个数,第一个灯为0, r、g、b 为颜色亮度值,范围值为0~255
rgb.write()
描述: 把数据写入RGB灯珠中
rgb.fill( (r, g, b) )
描述: 填充所有灯珠颜色及亮度, r、g、b 为颜色亮度值,范围值为0~255
外部RGB
外部RGB灯带灯环控制类指令
class NeoPixel(pin, n, bpp=3, timing=0)
描述: 构建对象

参数:
pin - 输出引脚
n - LED灯的个数
bpp - bpp=3,默认为3元组RGB;bpp=4,对于具有3种以上颜色的LED,例如RGBW像素或RGBY像素,采用4元组RGBY或RGBY像素
timing - 默认等于0,为400KHz速率;等于1,为800KHz速率
NeoPixel.write()
描述: 把数据写入RGB灯珠中
NeoPixel.fill( (r, g, b) )
描述: 填充所有灯珠颜色及亮度, r、g、b 为颜色亮度值,范围值为0~255
12、推荐RGB颜色参考对照表(非常细致)
https://tool.oschina.net/commons?type=3

13、依次点亮更亮的流水灯
#MicroPython动手做(13)——掌控板之RGB三色灯
#依次点亮更亮的流水灯
#MicroPython动手做(13)——掌控板之RGB三色灯
#依次点亮更亮的流水灯

from mpython import *

import time
while True:
    rgb.fill((int(102), int(102), int(102)))
    rgb.write()
    time.sleep_ms(1)
    time.sleep_ms(500)
    rgb.fill( (0, 0, 0) )
    rgb.write()
    time.sleep_ms(1)
    for k in range(3):
        rgb[k] = (int(((k + 1) * 66)), int(0), int(0))
        rgb.write()
        time.sleep_ms(1)
        time.sleep_ms(500)
    for k in range(3):
        rgb[k] = (int(0), int(((k + 1) * 45)), int(0))
        rgb.write()
        time.sleep_ms(1)
        time.sleep_ms(500)
    for k in range(3):
        rgb[k] = (int(0), int(0), int(((k + 1) * 85)))
        rgb.write()
        time.sleep_ms(1)
        time.sleep_ms(500)
mPython 图形编程


14、P24灯环4色流水钟摆灯
#MicroPython动手做(13)——掌控板之RGB三色灯
#P24灯环4色流水钟摆灯
#MicroPython动手做(13)——掌控板之RGB三色灯
#P24灯环4色流水钟摆灯

from mpython import *
import neopixel
import time

my_rgb = neopixel.NeoPixel(Pin(Pin.P8), n=24, bpp=3, timing=1)


while True:
    for i in range(23, -1, -1):
        my_rgb = (30, 30, 30)
        my_rgb.write()
        time.sleep_ms(30)
    my_rgb.fill( (0, 0, 0) )
    my_rgb.write()
    for i in range(24):
        my_rgb = (0, 30, 0)
        my_rgb.write()
        time.sleep_ms(30)
    my_rgb.fill( (0, 0, 0) )
    my_rgb.write()
    for i in range(23, -1, -1):
        my_rgb = (50, 0, 0)
        my_rgb.write()
        time.sleep_ms(30)
    my_rgb.fill( (0, 0, 0) )
    my_rgb.write()
    for i in range(24):
        my_rgb = (0, 0, 180)
        my_rgb.write()
        time.sleep_ms(30)
    my_rgb.fill( (0, 0, 0) )
    my_rgb.write()
mPython X 图形编程

15、声控RGB灯环
通过声音传感器检测到音乐声音的大小,并将其转换为亮灯的数量。
#MicroPython动手做(13)——掌控板之RGB三色灯
#声控RGB灯环

from mpython import *
import neopixel

my_rgb = neopixel.NeoPixel(Pin(Pin.P8), n=24, bpp=3, timing=1)

def upRange(start, stop, step):
    while start <= stop:
        yield start
        start += abs(step)

def downRange(start, stop, step):
    while start >= stop:
        yield start
        start -= abs(step)


while True:
    oled.fill(0)
    oled.DispChar("声音大小", 0, 0, 1)
    oled.DispChar((str(sound.read())), 0, 16, 1)
    oled.show()
    sheng = sound.read() // 140
    if sheng == 0:
        my_rgb.fill( (0, 0, 0) )
        my_rgb.write()
    else:
        for i in (0 <= int(sheng)) and upRange(0, int(sheng), 1) or downRange(0, int(sheng), 1):
            my_rgb = (0, 50, 0)
            my_rgb.write()
mPython X 图形编程文章来源:https://www.toymoban.com/news/detail-617492.html

 文章来源地址https://www.toymoban.com/news/detail-617492.html
到了这里,关于【雕爷学编程】MicroPython动手做(13)——掌控板之RGB三色灯3的文章就介绍完了。如果您还想了解更多内容,请在右上角搜索TOY模板网以前的文章或继续浏览下面的相关文章,希望大家以后多多支持TOY模板网!


