调用接口
一、 概述
1、 简介
在我们实现了权限控制功能后,那么我们就在也不用担心机器人话太多,同时,平时又没时间,电脑又不在身边,而无法控制机器人了。那么,我们实现了权限的管理就好说了。然后,又出现一个问题了,我们应该如何利用这个权限系统,来帮助我们管理机器人呢?
这个大家马上就会知晓了,我会从如何控制智能聊天,以及控制戳一戳,再接入一些功能接口。来讲述,如何使用这个权限功能。
2、 接口
其次,我们还需要了解一下,什么是接口呢?
应用程序接口(API,Application Programming Interface)是基于编程语言构建的结构,使开发人员更容易地创建复杂的功能。它们抽象了复杂的代码,并提供一些简单的接口规则直接使用。
举一个例子:想想您的房子、公寓或其他住宅的供电方式,如果您想在您的房子里用电,只要把电器的插头插入插座就可以,而不是直接把它连接到电线上——这样做非常低效,而且对于不是电工的人会是困难和危险的。
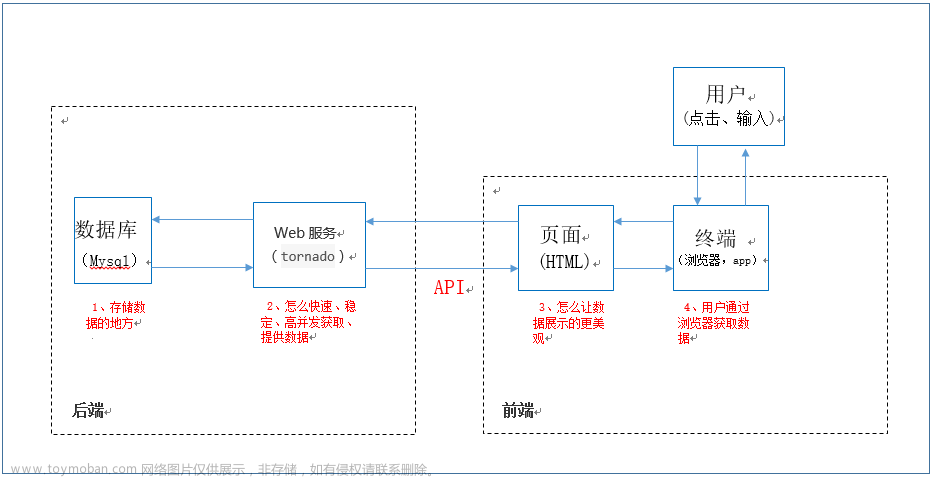
同时,可以根据这张图来理解API的功能,其就是可以给客户端来提供数据的。

我们访问一些特定的API就可以得到我们想要的数据,这有一些较为好用的API提供方:

下面,我将来告诉大家,API的使用方法
二、 接入权限系统
在调用API之前,我们先来学习一下,如何给戳一戳和智能聊天接入我们的权限管理系统,私聊的权限这里就不做展示了。大家可以根据这几次的文章,开发一个私聊的权限。
1、 智能聊天
我是这样设置的,为了防止机器人回的消息过多,只有艾特机器人的消息,它才会回,当然这是基于权限的基础上了,那么,如何接入呢?
请大家看代码:
if _.get("message_type") == "group" and "[CQ:at,qq=2786631176]" in _["raw_message"]:  # 即使用in来判断其是否为艾特机器人的消息
    # 制作群聊消息
    db = current_app.config["db"]
    session = db.session
    group = session.query(Group).filter(db.and_(Group.qqId == _["group_id"], Group.isDetect)).first() # 同时这个群要支持机器人聊天,才会进入下一步
    if group and group.group2auth.chat:  # 如果允许聊天的话,就在群内开启聊天功能,这个是基于if的权限管理系统
        asyncio.run(GroupChatMes.handle_group(_))

# GroupChatMes.handle_group的内容
async def handle_group(resp):
    message = resp["raw_message"].replace("[CQ:at,qq=2786631176]", "")  # 获取发送过来的消息
    gid = resp["group_id"]  # 获取发送消息的群号
    # 处理群聊信息
    if message.strip() == "":
        await send(gid, "艾特我干啥?又不发消息,一巴掌呼死你![CQ:face,id=86][CQ:face,id=12]", "group")
        else:
            # 调用接口,来获取回复,同时这里使用了异步请求
            async with httpx.AsyncClient() as client:
                params = {
                    "key": "free",
                    "appid": 0,
                    "msg": message,
                }
                resp = await client.get("http://api.qingyunke.com/api.php", params=params)
                _ = resp.json()
            ret = _.get("content", "获取回复失败")
            await send(gid, ret, "group")  # 发送群组消息
2、 戳一戳
戳一戳,就回复,这个功能是有点烦人的,如果是讨厌这个机器人的话,那当然就需要进行权限的控制啦!废话不多说,直接上代码
if _.get("sub_type") == "poke":
    # 如果事件类型为戳一戳
    asyncio.run(GroupAndPri.click_event(_))

# GroupAndPri.click_event的内容
async def click_event(resp):
    uid = resp["user_id"]
    tid = resp["target_id"]
    if str(tid) != "3500515050" and str(tid) != "2786631176":  # 如果不是这两个账号的戳一戳,则不管
        return
    try:
        gid = resp["group_id"]
        db = current_app.config["db"]
        session = db.session
        group = session.query(Group).filter(db.and_(Group.qqId == gid, Group.isDetect)).first()  # 同时这个需要被检测到,如果为群戳戳的话
    except KeyError as e:
        gid = None
        group = None

    # 处理戳一戳的消息
    info = choice(current_app.config.get("CLICK_MES"))  # 获取戳一戳需要回复的的信息
    try:
        info = info % uid
    except Exception as e:
        if gid:  # 说明其为群戳戳
            info = f"[CQ:at,qq={uid}]" + info
    if gid is None:  # 其为私聊信息
        await send(uid, info, "private")  # 发送信息,这个函数在上一篇文章中实现过
    elif gid and group.group2auth.click:  # 如果允许发送戳一戳的内容的话,就发送,反之,什么都不做,进行权限的判断
        await send(gid, info, "group")
3、 新成员
对于新成员的欢迎也是如此,也需要进行权限的管理
if _.get("notice_type") == "group_increase":
    # 有新成员加入
    db = current_app.config["db"]
    session = db.session
    group = session.query(Group).filter(db.and_(Group.qqId == _["group_id"], Group.isDetect)).first()
    if group and group.group2auth.welcome:  # 开启欢迎的功能的话,就继续,否则返回
        asyncio.run(GroupChatMes.group_increase(_))  # 发送欢迎语
# GroupChatMes.group_increase的内容
async def group_increase(resp):
    uid = resp["user_id"]  # 获取加入者的qq
    gid = resp["group_id"]  # 获取群号
    # 处理有新成员加入的情况
    welcome_group = current_app.config.get("WELCOME_MES")  # 从配置文件中获取欢迎的语句
    msg = welcome_group.get(str(gid),
                            welcome_group["default"]) % uid  # welcome_group的键是qq群号,值是欢迎语
    await send(gid, msg, "group")  # 发送信息
三、 调用接口
1、 查找接口
上面说了那么多,还没说到今天的重点,今天的重点就是实现机器人的主要功能,给群聊增加一些小功能,这些小功能的实现,是通过调用接口,或者自己编程实现的?那么,对比这两者,你更倾向于哪一种呢?我想是调用被人封装好的接口吧,简单又方便,相对来说也较为稳定。
这里推荐一些提供质量较好的接口的网站吧!
- https://www.yuanxiapi.cn/
- http://www.alapi.cn/api/list/
- https://api.vvhan.com/
- http://bjb.yunwj.top/php/API/html.html
- …
如果还有其他较好用的接口,可以在评论区下方留言一起分享哦!
好,接口在哪找我们知道了!那怎么用呢?
2、 调用接口
其实调用方法非常简单,就是使用网络请求工具,对这个地址发送请求,我们就可以得到这个接口的内容了!
# 比如,我对http://bjb.yunwj.top/php/tp/lj.php这个接口发送请求
#!/usr/bin/python3
# -*- coding: UTF-8 -*-
__author__ = "A.L.Kun"
__file__ = "handle.py"
__time__ = "2022/9/9 19:53"

import httpx
import re

resp = httpx.get("http://bjb.yunwj.top/php/tp/lj.php")
data = re.findall('"tp":"(?P<url>.*?)"', resp.text)[0]
print(data)
3、 接入机器人
在知道如何调用这个接口后,我们就可以尝试的把这个接入我们的机器人中去了!
首先,我们需要做一个消息分发的功能
    # 群聊小心分发的方式为:
    if _.get("message_type") == "group":
        # 获取群命令
        db = current_app.config["db"]
        session = db.session
        group = session.query(Group).filter(db.and_(Group.qqId == _["group_id"], Group.isDetect)).first()
        if not group:
            return
        message = _.get("raw_message")
        if message.startswith("/"):  # 如果这个函数是以/开头的话,说明其为命令,可能为管理员命令,也可能是普通命令,进行进一步分判别
            asyncio.run(Command.command(_, "group", group.group2auth.smallFunction))  # 同时传入这个群是否开启了拓展功能,方便后面的判断


    async def command(resp, ty, isornot=None):  # 对命令进行分类,如果这个消息是/开头的话,就直接进入到这个函数中,同时/开头的消息,还有管理员信息,故需要进行一个群区分
        """
        对所有命令进行处理
        :param resp: post的数据
        :param ty: 消息来自哪里
        :param isornot: 当为群消息时,要传入是否支持拓展功能
        :return:
        """
        uid = resp["sender"]["user_id"]  # 获取发信息的好友qq号
        message = resp["raw_message"]  # 获取发送过来的消息
        if ty == "group":
            gid = resp["group_id"]  # 获取群号
        else:
            gid = None
        if message.startswith("/admin:"):
            """管理系统的命令"""
            if str(uid) in current_app.config["SUPER_USER"] and ty == "private":
                await Command.super_command(uid, message)
            elif ty == "group" and resp["sender"]["role"] in ["owner", "admin"]:  # 判断运行这个命令的是否为群管理员
                # 说明这个是群管理员的修改
                await Command.admin_command(uid, gid, message)
            else:
                await Sender.send(uid if ty == "private" else gid, "权限不足!", ty)
        else:
            if isornot or ty == "private":  # 查看是否开启这个功能,是私聊消息,或者开启了拓展功能
                """管理拓展功能的命令"""
                await Command.com_command(uid if gid is None else gid, message, ty, resp)
            else:
                await Sender.send(resp["group_id"], "本群没有开启拓展功能哦!请联系管理员开启这个功能!", "group")
进行分发完后,我们就需要对命令进行解析了:文章来源:https://www.toymoban.com/news/detail-624270.html
async def com_command(id, message, ty, resp):  # 处理一般的命令
    """
	id : uid / gid
	messge : 命令消息
	ty: 这个消息是从哪里来的
	resp: 同时把响应的结果也传入
	"""
    uid = resp["sender"]["user_id"]
    base = "[CQ:at,qq=" + str(uid) + "]" if ty == 'group' else ""
    command = re.findall(r"/(.*)", message.split()[0])[0]  # 先获取一个类似函数的命令,作为启动
    if command == "bing":
        msg = await ConnectApi.get_bing()
        await Sender.send(id, msg, ty)
    elif command == "天气":
        if len(message.split()) != 2:
            await Sender.send(id, "输入格式错误,请根据帮助文档输入!", ty)
            return
        city = message.split()[1]
        msg = await ConnectApi.weather(city)
        await Sender.send(id, msg, ty)
    elif command == "send":  # 提建议给开发者
        if len(message.split()) < 2:
            await Sender.send(id, "输入格式错误,请根据帮助文档输入!", ty)
            return
        content = "\n".join(message.split()[1:]) + f"\n——{uid}"
        await Sender.send(current_app.config["ADMIN"], content, "private")
        await Sender.send(id, base + "收到,谢谢您的建议![CQ:face,id=63][CQ:face,id=63][CQ:face,id=63]", ty)
    elif command == "简报": # 获取每日简报
        msg = await ConnectApi.brief()
        await Sender.send(id, msg, ty)

# 实现的函数的代码
class ConnectApi:
    """连接接口,创建拓展功能"""

    @staticmethod
    async def get_bing():
        """
        获取bing的每日一图
        :return:
        """
        return "[CQ:image,file=https://www.yuanxiapi.cn/api/bing/,cache=0]"  # 这个网站就是一个接口

    @staticmethod
    async def weather(city):
        """天气数据获取"""
        async with httpx.AsyncClient(headers={
            "user-agent": UserAgent().random,
        }) as client:
            resp = await client.get("https://api.wpbom.com/api/weather.php?city=%s" % city)  # 向接口中传入城市信息
            data = resp.json()  # 获取返回的JSON数据
            try:
                if data["status"] == 1000:
                    # 获取成功,对数据进行解析
                    city = data["data"]["city"]
                    wea = data["data"]["forecast"][0]
                    high = re.findall(r".*?(?P<tem>\d.*)", wea["high"])[0]
                    low = re.findall(r".*?(?P<tem>\d.*)", wea["low"])[0]
                    type_ = wea["type"]
                    ganmao = data["data"]["ganmao"]
                    ret = f"{city}今日天气{type_}:\n{low}~{high}\n温馨提示:{ganmao}"
                else:
                    raise ValueError
            except Exception as e:
                # 接口获取失败
                ret = f"{city}天气数据获取失败!"
            return ret

    @staticmethod
    async def brief():
        # 获取每日简报
        async with httpx.AsyncClient() as client:
            resp = await client.get("http://bjb.yunwj.top/php/tp/lj.php")  # 同时,对于异步任务,记得要挂起
            url = re.findall('"tp":"(?P<url>.*?)"', resp.text)[0]
            return f"[CQ:image,file={url},cache=0]"  # 使用cq码发送我们的图片信息
好了,今天的文章就到这里结束了,不知道您学到了多少呢?代码,在我完成全部的功能之后,会在GitHub开源出来,所以大家不用担心代码的问题。现在只需要理解这些功能的实现原理。当然,能根据自己的理解,写一个属于自己的机器人就更好了!文章来源地址https://www.toymoban.com/news/detail-624270.html
到了这里,关于go-cqhttp调用接口的文章就介绍完了。如果您还想了解更多内容,请在右上角搜索TOY模板网以前的文章或继续浏览下面的相关文章,希望大家以后多多支持TOY模板网!


