回到目录
一般用于去存储 Pod 中应用所需的一些配置信息,或者环境变量,将配置于 Pod 分开,避免应为修改配置导致还需要重新构建 镜像与容器。
1 创建ConfigMap
#使用 kubectl create configmap -h 查看示例,构建 configmap 对象
Examples:
  # Create a new config map named my-config based on folder bar
  kubectl create configmap my-config --from-file=path/to/bar

  # Create a new config map named my-config with specified keys instead of file basenames on disk
  kubectl create configmap my-config --from-file=key1=/path/to/bar/file1.txt --from-file=key2=/path/to/bar/file2.txt

  # Create a new config map named my-config with key1=config1 and key2=config2
  kubectl create configmap my-config --from-literal=key1=config1 --from-literal=key2=config2

  # Create a new config map named my-config from the key=value pairs in the file
  kubectl create configmap my-config --from-file=path/to/bar

  # Create a new config map named my-config from an env file
  kubectl create configmap my-config --from-env-file=path/to/foo.env --from-env-file=path/to/bar.env
1.1 将指定目录下所有文件加载到配置文件中
# Create a new config map named my-config based on folder bar
# kubectl create configmap my-config --from-file=path/to/bar
#example:
#在test目录下有两个配置文件db.properties redis.properties

#1.创建configmap,名字为test-cm,从test目录下加载
[root@k8s-master1 configmap]# kubectl create cm test-cm --from-file=test/
configmap/test-cm created

#2.查看configmap
[root@k8s-master1 configmap]# kubectl get cm
NAME               DATA   AGE
kube-root-ca.crt   1      5d9h #k8s默认的认证
test-cm            2      7s	 #我们创建的

#3.查看test-cm的详细信息
[root@k8s-master1 configmap]# kubectl describe cm test-cm
#内容如下:
Name:         test-cm
Namespace:    default
Labels:       <none>
Annotations:  <none>

Data
====
db.properties:   #key
----
username: root
password: 1234

redis.properties:
----
port: 6379


BinaryData
====

Events:  <none>
1.2 指定一个或多个文件和key
# Create a new config map named my-config with specified keys instead of file basenames on disk
#  kubectl create configmap my-config --from-file=key1=/path/to/bar/file1.txt --from-file=key2=/path/to/bar/file2.txt

#指定一个或多个文件,不加key时以文件名作为key

#example:

#创建configmap,名称为testfile-cm,从指定的test目录下的db.properties加载
[root@k8s-master1 configmap]# kubectl create cm testfile-cm --from-file=test/db.properties
configmap/testfile-cm created

#查看configmap
[root@k8s-master1 configmap]# kubectl get cm
NAME               DATA   AGE
kube-root-ca.crt   1      5d10h
testfile-cm        1      5s

#查看详情
[root@k8s-master1 configmap]# kubectl describe cm testfile-cm
Name:         testfile-cm
Namespace:    default
Labels:       <none>
Annotations:  <none>

Data
====
db.properties: #不指定key,以文件名为key,如果指定则以具体指定作为key
----
username: root
password: 1234


BinaryData
====

Events:  <none>
1.3 命令上手动添加key-value
# Create a new config map named my-config with key1=config1 and key2=config2
#kubectl create configmap my-config --from-literal=key1=config1 --from-literal=key2=config2

#直接写入key和value

#example:

#创建configmap,名称为test-cm,手动添加key:user,value:root;key:password,value:1234
[root@k8s-master1 configmap]# kubectl create cm test-cm --from-literal=user=root --from-literal=password=1234
configmap/test-cm created
[root@k8s-master1 configmap]# kubectl get cm
NAME               DATA   AGE
kube-root-ca.crt   1      5d10h
test-cm            2      7s
[root@k8s-master1 configmap]# kubectl describe cm test-cm
Name:         test-cm
Namespace:    default
Labels:       <none>
Annotations:  <none>

Data
====
password: #key
----
1234   #value
user: #key
----
root  #value

BinaryData
====

Events:  <none>
2 configmap的使用
在pod中
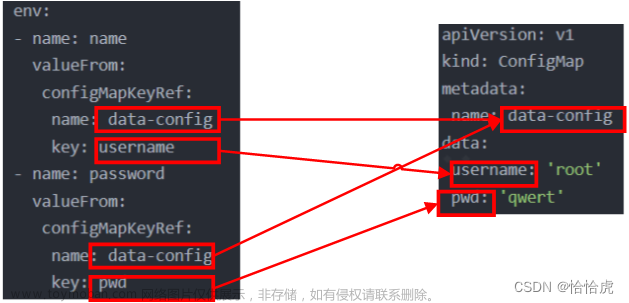
将configmap中的数据设置为容器的环境变量
将ConfigMap中的数据设置为命令行参数
使用Volume将ConfigMap作为文件或目录挂载
编写代码在 Pod 中运行,使用 Kubernetes API 来读取 ConfigMap
将configmap挂载到容器中,configmap变化,容器自动更新文章来源:https://www.toymoban.com/news/detail-624444.html
而 写入环境变量不会自动更新文章来源地址https://www.toymoban.com/news/detail-624444.html
2.1 配置到容器的环境变量中
# test-pod-configmap.yaml
apiVersion: v1
kind: Pod
metadata:
 name: test-pod-configmap
spec:
 containers:
  - name: test-busybox
    image: busybox
    imagePullPolicy: IfNotPresent
    args:
    - sleep
    - "86400"
    env:                  # env,配置容器环境变量
    - name: KEY1		  # 容器环境变量key为key1
      valueFrom:		  # value内容
       configMapKeyRef:	  # 通过configmap的key映射
        name: my-config	  # configmap的名称
        key: key1		  # configmap中的key
    - name: KEY2
      valueFrom:
       configMapKeyRef:
        name: my-config
        key: key2
2.2 设置为命令行参数
# test-pod-configmap-cmd
apiVersion: v1
kind: Pod
metadata:
 name: test-pod-configmap-cmd
spec:
 containers:
  - name: test-busybox
    image: busybox
    imagePullPolicy: IfNotPresent
    command: [ "/bin/sh","-c","echo $(KEY1) $(KEY2)"]
    env:
    - name: KEY1
      valueFrom:
       configMapKeyRef:
        name: my-config
        key: key1
    - name: KEY2
      valueFrom:
       configMapKeyRef:
        name: my-config
        key: key2
 restartPolicy: Never
2.3 将configmap挂载到容器中
# test-pod-projected-configmap-volume.yaml
apiVersion: v1
kind: Pod
metadata:
 name: test-pod-projected-configmap-volume
spec:
 containers:
 - name: test-pod-busybox
   image: busybox
   imagePullPolicy: IfNotPresent
   args:
   - sleep
   - "86400"
   volumeMounts:                        # 挂载
   - name: config-volume				# 挂载的数据卷名
     mountPath: "/projected-volume"		# 挂载到哪的路径
     readOnly: true						# 只读权限
 volumes:								# 数据卷
 - name: config-volume					# 数据卷名称
   projected:
    sources:
    - configMap:						# 数据卷为configmap
       name: my-config					# 数据卷名
到了这里,关于k8s概念-ConfigMap的文章就介绍完了。如果您还想了解更多内容,请在右上角搜索TOY模板网以前的文章或继续浏览下面的相关文章,希望大家以后多多支持TOY模板网!


