其实视觉检测的项目我也搞了一段时间了,只不过自我感觉不精,基本就是调库侠加拼接侠,会把各种例程拼来拼去的。
今天研究的是眨眼检测,开始用的是比较常见的opencv dlib的库,不过发现逼格不够高,有三个缺点:一是模型要64m,二是点数只有64,三是对侧脸的检测效果不好。特别是第三点很影响实际效果,所以为啥不用高大上的mediapipe呢?
很快找到了一个外国大佬的项目,在此
GITHUB-mediapipe眨眼检测
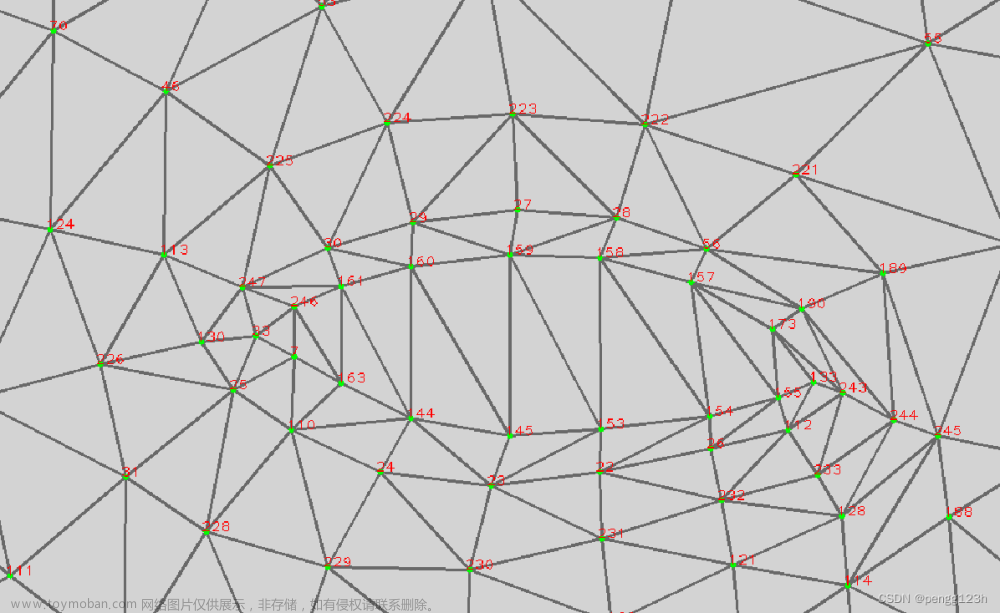
拿下来就直接可以用,很好,meidapipe的人脸mask检测有400多个点,这个库里给出了人脸眉毛合嘴巴的具体点数,省了很多事儿了,不过实际跑下来效果过不太好,原因很简单,**可能我眼睛太小了。。。**而且头部高低不同眼睛的参数也不同,为了适合更多人合更多姿态,我加了个平均参数,就是取前5次的平均值再来跟本次比较,这样一来就准确多啦!
不废话,上源码:文章来源:https://www.toymoban.com/news/detail-625831.html
from numpy import *
import cv2 as cv
import mediapipe as mp
import time
import utils, math
import numpy as np
# variables
frame_counter =0
CEF_COUNTER =0
TOTAL_BLINKS =0
# constants
THRESHOLD=0.6    #关键参数1,闭眼与睁眼的阈值调整,越大越不容易检测
CLOSED_EYES_FRAME =1    #关键参数2,闭眼的帧数,越大判定的时间越久
FONTS =cv.FONT_HERSHEY_COMPLEX

# face bounder indices
FACE_OVAL=[ 10, 338, 297, 332, 284, 251, 389, 356, 454, 323, 361, 288, 397, 365, 379, 378, 400, 377, 152, 148, 176, 149, 150, 136, 172, 58, 132, 93, 234, 127, 162, 21, 54, 103,67, 109]

# lips indices for Landmarks
LIPS=[ 61, 146, 91, 181, 84, 17, 314, 405, 321, 375,291, 308, 324, 318, 402, 317, 14, 87, 178, 88, 95,185, 40, 39, 37,0 ,267 ,269 ,270 ,409, 415, 310, 311, 312, 13, 82, 81, 42, 183, 78 ]
LOWER_LIPS =[61, 146, 91, 181, 84, 17, 314, 405, 321, 375, 291, 308, 324, 318, 402, 317, 14, 87, 178, 88, 95]
UPPER_LIPS=[ 185, 40, 39, 37,0 ,267 ,269 ,270 ,409, 415, 310, 311, 312, 13, 82, 81, 42, 183, 78]
# Left eyes indices
LEFT_EYE =[ 362, 382, 381, 380, 374, 373, 390, 249, 263, 466, 388, 387, 386, 385,384, 398 ]
LEFT_EYEBROW =[ 336, 296, 334, 293, 300, 276, 283, 282, 295, 285 ]

# right eyes indices
RIGHT_EYE=[ 33, 7, 163, 144, 145, 153, 154, 155, 133, 173, 157, 158, 159, 160, 161 , 246 ]
RIGHT_EYEBROW=[ 70, 63, 105, 66, 107, 55, 65, 52, 53, 46 ]

map_face_mesh = mp.solutions.face_mesh
# camera object
camera = cv.VideoCapture(0)
# landmark detection function
def landmarksDetection(img, results, draw=False):
    img_height, img_width= img.shape[:2]
    # list[(x,y), (x,y)....]
    mesh_coord = [(int(point.x * img_width), int(point.y * img_height)) for point in results.multi_face_landmarks[0].landmark]
    if draw :
        [cv.circle(img, p, 2, (0,255,0), -1) for p in mesh_coord]

    # returning the list of tuples for each landmarks
    return mesh_coord

# Euclaidean distance
def euclaideanDistance(point, point1):
    x, y = point
    x1, y1 = point1
    distance = math.sqrt((x1 - x)**2 + (y1 - y)**2)
    return distance

# Blinking Ratio
def blinkRatio(img, landmarks, right_indices, left_indices):
    # Right eyes
    # horizontal line
    rh_right = landmarks[right_indices[0]]
    rh_left = landmarks[right_indices[8]]
    # vertical line
    rv_top = landmarks[right_indices[12]]
    rv_bottom = landmarks[right_indices[4]]
    # draw lines on right eyes
    #cv.line(img, rh_right, rh_left, utils.GREEN, 2)
    #cv.line(img, rv_top, rv_bottom, utils.WHITE, 2)

    # LEFT_EYE
    # horizontal line
    lh_right = landmarks[left_indices[0]]
    lh_left = landmarks[left_indices[8]]

    # vertical line
    lv_top = landmarks[left_indices[12]]
    lv_bottom = landmarks[left_indices[4]]

    rhDistance = euclaideanDistance(rh_right, rh_left)
    rvDistance = euclaideanDistance(rv_top, rv_bottom)

    lvDistance = euclaideanDistance(lv_top, lv_bottom)
    lhDistance = euclaideanDistance(lh_right, lh_left)

    reRatio = rhDistance/rvDistance
    leRatio = lhDistance/lvDistance

    ratio = (reRatio+leRatio)/2
    return ratio


ratiolist=[4,4,4,4,4]
with map_face_mesh.FaceMesh(min_detection_confidence =0.5, min_tracking_confidence=0.5) as face_mesh:

    # starting time here
    start_time = time.time()
    # starting Video loop here.
    while True:
        frame_counter +=1 # frame counter
        ret, frame = camera.read() # getting frame from camera
        if not ret:
            break # no more frames break
        #  resizing frame

        frame = cv.resize(frame, None, fx=1.5, fy=1.5, interpolation=cv.INTER_CUBIC)
        frame_height, frame_width= frame.shape[:2]
        rgb_frame = cv.cvtColor(frame, cv.COLOR_RGB2BGR)
        results  = face_mesh.process(rgb_frame)
        if results.multi_face_landmarks:
            mesh_coords = landmarksDetection(frame, results, False)
            ratio = blinkRatio(frame, mesh_coords, RIGHT_EYE, LEFT_EYE)
            # cv.putText(frame, f'ratio {ratio}', (100, 100), FONTS, 1.0, utils.GREEN, 2)
            utils.colorBackgroundText(frame,  f'Ratio : {round(ratio,2)}', FONTS, 0.7, (30,100),2, utils.PINK, utils.YELLOW)
            ave=mean(ratiolist)
            if ratio >ave+THRESHOLD:
                CEF_COUNTER +=1
                # cv.putText(frame, 'Blink', (200, 50), FONTS, 1.3, utils.PINK, 2)
                utils.colorBackgroundText(frame,  f'Blink', FONTS, 1.7, (int(frame_height/2), 100), 2, utils.YELLOW, pad_x=6, pad_y=6, )
            else:
                if CEF_COUNTER>CLOSED_EYES_FRAME:
                    TOTAL_BLINKS +=1
                    CEF_COUNTER =0
            ratiolist.pop(0)
            ratiolist.append(ratio)
            # cv.putText(frame, f'Total Blinks: {TOTAL_BLINKS}', (100, 150), FONTS, 0.6, utils.GREEN, 2)
            utils.colorBackgroundText(frame,  f'Total Blinks: {TOTAL_BLINKS}', FONTS, 0.7, (30,150),2)

            #cv.polylines(frame,  [np.array([mesh_coords[p] for p in LEFT_EYE ], dtype=np.int32)], True, utils.GREEN, 1, cv.LINE_AA)
            #cv.polylines(frame,  [np.array([mesh_coords[p] for p in RIGHT_EYE ], dtype=np.int32)], True, utils.GREEN, 1, cv.LINE_AA)


        # calculating  frame per seconds FPS
        end_time = time.time()-start_time
        fps = frame_counter/end_time

        frame =utils.textWithBackground(frame,f'FPS: {round(fps,1)}',FONTS, 1.0, (30, 50), bgOpacity=0.9, textThickness=2)
        # writing image for thumbnail drawing shape
        # cv.imwrite(f'img/frame_{frame_counter}.png', frame)
        cv.imshow('frame', frame)
        key = cv.waitKey(2)
        if key==ord('q') or key ==ord('Q'):
            break
    cv.destroyAllWindows()
    camera.release()
反正也没人看,偷偷加一个头部三轴姿态的检测吧,巨好用哦!
github mediapipe 头部三轴姿态检测文章来源地址https://www.toymoban.com/news/detail-625831.html
import math

import cv2
import mediapipe as mp
import numpy as np

mp_face_mesh = mp.solutions.face_mesh
face_mesh = mp_face_mesh.FaceMesh(min_detection_confidence=0.5,
                                  min_tracking_confidence=0.5)
cap = cv2.VideoCapture(0)


def rotation_matrix_to_angles(rotation_matrix):
    """
    Calculate Euler angles from rotation matrix.
    :param rotation_matrix: A 3*3 matrix with the following structure
    [Cosz*Cosy  Cosz*Siny*Sinx - Sinz*Cosx  Cosz*Siny*Cosx + Sinz*Sinx]
    [Sinz*Cosy  Sinz*Siny*Sinx + Sinz*Cosx  Sinz*Siny*Cosx - Cosz*Sinx]
    [  -Siny             CosySinx                   Cosy*Cosx         ]
    :return: Angles in degrees for each axis
    """
    x = math.atan2(rotation_matrix[2, 1], rotation_matrix[2, 2])
    y = math.atan2(-rotation_matrix[2, 0], math.sqrt(rotation_matrix[0, 0] ** 2 +
                                                     rotation_matrix[1, 0] ** 2))
    z = math.atan2(rotation_matrix[1, 0], rotation_matrix[0, 0])
    return np.array([x, y, z]) * 180. / math.pi


while cap.isOpened():
    success, image = cap.read()

    # Convert the color space from BGR to RGB and get Mediapipe results
    image = cv2.cvtColor(image, cv2.COLOR_BGR2RGB)
    results = face_mesh.process(image)

    # Convert the color space from RGB to BGR to display well with Opencv
    image = cv2.cvtColor(image, cv2.COLOR_RGB2BGR)

    face_coordination_in_real_world = np.array([
        [285, 528, 200],
        [285, 371, 152],
        [197, 574, 128],
        [173, 425, 108],
        [360, 574, 128],
        [391, 425, 108]
    ], dtype=np.float64)

    h, w, _ = image.shape
    face_coordination_in_image = []

    if results.multi_face_landmarks:
        for face_landmarks in results.multi_face_landmarks:
            for idx, lm in enumerate(face_landmarks.landmark):
                if idx in [1, 9, 57, 130, 287, 359]:
                    x, y = int(lm.x * w), int(lm.y * h)
                    face_coordination_in_image.append([x, y])

            face_coordination_in_image = np.array(face_coordination_in_image,
                                                  dtype=np.float64)

            # The camera matrix
            focal_length = 1 * w
            cam_matrix = np.array([[focal_length, 0, w / 2],
                                   [0, focal_length, h / 2],
                                   [0, 0, 1]])

            # The Distance Matrix
            dist_matrix = np.zeros((4, 1), dtype=np.float64)

            # Use solvePnP function to get rotation vector
            success, rotation_vec, transition_vec = cv2.solvePnP(
                face_coordination_in_real_world, face_coordination_in_image,
                cam_matrix, dist_matrix)

            # Use Rodrigues function to convert rotation vector to matrix
            rotation_matrix, jacobian = cv2.Rodrigues(rotation_vec)

            result = rotation_matrix_to_angles(rotation_matrix)
            for i, info in enumerate(zip(('pitch', 'yaw', 'roll'), result)):
                k, v = info
                text = f'{k}: {int(v)}'
                cv2.putText(image, text, (20, i*30 + 20),
                            cv2.FONT_HERSHEY_SIMPLEX, 0.7, (200, 0, 200), 2)


    cv2.imshow('Head Pose Angles', image)

    if cv2.waitKey(5) & 0xFF == 27:
        break

cap.release()
到了这里,关于mediapipe 眨眼检测、头部三轴姿态检测(改进版)的文章就介绍完了。如果您还想了解更多内容,请在右上角搜索TOY模板网以前的文章或继续浏览下面的相关文章,希望大家以后多多支持TOY模板网!


