【Tools】VSCode软件设置头文件路径的方法

这篇具有很好参考价值的文章主要介绍了【Tools】VSCode软件设置头文件路径的方法。希望对大家有所帮助。如果存在错误或未考虑完全的地方,请大家不吝赐教,您也可以点击"举报违法"按钮提交疑问。

00. 目录

01. 问题描述

Visual Studio Code在添加自定义头文件的时候遇到错误“fatal error: xxx.h: No such file or directory”。

02. 问题分析

我用 VSCode 来 Coding,这个编辑器需要自己配置头文件路径,就是自动建立一个 c_cpp_properties.json 文件来管理头文件路径,然后需要用哪些库就手动加上即可。

03. 问题解决

3.1 按F1启动指令输入框,输入 C/C++,选择第一项 Edit Configuration:
vscode路径设置,Tools,vscode,ide,编辑器

3.2 会自动生成一个 Json 文件
vscode路径设置,Tools,vscode,ide,编辑器

3.3 添加头文件路径

我们只需要再红框的 IncludePath 内加上需要的头文件路径即可,比如我的工程:

Windows平台如下
vscode路径设置,Tools,vscode,ide,编辑器

Linux平台如下
vscode路径设置,Tools,vscode,ide,编辑器

所以使用#include "xxx.h" 的時候Visual studio code不会出现红线警示,因为这个时候intellisense已经知道这个路径了,但是编译器还不知道,所以编译的时候还是会报错。

04. 问题验证

05. 其它

Question Updated: I’m trying to build a c++ project on vscode using the C/C++ extension. The compiler complains about not finding header files (actually boost headers). I have included path to the root folder of boost, and Intellisense is also able to parse the header paths, but not the compiler. I checked the included header in my source is in the corresponding path in my filesystem. Is there any solution to make the compiler see the include headers?

This is my c_cpp_properties.json file:

{
    "configurations": [
        {
            "name": "Win32",
            "includePath": [
                "${workspaceFolder}/**",
                "C:/Users/zz_ro/Documents/source/boost_1_70_0"
            ],
            "defines": [
                "_DEBUG",
                "UNICODE",
                "_UNICODE"
            ],
            "windowsSdkVersion": "10.0.17763.0",
            "compilerPath": "C:/mingw/bin/g++.exe",
            "cStandard": "c11",
            "cppStandard": "c++11",
            "intelliSenseMode": "gcc-x64"
        }
    ],
    "version": 4
}

and this is my helloworld.cpp file:

#include "boost/math/constants/constants.hpp"
#include "boost/multiprecision/cpp_dec_float.hpp"
#include <iostream>
#include <limits>
int main()
{
    using boost::multiprecision::cpp_dec_float_50;
    cpp_dec_float_50 seventh = cpp_dec_float_50(1) / 7;
    std::cout.precision(std::numeric_limits<cpp_dec_float_50>::digits10);
    std::cout << seventh << std::endl;
}

And here is the compiler output:

helloworld.cpp:1:46: fatal error: boost/math/constants/constants.hpp: No such file or directory
 #include "boost/math/constants/constants.hpp"
                                              ^
compilation terminated.
The terminal process terminated with exit code: 1

If I change my tasks.json from

{
    // See https://go.microsoft.com/fwlink/?LinkId=733558
    // for the documentation about the tasks.json format
    "version": "2.0.0",
    "tasks": [
        {
            "label": "build hello world",
            "type": "shell",
            "command": "g++",
            "args": [
                "-g",
                "helloworld.cpp",
                "-o",                               
                "helloworld"                
            ],
            "group": {
                "kind": "build",
                "isDefault": true
            }
        }
    ]
}

to

{
    // See https://go.microsoft.com/fwlink/?LinkId=733558
    // for the documentation about the tasks.json format
    "version": "2.0.0",
    "tasks": [
        {
            "label": "build hello world",
            "type": "shell",
            "command": "g++",
            "args": [
                "-g",
                "-IC:\\Users\\zz_ro\\Documents\\source\\boost_1_70_0", 
                "helloworld.cpp",
                "-o",                               
                "helloworld"                
            ],
            "group": {
                "kind": "build",
                "isDefault": true
            }
        }
    ]
}

by just manually passing the include path as an argument to g++.exe and the compilation will go through. It confuses me that in the tutorial (vscode tutorial) there is no mention about manually inserting include path to g++.exe via command line parameters, where all of these are supposed to be done by modifying the includePath variable in c_cpp_property.json. Did I misunderstand the tutorial or I didn’t set the includePath value properly?

05. 附录

参考:c_cpp_properties.json和task.json的作用对象

参考:Visual studio code 添加自定义头文件路径文章来源地址https://www.toymoban.com/news/detail-628854.html

到了这里,关于【Tools】VSCode软件设置头文件路径的方法的文章就介绍完了。如果您还想了解更多内容,请在右上角搜索TOY模板网以前的文章或继续浏览下面的相关文章,希望大家以后多多支持TOY模板网!

本文来自互联网用户投稿,该文观点仅代表作者本人,不代表本站立场。本站仅提供信息存储空间服务,不拥有所有权,不承担相关法律责任。如若转载,请注明出处: 如若内容造成侵权/违法违规/事实不符,请点击违法举报进行投诉反馈,一经查实,立即删除!

领支付宝红包 赞助服务器费用

相关文章

  • 【软件安装&环境配置】vscode 安装界面没有出现安装路径的选择 的解决,以及vscode的删除的问题

    由于vscode 没有删除干净,就会出现vscode 安装的时候,没有出现安装路径的界面,所以可以来到vscode的安装路径,点击 unins000.exe 文件就可以 实现将vscode 相关的文件删除, 如果是删除了整个vscode 安装下的文件(在回收站也删除的情况下),但是还没有卸载干净vscode,我的做

    2024年02月08日
    浏览(46)
  • 【VScode/VS】解决头文件路径问题

    vs 中明明包含了头文件所在路径,但是却找不到头文件 首先,将要添加的压缩包解压,放在任意一个盘里,注意,我们在代码里要添加的头文件路径是 #include tensorflow/c/c_api.h 接下来我们要添加在VS中的所有路径都是tensorflow这个的 上一级文件夹 比如 D:/include 而不是 D:/include

    2024年02月15日
    浏览(38)
  • 【软件安装&环境配置】VScode 设置运行前清屏

    在运行插件中设置 运行插件的安装参考:【软件安装环境配置】VsCode安装和配置各种环境(保姆级)-CSDN博客 找到Code-runner: Clear Previous Output,把 √ 打上即可 本文所涉及的他人内容包括但不限于文字、图片、音频、视频等,来源于各个渠道和资源,并非本文作者原创。在使

    2024年02月06日
    浏览(44)
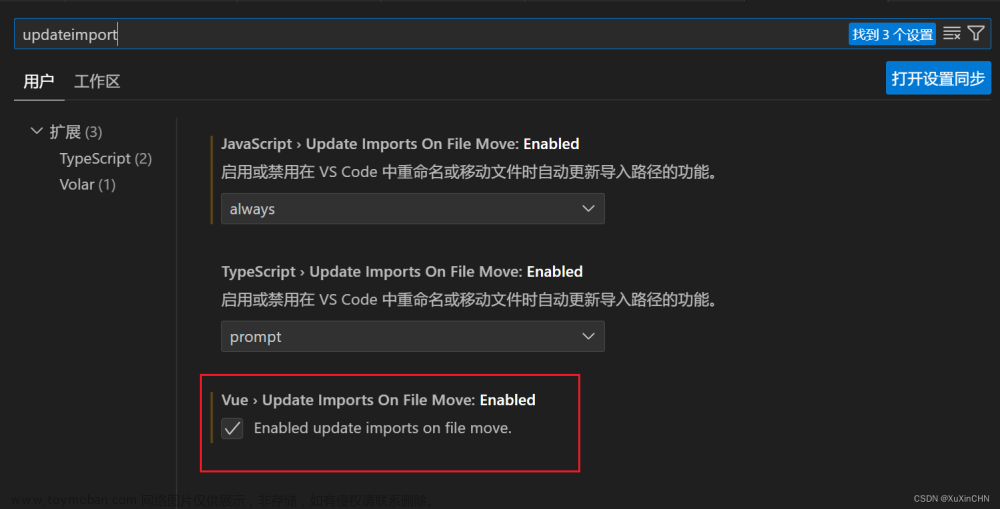
  • 使用vscode在vue项目中重命名文件选择了更新导入路径仍有部分导入路径没有更新

    背景: 将一个js文件重命名,vscode弹出是否更新导入路径,选择更新导入后,发现js文件中导入路径都自动更新,vue文件中路径都没有更新。 解决方案: 在设置中搜索updateimport,将最下面的VueUpdate Imports On File Move: Enable 将其勾选,就可以实现vue文件的重命名更新导入。经过实

    2024年02月12日
    浏览(39)
  • vscode 2023格式化vue文件设置

    2024年02月10日
    浏览(40)
  • VSCode 之 设置 settings.json 配置文件

    这篇文章主要介绍了 VSCode - settings.json 配置 , 文中通过示例代码介绍的非常详细,对大家的学习或者工作具有一定的参考学习价值 VSCode 从插件库里安装 eslint 和 prettier 两个 插件 ,也 🉑️ 实现自动格式化的设置  Ctrl + Shift + P  ( Mac : command + Shift + P ) , 或者直接按  

    2024年02月05日
    浏览(31)
  • [环境配置][vscode]vscode上ssh输入密码时候用户不是自己设置的解决方法

    今天遇到一个奇怪的问题,就是vscode去ssh用户时候怎么都显示密码不对,发现上面提示用户名提示和我设置不一样,我明明设置是abc但是显示是电脑用户名,于是去C:Usersadmin.sshconfig查看发现没有问题,这就奇怪了。于是把config改成下面格式再次连接就可以了 对照这个我改

    2024年02月11日
    浏览(26)
  • VScode import导入自己的模块文件路径错误ModuleNotFoundError: No module named ‘v0‘

    VScode的python报错 ModuleNotFoundError: No module named ‘v0’ 我的工作区文件夹打开的是server,文件相对路径是: server/v0/train_ddpg.py,其中的部分导入import代码如下,v0是上一级文件夹 from v0.cli import cli_train from v0.config import config_dict 不想修改代码,因为需要改的地方太多了,而只通过

    2024年02月04日
    浏览(22)
  • 超简单设置右键打开 vscode的方法

    这样就方便通过vscode快捷打开代码文件了,如果我们安装vscode软件时,没有进行如下选择 那么每次只能先打开vscode再通过打开文件或者拖拽文件才能实现打开的效果。 网上教程大部分都是通过直接修改注册表的方法实现此功能的,这样操作比较麻烦,我们为了实现修改注册

    2024年02月12日
    浏览(35)
  • mac vscode 命令行启动命令安装 别名设置方法

    vscode 给我们提供了一个从命令行启动并打开vscode编辑器的shell脚本, 如 在vscode中打开当前文件夹,可以执行 code . 即可。 打开vscode  使用 ctrl + shift + p 快捷键打开命令行窗口, 然后输入 shell command  然后在选择 Shell Command: Install \\\'code\\\' command in PATH 即可在terminal 终端中安装

    2024年03月25日
    浏览(36)

觉得文章有用就打赏一下文章作者

支付宝扫一扫打赏

博客赞助

微信扫一扫打赏

请作者喝杯咖啡吧~博客赞助

支付宝扫一扫领取红包,优惠每天领

二维码1

领取红包

二维码2

领红包