
准备:
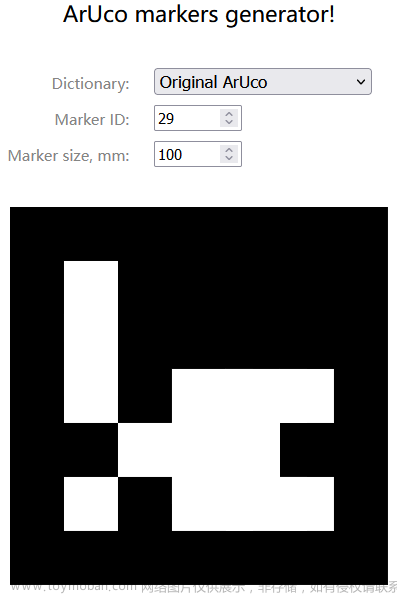
+ aruco标签6*6
+ 相机标定文件(参考我的上篇文章)
+ 摄像头文章来源:https://www.toymoban.com/news/detail-629281.html
+ 摄像头要一开始对准aruco标签才开始运行文章来源地址https://www.toymoban.com/news/detail-629281.html
import numpy as np
import time
import cv2
import cv2.aruco as aruco
import matplotlib.pyplot as plt
from mpl_toolkits.mplot3d import Axes3D
import yaml
import warnings
warnings.filterwarnings("ignore")
cv2.namedWindow('imgage', cv2.WINDOW_FREERATIO)


###加载标定参数yaml
###加载文件路径###
file_path = ("./4k标定参数.yaml")
# file_path = ("/home/pi/PycharmProjects/pythonProject/opencv_test/变焦相机标定参数.yaml")
###加载文件路径###

with open(file_path, "r") as file:
    parameter = yaml.load(file.read(), Loader=yaml.Loader)
    mtx = parameter['camera_matrix']
    dist = parameter['dist_coeff']
    camera_u = parameter['camera_u']
    camera_v = parameter['camera_v']
    mtx = np.array(mtx)
    dist = np.array(dist)


#打开摄像头
ID = 0
while (1):

    cap = cv2.VideoCapture(ID)
    ret, frame = cap.read()
    if ret == False:
        ID += 1
    elif ID >= 10:
        break
    else:
        #print(ID)
        break

font = cv2.FONT_HERSHEY_SIMPLEX  # font for displaying text (below)
flag = cap.isOpened()
cap.set(3, 3840)
cap.set(4, 2160)
cap.set(6, cv2.VideoWriter.fourcc(*'MJPG'))

plt.ion()
#画三维图

fig = plt.figure()
ax = fig.gca(projection="3d")


    #print(mtx, dist, camera_u, camera_v)
while 1:

    ret, img = cap.read()
    frame = img
    h1, w1 = frame.shape[:2]
    newcameramtx, roi = cv2.getOptimalNewCameraMatrix(mtx, dist, (h1, w1), 0, (h1, w1))
    dst1 = cv2.undistort(frame, mtx, dist, None, newcameramtx)
    x, y, w1, h1 = roi
    dst1 = dst1[y:y + h1, x:x + w1]
    frame1 = dst1

    gray = cv2.cvtColor(frame, cv2.COLOR_BGR2GRAY)
    aruco_dict = aruco.Dictionary_get(aruco.DICT_6X6_1000)
    parameters = aruco.DetectorParameters_create()
    dst1 = cv2.undistort(frame, mtx, dist, None, newcameramtx)
    #保存图像
    # cv2.imwrite("./frame.jpg", dst1)

    '''
    detectMarkers(...)
        detectMarkers(image, dictionary[, corners[, ids[, parameters[, rejectedI
        mgPoints]]]]) -> corners, ids, rejectedImgPoints
    '''

    # 使用aruco.detectMarkers()函数可以检测到marker,返回ID和标志板的4个角点坐标
    corners, ids, rejectedImgPoints = aruco.detectMarkers(gray, aruco_dict, parameters=parameters)

    #print(corners)
    #print(ids)
    #f是板卡的长度
    f=0.03

    #    如果找不打id
    if ids is not None:
        #计算r和t
        rvec, tvec, _ = aruco.estimatePoseSingleMarkers(corners, f, mtx, dist)
        # 估计每个标记的姿态并返回值rvet和tvec ---不同
        # from camera coeficcients
        (rvec - tvec).any()  # get rid of that nasty numpy value array error
        #print(tvec)
        #        aruco.drawAxis(frame, mtx, dist, rvec, tvec, 0.1) #绘制轴
        #        aruco.drawDetectedMarkers(frame, corners) #在标记周围画一个正方形

        for i in range(rvec.shape[0]):
            cv2.drawFrameAxes(frame, mtx, dist, rvec[i, :, :], tvec[i, :, :], 0.05)
            aruco.drawDetectedMarkers(frame, corners)

        ###### DRAW ID #####
        cv2.putText(frame, "Id: " + str(ids), (0, 64), font, 1, (0, 255, 0), 2, cv2.LINE_AA)
        # plt.imshow(frame, aspect='auto')
        cv2.imshow("imgage",frame)

        #计算两两标记间的距离并输出

        for i in range(tvec.shape[0]):
            j = i - 1
            while j >= 0:
                print('point:' + str(ids[i]) + str(ids[j]), ',dist:' + str(np.linalg.norm(tvec[i][0] - tvec[j][0])))
                j = j - 1
        #计算各个坐标到相机的距离
        for i in range(tvec.shape[0]):
            print('point:' + str(ids[i]) + ',dist:' + str(np.linalg.norm(tvec[i][0] - [0, 0, 0])))

        h1, w1 = frame.shape[:2]

        #每个标记自己的世界坐标系坐标
        #原点和四个角
        joint_world = [[0, 0, 0],
                       [f / 2, f / 2, 0],
                       [-f / 2, f / 2, 0],
                       [-f / 2, -f / 2, 0],
                       [f / 2, -f / 2, 0]]
        joint_cam_ori = []
        joint_cam_1 = []
        joint_cam_2 = []
        joint_cam_3 = []
        joint_cam_4 = []

        #循环将各个标记的世界坐标系转为相机坐标系
        #    如果找不打id
        if ids is not None:
            for i in range(rvec.shape[0]):
                R = np.zeros((3, 3), dtype=np.float64)
                cv2.Rodrigues(rvec[i, :, :], R)
                T = tvec[i][0]
                # print("R:",R)
                # print("T:",T)
                """
                世界坐标系 -> 相机坐标系: R * (pt - T):
                joint_cam = np.dot(R, (joint_world - T).T).T
                :return:
                """
                joint_world = np.asarray(joint_world)
                joint_num = len(joint_world)
                # 世界坐标系 -> 相机坐标系
                # [R|t] world coords -> camera coords
                # joint_cam = np.zeros((joint_num, 3))  # joint camera
                # for i in range(joint_num):  # joint i
                #     joint_cam[i] = np.dot(R, joint_world[i] - T)  # R * (pt - T)
                # .T is 转置, T is translation mat
                joint_cam = np.dot(R, (joint_world).T).T + T
                joint_cam_ori.append(joint_cam[0])
                joint_cam_1.append(joint_cam[1])
                joint_cam_2.append(joint_cam[2])
                joint_cam_3.append(joint_cam[3])
                joint_cam_4.append(joint_cam[4])


        xs = [0]
        ys = [0]
        zs = [0]

        for i in range(len(joint_cam_ori)):
            xs.append(joint_cam_ori[i][0])
            ys.append(joint_cam_ori[i][1] )
            zs.append(joint_cam_ori[i][2])

        for i in range(len(joint_cam_1)):
            xs.append(joint_cam_1[i][0])
            ys.append(joint_cam_1[i][1])
            zs.append(joint_cam_1[i][2])
        # '''
        for i in range(len(joint_cam_2)):
            xs.append(joint_cam_2[i][0])
            ys.append(joint_cam_2[i][1] )
            zs.append(joint_cam_2[i][2])

        for i in range(len(joint_cam_3)):
            xs.append(joint_cam_3[i][0])
            ys.append(joint_cam_3[i][1] )
            zs.append(joint_cam_3[i][2])

        for i in range(len(joint_cam_4)):
            xs.append(joint_cam_4[i][0])
            ys.append(joint_cam_4[i][1] )
            zs.append(joint_cam_4[i][2])
        # '''

        #画各个标记平面

        ax.scatter(xs, ys, zs, zdir="z", c="#00DDAA", marker="o", s=50)

        ax.set(xlabel="X", ylabel="Y", zlabel="Z")

        for i in range(len(ids)):
            j = 1 + i
            k = len(ids)
            x, y, z = np.array([[xs[j + k], ys[j + k], zs[j + k]], [xs[j + 2 * k], ys[j + 2 * k], zs[j + 2 * k]],
                                [xs[j + 3 * k], ys[j + 3 * k], zs[j + 3 * k]],
                                [xs[j + 4 * k], ys[j + 4 * k], zs[j + 4 * k]], [xs[j + k], ys[j + k], zs[j + k]],
                                [xs[j + 2 * k], ys[j + 2 * k], zs[j + 2 * k]],
                                [xs[j + 3 * k], ys[j + 3 * k], zs[j + 3 * k]],
                                [xs[j + 4 * k], ys[j + 4 * k], zs[j + 4 * k]]]).T
            ax.plot_trisurf(x, y, z)
        #画相机原点三轴
        ax.plot([0, f], [0, 0], [0, 0], label=' ', color='blue')
        ax.plot([0, 0], [0, f], [0, 0], label=' ', color='green')
        ax.plot([0, 0], [0, 0], [0, f], label=' ', color='red')

        plt.gca().set_box_aspect((3, 2, 12))  # 当x、y、z轴范围之比为3:5:2时。
        plt.pause(0.1)
        plt.cla()
        # plt.ioff()  # 关闭画图窗口Z


    else:
        ##### DRAW "NO IDS" #####
        cv2.putText(frame, "No Ids", (0, 64), font, 1, (0, 255, 0), 2, cv2.LINE_AA)


plt.clf()  # 清除之前画的图
到了这里,关于Aruco标签定位、测距、三维位置估算 opencv应用的文章就介绍完了。如果您还想了解更多内容,请在右上角搜索TOY模板网以前的文章或继续浏览下面的相关文章,希望大家以后多多支持TOY模板网!


