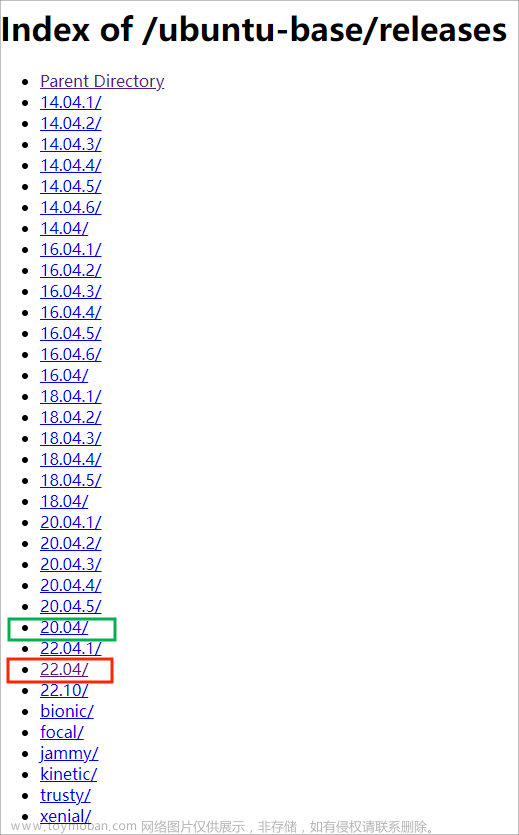
1:ubuntu官网下载最小根文件系统:
放置到电脑的ubuntu中,
Mkdir Ubuntu_rootfs
Cd Ubuntu_rootfs
Sudo tar –zxvf Ubuntu-bash-xxxxxx.tar.gz
2:电脑的ubuntu安装qemu搭建arm模拟系统
将/usr/bin/qemu-arm-static/(64位拷贝)qemu-aachr64-static到解压的目录中的/usr/bin中
sudo apt install qemu-user-static
sudo /usr/bin/qemu-arm-static Ubuntu_rootfs/usr/bin
3:拷贝电脑ubuntu的网络联网文件
Sudo cp /etc/resolv.conf Ubuntu_rootfs/etc/resolv.conf
如果电脑的源已经可以使用的就不用自己添加源,需要修改的话修改一下文件
Sudo vim Ubuntu_rootfs/etc/apt/source.list
4:编写挂载文件和卸载文件:
####mymount.sh
#!/bin/bash
echo "mountting..."
sudo mount -t proc /proc /home/my_linux/ubuntu_rootfs/proc
sudo mount -t sysfs /sys /home/my_linux/ubuntu_rootfs/sys
sudo mount -o bind /dev /home/my_linux/ubuntu_rootfs/dev
sudo mount -o bind /dev/pts /home/my_linux/ubuntu_rootfs/dev/pts
sudo chroot /home/my_linux/ubuntu_rootfs
####myumount.sh

#!/bin/bash
echo "umountting..."
sudo umount -f /home/my_linux/ubuntu_rootfs/dev/pts
sudo umount -f /home/my_linux/ubuntu_rootfs/dev
sudo umount /home/my_linux/ubuntu_rootfs/sys
sudo umount /home/my_linux/ubuntu_rootfs/proc
附加执行权限:
Sudo chmod 777 mymount.sh
Sudo chmod 777 myumount.sh
运行脚本挂载系统:
Source mymount.sh
6:安装ubuntu文件系统所需软件(在挂在后的文件系统中安装,指令:apt install xxx)
所需软件如下:
Make,gcc,device-tree-compiler,rsyslog,net-tool,ssh,language-pack-en-base, kmod,nano,xorg等


7:添加用户:
Passwd root

Adduser cjqzynq

为用户添加权限:打开/etc/sudoers

8: 修改终端tty打印(很重要)
操作如下:如果没搞对,会出现以下问题:
/bin/sh : cannot accese tty turn off ….
如果修改的不对会有:

解决办法:

Tty需要根据板卡设置的串口进行设置,操作如下:ttyPS0是kernel和uboot,设备树中配置开启的终端输出串口


9:退出根文件系统制作:
Exit
运行卸载:
Source ./myumount.sh
使用tar打包ubuntu_rootfs/
然后烧录到ddr,再用ext4write,写进mmc,在进去mmc做解压,需要解压到mmcblk0p1
不能有额外多的路径:正确如下:

前期需要uboot和kernel都能识别到mmc,然后使用randisk进去系统,针对mmc做格式化和分区:使用Fdisk指令和mke2fs mmcblk0
10:启动系统(同样使用ext4write将ddr中的uimage.dtb放进mmc中)
然后就叫可以使用cmd指令和args从mmc中引导起来
setenv bootargs  "console=ttyPS0,115200 root=/dev/mmcblk0p1 rootfstype=ext4 rw rootwait "

setenv bootcmd "echo zIamge is loading ... ... && ext4load mmc 0:1 0x2000000 zImage && echo zIamge is loading ... ... && ext4load mmc 0:1 0x6a00000 system-top.dtb && echo zIamge is loading ... ... && bootz 0x2000000 - 0x6a00000"
参考链接:
搭建最小ubuntu20.04系统_ubuntu20.04最小化安装_代码撸起的博客-CSDN博客文章来源:https://www.toymoban.com/news/detail-629979.html
基于ubuntu-base进行根文件系统的修改与打包_根文件系统打包_里先森的博客-CSDN博客文章来源地址https://www.toymoban.com/news/detail-629979.html
到了这里,关于使用ubuntu-base制作根文件系统的文章就介绍完了。如果您还想了解更多内容,请在右上角搜索TOY模板网以前的文章或继续浏览下面的相关文章,希望大家以后多多支持TOY模板网!


![[Linux]理解文件系统!动静态库详细制作使用!(缓冲区、inode、软硬链接、动静态库)](https://imgs.yssmx.com/Uploads/2024/02/638015-1.png)


