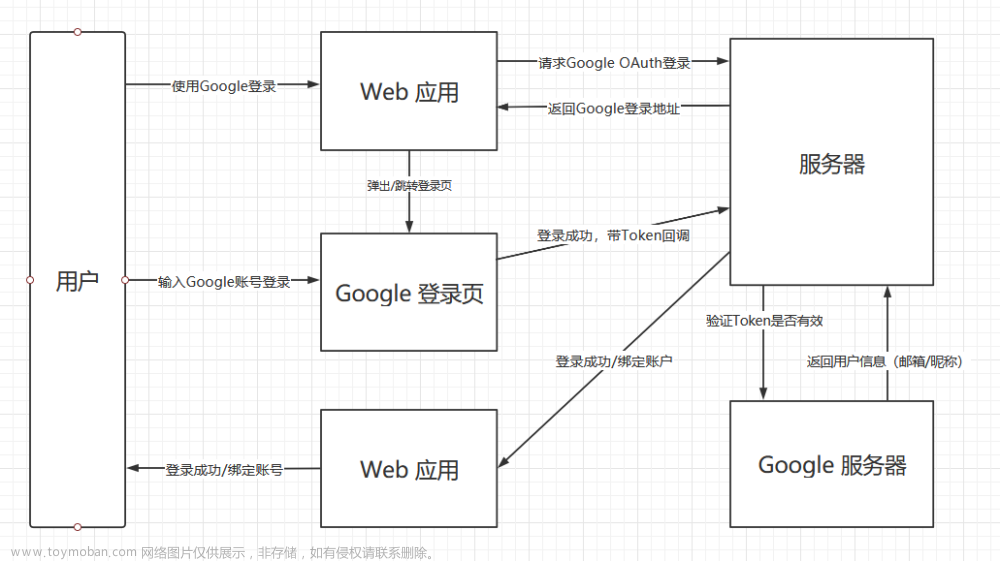
首先创建OAuth 2.0 客户端 ID
配置url,必须是https的,同时复制好客户端id 和密钥

配置回调url 文章来源:https://www.toymoban.com/news/detail-631809.html
    /**
     * Google授权登录跳转。但是会重定向,建议前端跳转
     *
     * 前端js
     * // 构建 Google 授权 URL
     * const authParams = new URLSearchParams({
     *   response_type: 'code', //固定
     *   client_id: 'YOUR_CLIENT_ID', // 请将 YOUR_CLIENT_ID 替换为实际的客户端 ID
     *   scope: 'openid email profile',  //固定
     *   redirect_uri: 'YOUR_REDIRECT_URI', // 在Google配置的回调url
     * });
     *
     * const authUrl = `https://accounts.google.com/o/oauth2/v2/auth?${authParams}`;
     *
     通过Java接口跳转Google登录页面,会重定向,建议前端跳转
     * @param response
     * @return
     * @throws IOException
     */
    @GetMapping("/google-login")
    @NoAuth
    public CommonResult<String> googleLogin(HttpServletResponse response) throws IOException {
        HttpTransport httpTransport = new NetHttpTransport();
        JsonFactory jsonFactory = GsonFactory.getDefaultInstance();

        // 设置 OAuth 2.0 授权码流对象
        AuthorizationCodeFlow flow = new GoogleAuthorizationCodeFlow.Builder(
                httpTransport, jsonFactory, CLIENT_ID, CLIENT_SECRET, SCOPES)
                .setAccessType("offline")
                .setApprovalPrompt("force") // 可选,强制用户重新授权
                .build();

        // 生成用户授权的 URL
        AuthorizationCodeRequestUrl authorizationUrl = flow.newAuthorizationUrl()
                .setRedirectUri(REDIRECT_URI);

        // 重定向用户到授权 URL
        response.sendRedirect(authorizationUrl.build());
        return new CommonResult("success");
    }
回调接口文章来源地址https://www.toymoban.com/news/detail-631809.html
 @GetMapping("/google-callback")
    @NoAuth //不需要登录
    public ResponseEntity<String> googleCallback(@RequestParam("code") String authorizationCode) throws IOException {
        System.out.println("google-callback code = "+authorizationCode);

        // 创建 Google 授权码流对象
        GoogleAuthorizationCodeFlow flow = new GoogleAuthorizationCodeFlow.Builder(
                new NetHttpTransport(),
                JacksonFactory.getDefaultInstance(),
                CLIENT_ID,
                CLIENT_SECRET,
                Arrays.asList("openid", "email", "profile"))
                .setAccessType("offline")
                .build();

        // 交换授权码为访问令牌
        TokenResponse tokenResponse = flow.newTokenRequest(authorizationCode)
                .setRedirectUri(REDIRECT_URI)
                .execute();
        String accessToken = tokenResponse.getAccessToken();

//        System.out.println("google accessToken: "+accessToken);

        String userInfo = getUserInfo(accessToken);
//        System.out.println("userInfo: "+userInfo);
        /** 格式
         * {
         *   "iss": "https://accounts.google.com",
         *   "sub": "123456789012345678901",  表示用户的唯一标识符,通常是用户的Google ID。
         *   "aud": "your-client-id",
         *   "email": "user@example.com",
         *   "email_verified": true,
         *   "exp": 1627889766,
         *   "iat": 1627886166
         * }
         */
        JSONObject jsonObject = JSONObject.parseObject(userInfo);
        String email =  jsonObject.getString("email") ;
        //登录逻辑
        JSONObject userJson = loginByEmail(email);
        String redirectUrl = "https://funflixvideo.com/#/?userId="+userJson.getString("userId")+"&sessionId="+userJson.getString("sessionId");
        // 重定向到 H5 页面,并带上 session ID
        HttpHeaders headers = new HttpHeaders();
        headers.setLocation(URI.create(redirectUrl));
        return new ResponseEntity<>(headers, HttpStatus.FOUND);
    }

    //获取用户信息
 public  String getUserInfo(String accessToken) {

        String url = "https://www.googleapis.com/oauth2/v1/userinfo?access_token=" + accessToken;
        try {
            return HttpClient4Utils.httpGet(url, null, "utf-8", 30);
        } catch (Exception e) {
            e.printStackTrace();
        }
        return null;
    }
到了这里,关于Java实现Google授权登录,OAuth 2.0登录的文章就介绍完了。如果您还想了解更多内容,请在右上角搜索TOY模板网以前的文章或继续浏览下面的相关文章,希望大家以后多多支持TOY模板网!


