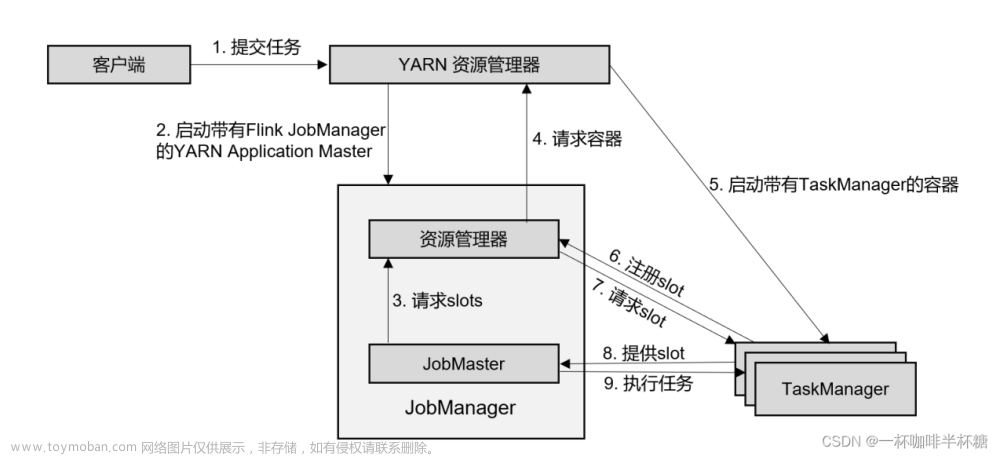
启动一个任务
通常我们会使用 bin/flink run -t yarn-per-job -c com.xxx.xxx.WordCount/WordCount.jar 方式启动任务;我们看一下 flink文件中到底做了什么,以下是其部分源码
# Convert relative path to absolute path
bin=`dirname "$target"`

# get flink config
. "$bin"/config.sh

if [ "$FLINK_IDENT_STRING" = "" ]; then
        FLINK_IDENT_STRING="$USER"
fi

CC_CLASSPATH=`constructFlinkClassPath`

log=$FLINK_LOG_DIR/flink-$FLINK_IDENT_STRING-client-$HOSTNAME.log
log_setting=(-Dlog.file="$log" -Dlog4j.configuration=file:"$FLINK_CONF_DIR"/log4j-cli.properties -Dlog4j.configurationFile=file:"$FLINK_CONF_DIR"/log4j-cli.properties -Dlogback.configurationFile=file:"$FLINK_CONF_DIR"/logback.xml)

# Add Client-specific JVM options
FLINK_ENV_JAVA_OPTS="${FLINK_ENV_JAVA_OPTS} ${FLINK_ENV_JAVA_OPTS_CLI}"

# Add HADOOP_CLASSPATH to allow the usage of Hadoop file systems
exec "${JAVA_RUN}" $JVM_ARGS $FLINK_ENV_JAVA_OPTS "${log_setting[@]}" -classpath "`manglePathList "$CC_CLASSPATH:$INTERNAL_HADOOP_CLASSPATHS"`" org.apache.flink.client.cli.CliFrontend "$@"
可以看到,第一步将相对地址转换成绝对地址;第二步获取 Flink 配置信息,这个信息放在 bin 目录下的 config. sh中;第三步获取 JVM 配置信息;最后一步就是程序真正的入口 org.apache.flink.client.cli.CliFrontend,这里有几点需要注意的:
- Linux-
exec命令用于调用并执行指令; - 在配置文件中
JAVA_RUN="$JAVA_HOME"/bin/java,因此这里运行的是 Java 程序; -
FLINK_ENV_JAVA_OPTS:是上文获取的关于 JVM 的相关配置; -
java -cp和 -classpath 一样,是指定类运行所依赖其他类的路径; -
INTERNAL_HADOOP_CLASSPATHS="${HADOOP_CLASSPATH}:${HADOOP_CONF_DIR}:${YARN_CONF_DIR}":config. sh文件指定了 Hadoop 的相关路径; -
"$@"表示所有参数以以"$1" " $2" … "$ n"的形式输出,例如bin/flink run -t yarn-per-job -c com.xxx.xxx.WordCount/WordCount.jar -p 11 "$@"会解析成run -t yarn-per-job -c com.xxx.xxx.WordCount/WordCount.jar -p 11。
小结一下,我们任务的提交流程是输入启动命令→读取配置信息→ java -cp 开启虚拟机→开启 CliFrontend→运行 CliFrontend. run
CliFrontend 详解
class CliFrontend{
	protected void run(String[] args) throws Exception {
        LOG.info("Running 'run' command.");
		// TODO 获取默认的运行时参数
        final Options commandOptions = CliFrontendParser.getRunCommandOptions();
        // 解析参数返回CommandLine对象
        // 解析见-> DefaultParser详解,核心逻辑是使用CliFrontendParser进行解析->使用DefaultParser进行解析
        final CommandLine commandLine = getCommandLine(commandOptions, args, true);

        // evaluate help flag
        if (commandLine.hasOption(HELP_OPTION.getOpt())) {
            CliFrontendParser.printHelpForRun(customCommandLines);
            return;
        }

        // TODO 按照Generic、Yarn、Default顺序判断是否活跃
        // 详解见 -> sub1
        final CustomCommandLine activeCommandLine =
                validateAndGetActiveCommandLine(checkNotNull(commandLine));

        // TODO 根据输入参数封装了一个ProgramOptions
        // 详解见 -> ProgramOptions
        final ProgramOptions programOptions = ProgramOptions.create(commandLine);

        // TODO 获取任务Jar包和依赖项;
        // 详解见 -> sub2
        final List<URL> jobJars = getJobJarAndDependencies(programOptions);

        // TODO 获取有效配置 -> 这里的逻辑最终是调用每一个CLI的toConfiguration方法
        final Configuration effectiveConfiguration =
                getEffectiveConfiguration(activeCommandLine, commandLine, programOptions, jobJars);

        // TODO 打印日志信息,
        LOG.debug("Effective executor configuration: {}", effectiveConfiguration);

        // TODO 将programOptions(程序)和effectiveConfiguration(有效配置信息)再封装成一个PackagedProgram对象
        try (PackagedProgram program = getPackagedProgram(programOptions, effectiveConfiguration)) {
            // TODO 执行封装对象
            executeProgram(effectiveConfiguration, program);
        }
    }

	// ****************************** sub1 ******************************************** //
    public CustomCommandLine validateAndGetActiveCommandLine(CommandLine commandLine) {
            LOG.debug("Custom commandlines: {}", customCommandLines);
            for (CustomCommandLine cli : customCommandLines) {
                LOG.debug(
                        "Checking custom commandline {}, isActive: {}", cli, cli.isActive(commandLine));
                // 按照Generic、Yarn、Default顺序判断是否活跃,具体分析见下文
                if (cli.isActive(commandLine)) {
                    return cli;
                }
            }
            throw new IllegalStateException("No valid command-line found.");
    }
    // ************************************************************************** //

	// ****************************** sub2 ******************************************** //
	private List<URL> getJobJarAndDependencies(ProgramOptions programOptions)
            throws CliArgsException {
        // TODO 获取入口类
        String entryPointClass = programOptions.getEntryPointClassName();
        // TODO 获取JAR包路径
        String jarFilePath = programOptions.getJarFilePath();

        try {
            File jarFile = jarFilePath != null ? getJarFile(jarFilePath) : null;
            return PackagedProgram.getJobJarAndDependencies(jarFile, entryPointClass);
        } catch (FileNotFoundException | ProgramInvocationException e) {
            throw new CliArgsException(
                    "Could not get job jar and dependencies from JAR file: " + e.getMessage(), e);
        }
    }
    // ************************************************************************** //
}

c

class DefaultParser{

}


/*
CustomCommandLine 是一个接口,GenericCLI、AbstractYarnCli、DefaultCLI
继承关系见下图
*/
class GenericCLI {
	/* 每一个Option都是这样的解析逻辑,有一个短的opt参数进行判断,同时有一个longOpt参数进行辅助判断,
	以executorOption为例,就是命令行中有-e 或者 -executor 就会返回True
	*/
	private final Option executorOption =
            new Option(
                    "e",
                    "executor",
                    true,
                    "DEPRECATED: Please use the -t option instead which is also available with the \"Application Mode\".\n"
                            + "The name of the executor to be used for executing the given job, which is equivalent "
                            + "to the \""
                            + DeploymentOptions.TARGET.key()
                            + "\" config option. The "
                            + "currently available executors are: "
                            + getExecutorFactoryNames()
                            + ".");

	 /*
    1. 获取验证配置项是否存在
    2. 获取验证执行器参数,即-e, executor
    3. 获取验证目标参数是否存在,即-t target
    */
	public boolean isActive(CommandLine commandLine) {
		// configuration是配置文件
		return configuration.getOptional(DeploymentOptions.TARGET).isPresent()
		|| commandLine.hasOption(executorOption.getOpt())
		|| commandLine.hasOption(targetOption.getOpt());
	}
}

class FlinkYarnSessionCli{
	public boolean isActive(CommandLine commandLine) {
		// 调用父类的的isActive方法
        if (!super.isActive(commandLine)) {
            return (isYarnPropertiesFileMode(commandLine)
                    && yarnApplicationIdFromYarnProperties != null);
        }
        return true;
    }

	public Configuration toConfiguration(CommandLine commandLine) throws FlinkException {
        // we ignore the addressOption because it can only contain "yarn-cluster"
        final Configuration effectiveConfiguration = new Configuration();

        applyDescriptorOptionToConfig(commandLine, effectiveConfiguration);

        // TODO 获取APPID,查看是否启动了集群
        final ApplicationId applicationId = getApplicationId(commandLine);
        if (applicationId != null) {
            final String zooKeeperNamespace;
            if (commandLine.hasOption(zookeeperNamespace.getOpt())) {
                zooKeeperNamespace = commandLine.getOptionValue(zookeeperNamespace.getOpt());
            } else {
                zooKeeperNamespace =
                        effectiveConfiguration.getString(HA_CLUSTER_ID, applicationId.toString());
            }

            // TODO 设置高可用
            effectiveConfiguration.setString(HA_CLUSTER_ID, zooKeeperNamespace);
            // TODO 设置YARN的应用ID
            effectiveConfiguration.setString(
                    YarnConfigOptions.APPLICATION_ID, applicationId.toString());
            // 执行器,已经启动了集群就是Session模式
            effectiveConfiguration.setString(
                    DeploymentOptions.TARGET, YarnSessionClusterExecutor.NAME);
        } else {
            // 没启动集群就是per-JOB 模式
            effectiveConfiguration.setString(DeploymentOptions.TARGET, YarnJobClusterExecutor.NAME);
        }

	    // TODO 如果有JM内存设置,则进行设置
        if (commandLine.hasOption(jmMemory.getOpt())) {
            String jmMemoryVal = commandLine.getOptionValue(jmMemory.getOpt());
            if (!MemorySize.MemoryUnit.hasUnit(jmMemoryVal)) {
                jmMemoryVal += "m";
            }
            // TODO 添加JM内存设置
            effectiveConfiguration.set(
                    JobManagerOptions.TOTAL_PROCESS_MEMORY, MemorySize.parse(jmMemoryVal));
        }

		// TODO 如果有TM总内存设置,则进行设置
        if (commandLine.hasOption(tmMemory.getOpt())) {
            String tmMemoryVal = commandLine.getOptionValue(tmMemory.getOpt());
            if (!MemorySize.MemoryUnit.hasUnit(tmMemoryVal)) {
                tmMemoryVal += "m";
            }
            //  TODO 添加TM的总内存;
            effectiveConfiguration.set(
                    TaskManagerOptions.TOTAL_PROCESS_MEMORY, MemorySize.parse(tmMemoryVal));
        }

		// TODO 如果有SLOT数设置,则进行设置
        if (commandLine.hasOption(slots.getOpt())) {
            // 每个TM的SLOT数
            effectiveConfiguration.setInteger(
                    TaskManagerOptions.NUM_TASK_SLOTS,
                    Integer.parseInt(commandLine.getOptionValue(slots.getOpt())));
        }

		// TODO 设置动态属性
        dynamicPropertiesEncoded = encodeDynamicProperties(commandLine);
        if (!dynamicPropertiesEncoded.isEmpty()) {
            Map<String, String> dynProperties = getDynamicProperties(dynamicPropertiesEncoded);
            for (Map.Entry<String, String> dynProperty : dynProperties.entrySet()) {
                effectiveConfiguration.setString(dynProperty.getKey(), dynProperty.getValue());
            }
        }


        if (isYarnPropertiesFileMode(commandLine)) {
            return applyYarnProperties(effectiveConfiguration);
        } else {
            return effectiveConfiguration;
        }
    }
}

// FlinkYarnSessionCli的父类
class AbstractYarnCli{
	public boolean isActive(CommandLine commandLine) {
            // TODO 获取JM地址
            final String jobManagerOption = commandLine.getOptionValue(addressOption.getOpt(), null);
            // TODO ID = “yarn-cluster”,
            final boolean yarnJobManager = ID.equals(jobManagerOption);
            // TODO 如果Yarn启动,则会有APPID,判断是否有APPID;1. 看输入命令中是否有APPID;2.从配置文件中读取APPID;
            final boolean hasYarnAppId =
                    commandLine.hasOption(applicationId.getOpt())
                            || configuration.getOptional(YarnConfigOptions.APPLICATION_ID).isPresent();
            // TODO 使用“yarn-session”或者“yarn-per-job”进行比较
            final boolean hasYarnExecutor =
                    YarnSessionClusterExecutor.NAME.equalsIgnoreCase(
                                    configuration.get(DeploymentOptions.TARGET))
                            || YarnJobClusterExecutor.NAME.equalsIgnoreCase(
                                    configuration.get(DeploymentOptions.TARGET));
            // -m yarn-cluster || yarn 有APPID、命令行制定了 || 执行器是YARN的
            return hasYarnExecutor || yarnJobManager || hasYarnAppId;
    }
}

// DefaultCLI用来部署Standalone模式
class DefaultCLI{
	public boolean isActive(CommandLine commandLine) {
        // 永远返回True
        return true;
    }
}

class ProgramOptions {
    public static ProgramOptions create(CommandLine line) throws CliArgsException {

        if (isPythonEntryPoint(line) || containsPythonDependencyOptions(line)) {
            // Python相关的类都是调用这个方法
            return createPythonProgramOptions(line);
        } else {
            // 其他都是调用这个方法
            return new ProgramOptions(line);
        }
    }

	protected ProgramOptions(CommandLine line) throws CliArgsException {
        super(line);

        // TODO 获取入口类
        this.entryPointClass =
                line.hasOption(CLASS_OPTION.getOpt())
                        ? line.getOptionValue(CLASS_OPTION.getOpt())
                        : null;

        // TODO 获取JAR包
        this.jarFilePath =
                line.hasOption(JAR_OPTION.getOpt())
                        ? line.getOptionValue(JAR_OPTION.getOpt())
                        : null;

        this.programArgs = extractProgramArgs(line);

		// TODO 路径解析并添加到一个ArrayList中
        List<URL> classpaths = new ArrayList<URL>();
        if (line.hasOption(CLASSPATH_OPTION.getOpt())) {
            for (String path : line.getOptionValues(CLASSPATH_OPTION.getOpt())) {
                try {
                    classpaths.add(new URL(path));
                } catch (MalformedURLException e) {
                    throw new CliArgsException("Bad syntax for classpath: " + path);
                }
            }
        }
        this.classpaths = classpaths;

		// TODO 先检查是否有并行度设置,如果有则解析并行度并进行值检查,如果没有则使用默认并行度
        if (line.hasOption(PARALLELISM_OPTION.getOpt())) {
            String parString = line.getOptionValue(PARALLELISM_OPTION.getOpt());
            try {
                parallelism = Integer.parseInt(parString);
                if (parallelism <= 0) {
                    throw new NumberFormatException();
                }
            } catch (NumberFormatException e) {
                throw new CliArgsException(
                        "The parallelism must be a positive number: " + parString);
            }
        } else {
            parallelism = ExecutionConfig.PARALLELISM_DEFAULT;
        }

		// TODO 分发模式,这个和上文介绍的executorOption判断逻辑是一致的。
        detachedMode =
                line.hasOption(DETACHED_OPTION.getOpt())
                        || line.hasOption(YARN_DETACHED_OPTION.getOpt());
        shutdownOnAttachedExit = line.hasOption(SHUTDOWN_IF_ATTACHED_OPTION.getOpt());

        this.savepointSettings = CliFrontendParser.createSavepointRestoreSettings(line);
    }
}

class JobManagerOptions{
    public static final ConfigOption<MemorySize> TOTAL_PROCESS_MEMORY =
		    // 这类配置信息都是这种链式调用
            key("jobmanager.memory.process.size")
                    .memoryType()
                    .noDefaultValue()
                    .withDescription(
                            "Total Process Memory size for the JobManager. This includes all the memory that a "
                                    + "JobManager JVM process consumes, consisting of Total Flink Memory, JVM Metaspace, and JVM Overhead. "
                                    + "In containerized setups, this should be set to the container memory. See also "
                                    + "'jobmanager.memory.flink.size' for Total Flink Memory size configuration.");
}
CustomCommandLine 继承关系:文章来源:https://www.toymoban.com/news/detail-632359.html
 文章来源地址https://www.toymoban.com/news/detail-632359.html
参数解析
class CliFrontendParser{
    // 选项列表
    // 解析和以executorOption等的逻辑都是一样的
    static final Option SAVEPOINT_DISPOSE_OPTION =
            new Option("d", "dispose", true, "Path of savepoint to dispose.");

    static final Option HELP_OPTION =
            new Option(
                    "h",
                    "help",
                    false,
                    "Show the help message for the CLI Frontend or the action.");
    ...
}

class DefaultParser{
    public CommandLine parse(Options options, String[] arguments, Properties properties, boolean stopAtNonOption) throws ParseException {
        ...;
         if (arguments != null) {
            String[] var9 = arguments;
            int var10 = arguments.length;

            for(int var7 = 0; var7 < var10; ++var7) {
                String argument = var9[var7];
                // 核心解析逻辑
                this.handleToken(argument);
            }
        }
        ...
    }

    private void handleToken(String token) throws ParseException {
        this.currentToken = token;
        if (this.skipParsing) {
            this.cmd.addArg(token);
        } else if ("--".equals(token)) {
            this.skipParsing = true;
        } else if (this.currentOption != null && this.currentOption.acceptsArg() && this.isArgument(token)) {
        // 添加参数值
        this.currentOption.addValueForProcessing(
                this.stripLeadingAndTrailingQuotesDefaultOn(token));
        } else if (token.startsWith("--")) {
            // TODO 解析 -- 形式参数;
            this.handleLongOption(token);
        } else if (token.startsWith("-") && !"-".equals(token)) {
            // TODO 解析 - 形式参数
            this.handleShortAndLongOption(token);
        } else {
            // TODO 解析未知参数
            this.handleUnknownToken(token);
        }

        if (this.currentOption != null && !this.currentOption.acceptsArg()) {
            this.currentOption = null;
        }

    }

    private void handleLongOption(String token) throws ParseException {
        if (token.indexOf(61) == -1) {
            // TODO 解析的是不包含=号的,例如-L、--l
            this.handleLongOptionWithoutEqual(token);
        } else {
            // TODO 解析包含=号的,例如--L=V
            this.handleLongOptionWithEqual(token);
        }

    }

    // 解析逻辑都是去除前缀,然后校验参数
    private void handleLongOptionWithoutEqual(String token) throws ParseException {
        List<String> matchingOpts = this.getMatchingLongOptions(token);
        if (matchingOpts.isEmpty()) {
            this.handleUnknownToken(this.currentToken);
        } else {
            if (matchingOpts.size() > 1 && !this.options.hasLongOption(token)) {
                throw new AmbiguousOptionException(token, matchingOpts);
            }

            String key = this.options.hasLongOption(token) ? token : (String)matchingOpts.get(0);
            // 参数添加到执行命令
            this.handleOption(this.options.getOption(key));
        }

    }

    private List<String> getMatchingLongOptions(String token) {
        if (this.allowPartialMatching) {
            // 部分匹配走这里
            return this.options.getMatchingOptions(token);
        } else {
            List<String> matches = new ArrayList(1);
            if (this.options.hasLongOption(token)) {
                // 获取参数
                Option option = this.options.getOption(token);
                // 添加参数
                matches.add(option.getLongOpt());
            }

            return matches;
        }
    }

    public Option getOption(String opt) {
        // 先去前缀
        opt = Util.stripLeadingHyphens(opt);
        // 去完前缀后看短字符有没有包含,有返回短参数否则返回长参数
        return this.shortOpts.containsKey(opt) ? (Option)this.shortOpts.get(opt) : (Option)this.longOpts.get(opt);
    }

    private void handleOption(Option option) throws ParseException {
        // 添加前先检查起哪一个参数
        this.checkRequiredArgs();
        option = (Option)option.clone();
        this.updateRequiredOptions(option);
        // 添加参数
        this.cmd.addOption(option);
        // 设置当前参数,跟checkRequiredArgs 这个方法相配合
        if (option.hasArg()) {
            this.currentOption = option;
        } else {
            this.currentOption = null;
        }
    }
}
小结
- 程序的入口命令:
run -t yarn-per-job /opt/module...ratget.jar --port 9999 - 入口类是:org.apache.flink.client.cli.CliFrontend;环境信息:Config.sh
- 在
Run方法中-
validateAndGetActiveCommandLine:按照Generic、Yarn、Default顺序判断是否活跃,创建对应的客户端;-
Generic的
isActive方法中- 获取验证配置项是否存在
- 获取验证执行器参数是否存在,即
-e, executor - 获取验证目标参数是否存在,即
-t target
-
FlinkYarnSessionCli的
isActive方法-
-m yarn-cluster:判断是否是per-job模式; - 根据 JM 地址→是否有 APPID,看是否启动了 Yarn(从命令行和配置信息中检查)
- 使用“yarn-session”或者“yarn-per-job”进行比较,看exector是否是这两个;
- 上述三种情况任意一种成立都会使用 Yarn 模式;
-
- Default的
isActive方法永远返回True;
-
Generic的
- 根据输入参数封装了一个ProgramOptions对象,该对象包括 Java 的主要获取入口类、JAR 包路径、程序参数、并行度等;
- 获取并设置有效配置(高可用、JM 和 TM 内存、TM-SLOT 数),简而言之就是将多个配置信息(activeCommandLine, commandLine,programOptions, jobJars)变成一个Configuration对象;
- 将程序+配置信息封装成一个PackagedProgram对象然后调用其
execute方法执行任务;
-
往期回顾
- 【Flink】Flink时间语义详解
- 【Flink】详解JobGraph
- 【Flink】详解StreamGraph
- 【Flink】浅谈Flink架构和调度
- 【Flink】详解Flink的八种分区
- 【Flink】浅谈Flink背压问题(1)
- 【分布式】浅谈CAP、BASE理论(1)
到了这里,关于【Flink】详解Flink任务提交流程的文章就介绍完了。如果您还想了解更多内容,请在右上角搜索TOY模板网以前的文章或继续浏览下面的相关文章,希望大家以后多多支持TOY模板网!


