文章来源地址https://www.toymoban.com/news/detail-633888.html
安装 Truffle
构建一个Truffle项目
浏览一下这个项目
测试项目
编译智能合约
使用 Ganache 部署项目
与智能合约交互
搭建自连网络
truflle初始化项目
Stairs upon the temple I climb and I crawl
Wonder how much further I'll go
Feet that fall apart till I walk on my ankles
Can I finish
I just don't know
简介: truffle是以太坊(ethereum)开发智能合约(smart contract)智能框架,本教程来安装构建一个基本的Truffle项目并部署一个智能合约到区块链。
truffle是以太坊(ethereum)开发智能合约(smart contract)智能框架,本教程来安装构建一个基本的Truffle项目并部署一个智能合约到区块链。
开始本文之前希望你已经了解区块链、以太坊、智能合约等基本概念。
安装 Truffle
安装 Truffle 框架非常的简单,只需要一行命令:
npm install -g truffle当然前提是你已经安装好了NodeJS并且版本要在5.0以上。
Tunffle还要求一个运行的以太坊客户端,以便支持标准的JSON RPC API,有很多的选择比如Ganache、geth。
构建一个Truffle项目
要使用大量的Tunffle命令,我们通过使用一个现成的Tunffle项目来学习。第一步是创建一个Truffle项目。
我们可以创建一个空的项目模板,不过刚开始构建项目,我们可以使用Tunffle Boxs,里面有很多的示例应用程序和项目模板。本文使用MetaCoin box,它创建一个可以在帐户之间传输代币的应用程序示例。
1.为构建Truffle项目创建新目录:
mkdir MetaCoin
cd MetaCoin
2.下载 MetaCoin box,使用truffle unbox <box-name>来下载各种示例,如果要建一个空的不包括智能合约的项目可以使用truffle init。
truffle unbox metacoin上述命令完成后,我们获得一个有以下目录结构的项目:
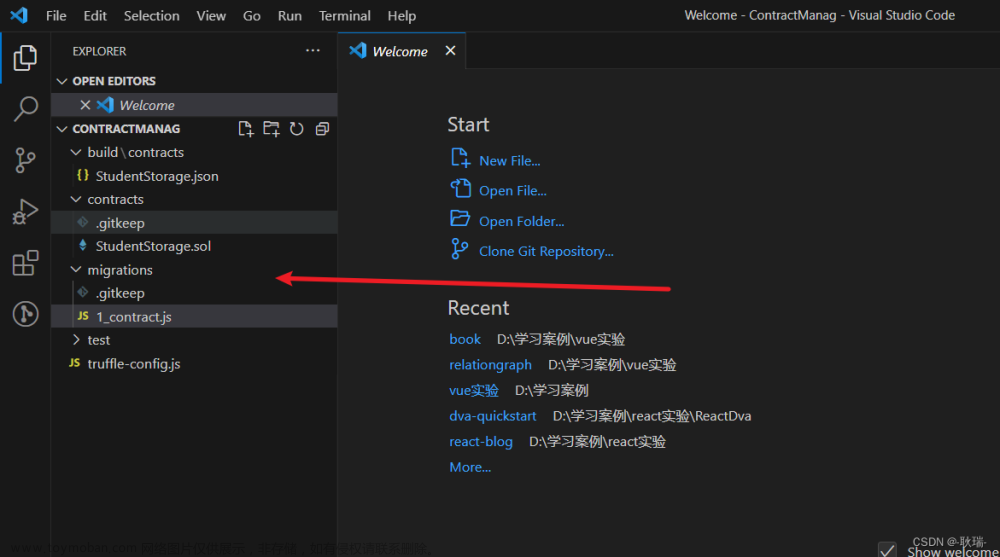
- contracts/: Solidity编写的智能合约目录。
- migrations/:脚本部署目录。
- test/:用来测试应用程序和智能合约的测试目录。
- truffle.js/:Truffle 配置文件。
浏览一下这个项目
-
打开
contracts/MetaCoin.sol,这是一个用Solidity编写的智能合约文件,这个智能合约建了Metacoin代币,我们可以注意到它引用了同目录下的另外一个solidity编写的文件contracts/ConvertLib.sol。 -
打开
contracts/Migrations.sol,这是一个单独的Solidity文件,用来管理和更新部署的智能合同的状态。这个文件每个Tunffle项目都有,通常不用管。 -
打开
migrations/1_initial_deployment.js文件,这个脚本是为了部署Migrations.sol文件中的Migrations合约。 -
打开
migrations/2_deploy_contracts.js文件,这个脚本是为了部署MetaCoin合约,会按顺序执行完上一步的脚本后执行。 -
打开
test/TestMetacoin.sol文件,这是一个Solidity编写的测试文件,确保你的合约正常工作。 -
打开
test/metacoin.js文件,这个脚本与上面的测试文件类似。 -
打开
truffle.js文件,用于设置网络信息和其他与项目相关的内容。文件是空白的,没关系,因为我们将使用一个内置有默认值的Truffle命令。
测试项目
1.打开终端,执行命令:
truffle test ./test/TestMetacoin.sol输出结果是这样的:
TestMetacoin
    √ testInitialBalanceUsingDeployedContract (71ms)
    √ testInitialBalanceWithNewMetaCoin (59ms)

  2 passing (794ms)
2.运行JavaScript测试:
truffle test ./test/metacoin.js输出结果是这样的:
  Contract: MetaCoin
    √ should put 10000 MetaCoin in the first account
    √ should call a function that depends on a linked library (40ms)
    √ should send coin correctly (129ms)

  3 passing (255ms)
编译智能合约
truffle compile输出结果是这样的:
Compiling .\contracts\ConvertLib.sol...
Compiling .\contracts\MetaCoin.sol...
Compiling .\contracts\Migrations.sol...

Writing artifacts to .\build\contracts
使用 Ganache 部署项目
当使用Tuffle开发一个多功能的私有链和控制台时也可以使用ganache,它作为一个桌面应用程序来启动私有链。对于以太坊和区块链新手来说ganache是一个更容易理解的工具,因为它会显示更多的信息给我们。
除了运行Ganache之外,需要额外编辑一下Tunffle配置文件,以指向ganache实例。
1.下载和安装 Ganache
2.打开 truffle.js ,用下面的内容替换:
module.exports = {
  networks: {
    development: {
      host: "127.0.0.1",
      port: 7545,
      network_id: "*"
    }
  }
};
这样就可以使用Ganache的默认参数进行连接了。
3.保存一下这个文件。
4.启动 Ganache
文章来源:https://www.toymoban.com/news/detail-633888.html
5.打开终端,用Ganache部署智能合约到区块链
truffle migrate输出结果是这样的:
Using network 'development'.

Running migration: 1_initial_migration.js
  Replacing Migrations...
  ... 0x63b393bd50251ec5aa3e159070609ee7c61da55531ff5dea5b869e762263cb90
  Migrations: 0xd6d1ea53b3a7dae2424a0525d6b1754045a0df9f
Saving successful migration to network...
  ... 0xe463b4cb6a3bbba06ab36ac4d7ce04e2a220abd186c8d2bde092c3d5b2217ed6
Saving artifacts...
Running migration: 2_deploy_contracts.js
  Replacing ConvertLib...
  ... 0xa59221bc26a24f1a2ee7838c36abdf3231a2954b96d28dd7def7b98bbb8a7f35
  ConvertLib: 0x33b217190208f7b8d2b14d7a30ec3de7bd722ac6
  Replacing MetaCoin...
  ... 0x5d51f5dc05e5d926323d580559354ad39035f16db268b91b6db5c7baddef5de5
  MetaCoin: 0xcd2c65cc0b498cb7a3835cfb1e283ccd25862086
Saving successful migration to network...
  ... 0xeca6515f3fb47a477df99c3389d3452a48dfe507980bfd29a3c57837d6ef55c5
Saving artifacts...
内容显示的是交易id和你所部署的智能合约地址。
6.在Ganache中,点击Transactions 按钮可以看到被处理的交易。
7.要与合约进行交互,可以使用Truffle控制台。类似于Truffle Develop,唯一不同的是它连接到现有区块链(在这种情况下,由Ganache生成的)
truffle console你会看到下面的提示:
truffle(development)>与智能合约交互
使用控制台通过下面的方式进行交互:
- 查看账户余额
MetaCoin.deployed().then(function(instance){return instance.getBalance(web3.eth.accounts[0]);}).then(function(value){return value.toNumber()});- 看看有多少以太合适(并注意合约定义1个metacoin价值2以太)
MetaCoin.deployed().then(function(instance){return instance.getBalanceInEth(web3.eth.accounts[0]);}).then(function(value){return value.toNumber()});- 从一个账号转账到另一个账号
MetaCoin.deployed().then(function(instance){return instance.sendCoin(web3.eth.accounts[1], 500);});- 检查是否收到metacoin
MetaCoin.deployed().then(function(instance){return instance.getBalance(web3.eth.accounts[1]);}).then(function(value){return value.toNumber()});- 检查给别人转账的账户
MetaCoin.deployed().then(function(instance){return instance.getBalance(web3.eth.accounts[0]);}).t-
启动一个连接到节点的交互控制台,您可以参考文档开启geth交互控制台来建立一个交互控制台
-
在交互控制台输入以下指令,创建一个以太坊账户。如果您已经在节点上创建了以太坊账户,您也可以使用已有账户完成后续操作。
// create a account that use empty passwordvar account = personal.newAccount("");// using an existing account in node// var account = eth.accounts[0]// unlock account for 300 seconds with empty passwordpersonal.unlockAccount(account, "", 300);// set it as default accountweb3.eth.defaultAccount = account;
-
使用solc或truffle等第三方编译工具,编译智能合约,获取智能合约的ABI和字节码(bytecode)。您可以参考编译智能合约编译您的智能合约。
-
在交互控制台输入以下示例命令,在Quorum网络中部署智能合约。在您需要部署自己的智能合约时,您需要将
abi和bytecode替换为您智能合约的编译结果。// abi for contractvar abi = [{"constant":true,"inputs":[],"name":"storedData","outputs":[{"name":"","type":"uint256"}],"payable":false,"type":"function"},{"constant":false,"inputs":[{"name":"x","type":"uint256"}],"name":"set","outputs":[],"payable":false,"type":"function"},{"constant":true,"inputs":[],"name":"get","outputs":[{"name":"retVal","type":"uint256"}],"payable":false,"type":"function"},{"inputs":[{"name":"initVal","type":"uint256"}],"payable":false,"type":"constructor"}];// compiled solidity bytecode code using https://github.com/jpmorganchase/quorum-examples/blob/master/examples/7nodes/simplestorage.solvar bytecode = "0x6060604052341561000f57600080fd5b604051602080610149833981016040528080519060200190919050505b806000819055505b505b610104806100456000396000f30060606040526000357c0100000000000000000000000000000000000000000000000000000000900463ffffffff1680632a1afcd914605157806360fe47b11460775780636d4ce63c146097575b600080fd5b3415605b57600080fd5b606160bd565b6040518082815260200191505060405180910390f35b3415608157600080fd5b6095600480803590602001909190505060c3565b005b341560a157600080fd5b60a760ce565b6040518082815260200191505060405180910390f35b60005481565b806000819055505b50565b6000805490505b905600a165627a7a72305820d5851baab720bba574474de3d09dbeaabc674a15f4dd93b974908476542c23f00029";var address = ""var simpleContract = web3.eth.contract(abi);var simple = simpleContract.new(42, {from: account,data: bytecode,gas: 0x47b760}, function(e, contract) {if (e) {console.log("err creating contract", e);} else {if (!contract.address) {console.log("Contract transaction send: TransactionHash: " + contract.transactionHash + " waiting to be mined...");} else {console.log("Contract mined! Address: " + contract.address);address = contract.addressconsole.log(contract);}}});
-
当部署智能合约的交易被共识节点打包,您可以在交互控制台看到您部署的合约地址,后续您可以向该地址发起交易,调用智能合约。
整个过程主要演示chrome扩展 METAMASK, OpenZepplin库和truffle框架的使用。
搭建自连网络
主要参考之前的以太坊-私有链搭建初步实践, 这里只用单节点的网络。
还是先准备账户:
mkdir node0
# 会在node0/keystore目录里生成一个keyfile json文件
geth --datadir node0 account new

#利用puppeth生成genesis.json的过程不表,参考上边的链接
geth --datadir node0 init genesis.json

# 把刚才的账号的密码写入node0/password文件
# 启动私链,顺便开启console
echo node0 > node0/password
geth --datadir node0 --port 30000 --nodiscover --unlock '0' --password ./node0/password --mine --rpc --rpccorsdomain "*" --rpcapi "eth,net,web3,admin,personal" console
我们把这个账号的json文件导入到chorme插件metamask里,便于后面调试和演示
ubuntu系统上的chrome插件会有窗口消失的bug,在URL栏里打开chrome-extension://nkbihfbeogaeaoehlefnkodbefgpgknn/popup.html
truflle初始化项目
需要下载truffle命令号
npm install -g truffle

mkdir token && cd token

# 利用trulle下载token代笔示例
truffle unbox tutorialtoken

npm intall zeppelin-solidity
如上必要的依赖框架和库已经下载到了本地, 接下来就创建自己的代币合约
在contract目录创建TutorialToken.sol文件,内容如下:
pragma solidity ^0.4.11;


import 'zeppelin-solidity/contracts/token/StandardToken.sol';


/**
 * @title SimpleToken
 * @dev Very simple ERC20 Token example, where all tokens are pre-assigned to the creator.
 * Note they can later distribute these tokens as they wish using `transfer` and other
 * `StandardToken` functions.
 */
contract TutorialToken is StandardToken {

  string public name = "TutorialToken";
  string public symbol = "SIM";
  uint256 public decimals = 18;
  uint256 public INITIAL_SUPPLY = 10000;

  /**
   * @dev Contructor that gives msg.sender all of existing tokens.
   */
  function TutorialToken() {
    totalSupply = INITIAL_SUPPLY;
    balances[msg.sender] = INITIAL_SUPPLY;
  }

}
在以太坊里几乎所有操作都是当做交易来看的,部署合约就是一种交易,交易就要花钱(gas消耗),所以truffle做的是增量部署(少消耗gas),现在在migrations目录添加新的部署文件2_deploy_contracts.js。
var TutorialToken = artifacts.require("./TutorialToken.sol");

module.exports = function(deployer) {
  deployer.deploy(TutorialToken);
};
一切准备就绪,编译,部署开始:
# 编译
  truffle compile
Compiling ./contracts/Migrations.sol...
Compiling ./contracts/TutorialToken.sol...
Compiling zeppelin-solidity/contracts/math/SafeMath.sol...
Compiling zeppelin-solidity/contracts/token/BasicToken.sol...
Compiling zeppelin-solidity/contracts/token/ERC20.sol...
Compiling zeppelin-solidity/contracts/token/ERC20Basic.sol...
Compiling zeppelin-solidity/contracts/token/StandardToken.sol...
Writing artifacts to ./build/contracts
# 根据truffle.js的配置进行部署
  truffle migrate
Using network 'development'.

Running migration: 1_initial_migration.js
  Deploying Migrations...
  ... 0x65ccd2d6a4f4248466dd7887da7a2ac35d18c7ab0ec826cb25580bc785a2c3b8
  Migrations: 0xc64569558f90302f4b3884929ac5540c645674dc
Saving successful migration to network...
  ... 0xf9043ca886d352f05a05642047f63eed11d9b328fb815becc68baffc4d953d60
Saving artifacts...
Running migration: 2_deploy_contracts.js
  Deploying TutorialToken...
  ... 0x19350625474c36316046b103e671eaad45834a60c17a5b9c64cf96316754560f
  TutorialToken: 0x7f469dc1ec17c3b7c52a3ad74611cb4b7e6807e1
Saving successful migration to network...
  ... 0xe57ba56dd5f1b18d410577def8bc7089f7de56e8d8718c3098430995d4b81353
Saving artifacts...
顺便分享两个教程给大家,可以看一眼:
一个适合区块链新手的以太坊DApp开发:
http://xc.hubwiz.com/course/5a952991adb3847553d205d1
一个用区块链、星际文件系统(IPFS)、Nodejs和MongoDB构建电商平台:
http://xc.hubwiz.com/course/5abbb7acc02e6b6a59171dd6
到了这里,关于如何使用Truffle开发太坊智能及其区块链的文章就介绍完了。如果您还想了解更多内容,请在右上角搜索TOY模板网以前的文章或继续浏览下面的相关文章,希望大家以后多多支持TOY模板网!


