目录
Cadvisor +Prometheus+Grafana的安装部署
一、安装docker:
1、安装docker-ce
2、阿里云镜像加速器
3、下载组件镜像
4、创建自定义网络
二、部署Cadvisor
1、被监控主机上部署Cadvisor容器
2、访问cAdvisor页面
三、安装prometheus
1、部署Prometheus
2、先准备配置
3、访问prometheus页面
四、部署Granfana
1、下载grafana并运行
2、配置Granfana
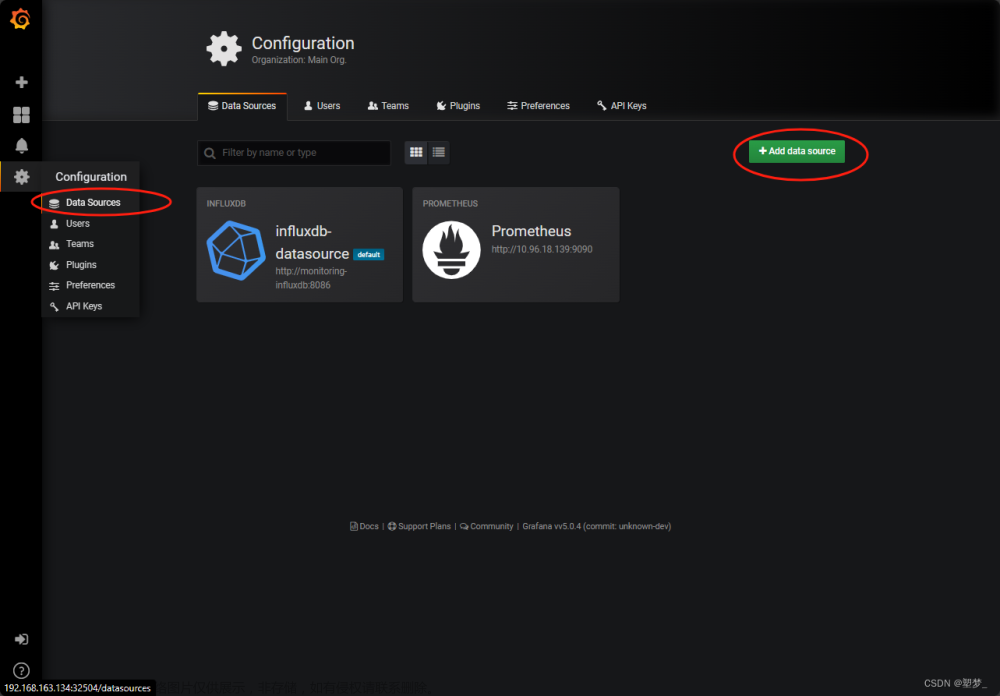
3、配置数据源
4、导入模板
5、选择对应的数据源,点击导入,
6、准备测试容器
7、WEB操作,如下:(新建+编+保存)
8、结果如下:
Cadvisor +Prometheus+Grafana的安装部署
一、安装docker:
1、安装docker-ce
[root@huyang3 ~]# iptables -F
[root@huyang3 ~]# setenforce 0
[root@huyang3 ~]# systemctl stop firewalld

[root@huyang3 ~]# cd /etc/yum.repos.d/

[root@lhuyang3 ~]# wget

http://mirrors.aliyun.com/repo/Centos-7.repo

[root@huyang3 ~]# yum -y install yum-utils device-mapper-persistent-data lvm2

[root@huyang3 ~]# yum-config-manager --add-repo http://mirrors.aliyun.com/docker-ce/linux/centos/docker-ce.repo

[root@huyang3 ~]# yum -y install docker-ce

[root@huyang3 ~]# systemctl start docker

[root@huyang3 ~]# systemctl enable docker

[root@huyang3 ~]# docker version
2、阿里云镜像加速器
阿里云登录 - 欢迎登录阿里云,安全稳定的云计算服务平台
[root@huyang3 ~]# cat << END > /etc/docker/daemon.json
{
"registry-mirrors":[ "https://nyakyfun.mirror.aliyuncs.com" ]
}
END

[root@huyang3 ~]# systemctl daemon-reload
[root@huyang3 ~]# systemctl restart docker
3、下载组件镜像
[root@huyang3 ~]# docker pull prom/prometheus
[root@huyang3 ~]# docker pull google/cadvisor
[root@huyang3 ~]# docker pull grafana/grafana
[root@huyang3 ~]# docker images

4、创建自定义网络
为了把后期创建的Cadvisor+InfluxDB+Grafana这三个容器都加入自己定义的网络便于理解和管理,所以才新建一个自定义网络。
[root@huyang3 ~]# docker network create monitor
[root@huyang3 ~]# docker network ls

Ps备注:假如出现上述网络创建不成功的话,则重启docker,然后再创建网络,这样就可以创建成功了!
[root@huyang3 ~]# docker network inspect monitor

二、部署Cadvisor
1、被监控主机上部署Cadvisor容器
[root@huyang3 ~]# docker pull google/cadvisor

[root@huyang3 ~]# docker run -d \

--volume=/:/rootfs:ro \

--volume=/var/run:/var/run:ro \

--volume=/sys:/sys:ro \

--volume=/var/lib/docker/:/var/lib/docker:ro \

--volume=/dev/disk/:/dev/disk:ro \

--publish=8080:8080 \

--detach=true \

--name=cadvisor \

google/cadvisor:latest
2、访问cAdvisor页面
访问http://192.168.100.133:8080 cAdvisor页面可以看到收集到的数据

三、安装prometheus
1、部署Prometheus
[root@huyang3 ~]# docker pull prom/prometheus

2、先准备配置
[root@huyang3 ~]# vim /tmp/prometheus.yml
# my global config

global:

  scrape_interval:     15s # Set the scrape interval to every 15 seconds. Default is every 1 minute.

  evaluation_interval: 15s # Evaluate rules every 15 seconds. The default is every 1 minute.

  # scrape_timeout is set to the global default (10s).


# Alertmanager configuration

alerting:

  alertmanagers:

  - static_configs:

    - targets:

      # - alertmanager:9093


# Load rules once and periodically evaluate them according to the global 'evaluation_interval'.

rule_files:

  # - "first_rules.yml"

  # - "second_rules.yml"


# A scrape configuration containing exactly one endpoint to scrape:

# Here it's Prometheus itself.

scrape_configs:

  # The job name is added as a label `job=<job_name>` to any timeseries scraped from this config.

  - job_name: 'prometheus'


    # metrics_path defaults to '/metrics'

    # scheme defaults to 'http'.


    static_configs:

    - targets: ['localhost:9090']

  - job_name: 'docker'      ##定义一个叫docker的组

    static_configs:

- targets: ['192.168.100.133:8080']   ##填写一个或多个cadvisor的主机地址用逗号隔开运行容器
[root@huyang3 ~]# docker run -d \
--name=prometheus -p 9090:9090 \
-v /tmp/prometheus.yml:/etc/prometheus/prometheus.yml \
-v /etc/localtime:/etc/localtime \
prom/prometheus

3、访问prometheus页面
http://192.168.100.133:9090

看到docker组状态up为正常

查询项是可以查到数据的

四、部署Granfana
1、下载grafana并运行
[root@huyang3 ~]# docker pull grafana/grafana
[root@huyang3 ~]# docker run -d \
--name=grafana \
-p 3000:3000 \
grafana/grafana

2、配置Granfana
访问http://192.168.100.133:3000默认账户admin 密码 admin首次登陆需要修改密码!


3、配置数据源


4、导入模板


5、选择对应的数据源,点击导入,
就可以看到被监控主机的数据

6、准备测试容器
[root@huyang3 ~]# docker run -d --name=nginx -p 80:80 nginx

7、WEB操作,如下:(新建+编+保存)


8、结果如下:

文章来源:https://www.toymoban.com/news/detail-634116.html
到此Cadvisor +Prometheus+Grafana基本架构部署完毕文章来源地址https://www.toymoban.com/news/detail-634116.html
到了这里,关于docker容器监控:Cadvisor +Prometheus+Grafana的安装部署的文章就介绍完了。如果您还想了解更多内容,请在右上角搜索TOY模板网以前的文章或继续浏览下面的相关文章,希望大家以后多多支持TOY模板网!


