- 🍨 本文为🔗365天深度学习训练营中的学习记录博客
- 🍖 原作者:K同学啊|接辅导、项目定制
前面实现了ResNet和DenseNet的算法,了解了它们有各自的特点:
- ResNet:通过建立前面层与后面层之间的“短路连接”(shortcu),其特征则直接进行sum操作,因此channel数不变;
- DenseNet:通过建立的是前面所有层与后面层的紧密连接(dense connection),其特征在channel维度上的直接concat来实现特征重用(feature reuse),因此channel数增加;
1 DPN设计理念
本课题是将ResNet与DenseNet相结合,而DPN则正是对它们俩进行了融合,所谓dual path,即一条path是ResNet,另外一条是DenseNet。在《Dual Path Networks》中,作者通过对ResNet和DenseNet的分解,证明了ResNet更侧重于特征的复用,而DenseNet则更侧重于特征的生成,通过分析两个模型的优劣,将两个模型有针对性的组合起来,提出了DPN。

图中
- (a):为ResNet;
- (b):为Densely Connected Network,其中每一次都可以访问之前所有的micro-block的输出。为了与(a)中的micro-block设计保持一致,这里增加了一个1*1的卷积层(图中带下划线的部分);
- (c):通过在(b)中micro-block之间共享相同输出的第一个1*1连接,密集连接的网络退化为一个残差网络,即图中点线框中的部分;
- (d):Dual Path结构的DPN
- (e):与(d)等价,都表示DPN,这里为其实现形式,其中表示分割操作,而+表示元素相加
由上图可知,ResNet复用了前面层的特征,而每一层的特征会原封不动的传到下一层,而在每一层通过卷积等操作后又会提取到不同的特征,因此特征的冗余度较低。但DenseNet的每个1*1卷积参数不同,前面提到的层不是被后面的层直接使用,而是被重新加工后生成了新的特征,因此这种结构很有可能会造成后面的层提取到的特征是前面的网络已经提取过的特征,故而DenseNet是一个冗余度较高的网络。DPN以ResNet为主要框架,保证特征的低冗余度,并添加了一个非常小的DenseNet分支,用于生成新的特征。
2 DPN代码实现

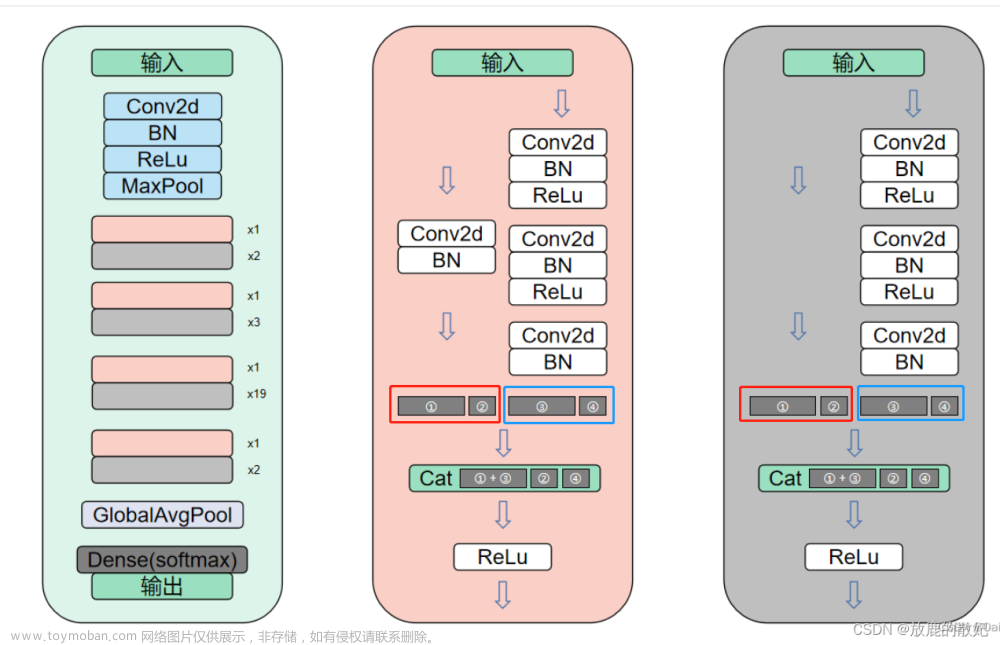
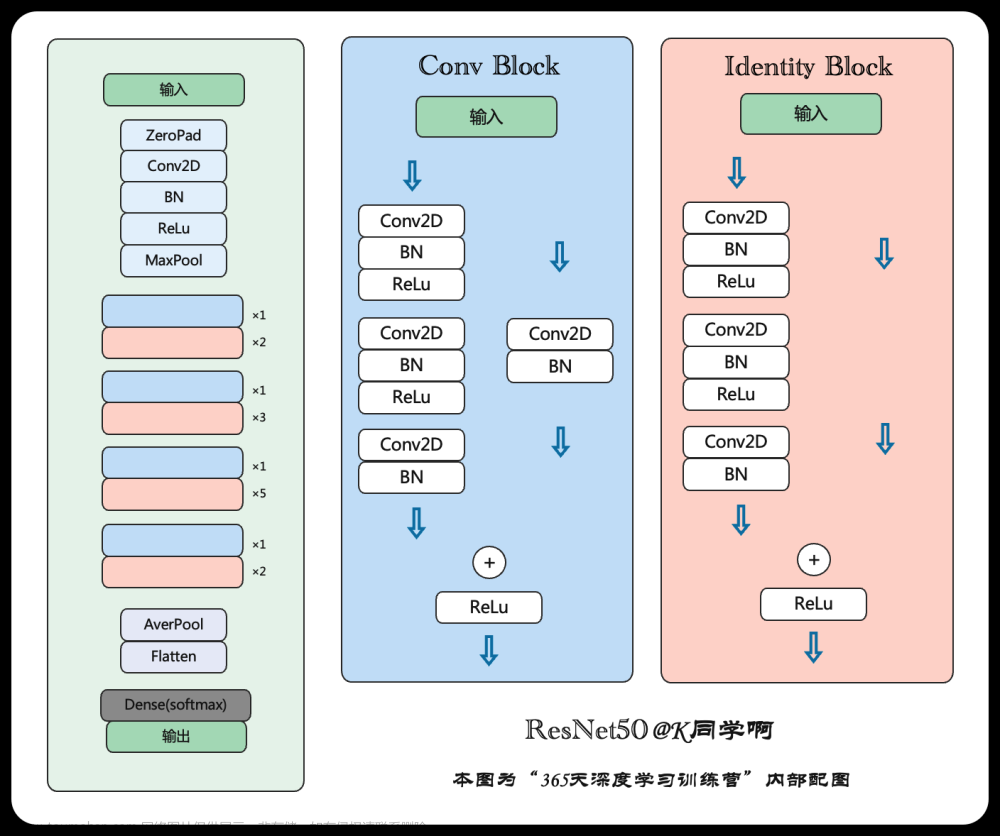
上图最左侧为DPN92的网络结构,对比下图的ResNet不难看出,DPN确是以ResNet为框架进行的改进。右侧是DPN主要模块的详细结构图,其中粉色模块对应ResNet中的ConvBlock模块,灰色模块对应ResNet中的IdentityBlock模块。但又由独特之处,就是在两个模块中,无论是直接shortcut还是经过一个Conc2d+BN,与ResNet的直接进行sum处理不同,这里将两条支路的特征分别进行截取,如图中红框和蓝框中所示,将其特征分别截取成①和②部分,以及③和④部分,其中①③的尺寸一致,②④的尺寸一致,然后将①和③进行sum操作后再与②④进行concat操作,这样便引入了DenseNet中的直接在channel维度上进行concat的思想。

2.1 前期工作
2.1.1 开发环境
-
电脑系统:ubuntu16.04
-
编译器:Jupter Lab
-
语言环境:Python 3.7
-
深度学习环境:pytorch
2.1.2 设置GPU
如果设备上支持GPU就使用GPU,否则注释掉这部分代码。
import torch
import torch.nn as nn
import torchvision.transforms as transforms
import torchvision
from torchvision import transforms, datasets
import os, PIL, pathlib, warnings

warnings.filterwarnings("ignore")
device = torch.device("cuda" if torch.cuda.is_available() else "cpu")

print(device)
2.1.3 导入数据
import os,PIL,random,pathlib

data_dir_str = '../data/bird_photos'
data_dir = pathlib.Path(data_dir_str)
print("data_dir:", data_dir, "\n")

data_paths = list(data_dir.glob('*'))
classNames = [str(path).split('/')[-1] for path in data_paths]
print('classNames:', classNames , '\n')

train_transforms = transforms.Compose([
    transforms.Resize([224, 224]),  # resize输入图片
    transforms.ToTensor(),  # 将PIL Image或numpy.ndarray转换成tensor
    transforms.Normalize(
        mean=[0.485, 0.456, 0.406],
        std=[0.229, 0.224, 0.225])  # 从数据集中随机抽样计算得到
])

total_data = datasets.ImageFolder(data_dir_str, transform=train_transforms)
print(total_data)
print(total_data.class_to_idx)
结果输出如图:

2.1.4 划分数据集
train_size = int(0.8 * len(total_data))
test_size = len(total_data) - train_size
train_dataset, test_dataset = torch.utils.data.random_split(total_data, [train_size, test_size])
print(train_dataset, test_dataset)

batch_size = 4
train_dl = torch.utils.data.DataLoader(train_dataset,
                                      batch_size=batch_size,
                                      shuffle=True,
                                      num_workers=1,
                                      pin_memory=False)
test_dl = torch.utils.data.DataLoader(test_dataset,
                                      batch_size=batch_size,
                                      shuffle=True,
                                      num_workers=1,
                                      pin_memory=False)

for X, y in test_dl:
    print("Shape of X [N, C, H, W]:", X.shape)
    print("Shape of y:", y.shape, y.dtype)
    break
结果输出如图:

2.2 搭建DPN
2.2.1 DPN模块搭建
import torch
import torch.nn as nn

class Block(nn.Module):
    """
    param : in_channel--输入通道数
            mid_channel -- 中间经历的通道数
            out_channel -- ResNet部分使用的通道数(sum操作,这部分输出仍然是out_channel个通道)
            dense_channel -- DenseNet部分使用的通道数(concat操作,这部分输出是2*dense_channel个通道)
            groups -- conv2中的分组卷积参数
            is_shortcut -- ResNet前是否进行shortcut操作
    """
    def __init__(self, in_channel, mid_channel, out_channel, dense_channel, stride, groups, is_shortcut=False):
        super(Block, self).__init__()

        self.is_shortcut = is_shortcut
        self.out_channel = out_channel
        self.conv1 = nn.Sequential(
            nn.Conv2d(in_channel, mid_channel, kernel_size=1, bias=False),
            nn.BatchNorm2d(mid_channel),
            nn.ReLU()
        )

        self.conv2 = nn.Sequential(
            nn.Conv2d(mid_channel, mid_channel, kernel_size=3, stride=stride, padding=1, groups=groups, bias=False),
            nn.BatchNorm2d(mid_channel),
            nn.ReLU()
        )

        self.conv3 = nn.Sequential(
            nn.Conv2d(mid_channel, out_channel+dense_channel, kernel_size=1, bias=False),
            nn.BatchNorm2d(out_channel+dense_channel)
        )

        if self.is_shortcut:
            self.shortcut = nn.Sequential(
            nn.Conv2d(in_channel, out_channel+dense_channel, kernel_size=3, padding=1, stride=stride, bias=False),
            nn.BatchNorm2d(out_channel+dense_channel)
        )

        self.relu = nn.ReLU(inplace=True)

    def forward(self, x):
        a = x
        x = self.conv1(x)
        x = self.conv2(x)
        x = self.conv3(x)
        if self.is_shortcut:
            a = self.shortcut(a)

        # a[:, :self.out_channel, :, :]+x[:, :self.out_channel, :, :]是使用ResNet的方法,即采用sum的方式将特征图进行求和,通道数不变,都是out_channel个通道
        # a[:, self.out_channel:, :, :], x[:, self.out_channel:, :, :]]是使用DenseNet的方法,即采用concat的方式将特征图在channel维度上直接进行叠加,通道数加倍,即2*dense_channel
        # 注意最终是将out_channel个通道的特征(ResNet方式)与2*dense_channel个通道特征(DenseNet方式)进行叠加,因此最终通道数为out_channel+2*dense_channel
        x = torch.cat([a[:, :self.out_channel, :, :]+x[:, :self.out_channel, :, :], a[:, self.out_channel:, :, :], x[:, self.out_channel:, :, :]], dim=1)
        x = self.relu(x)

        return x

class DPN(nn.Module):
    def __init__(self, cfg):
        super(DPN, self).__init__()

        self.group = cfg['group']
        self.in_channel = cfg['in_channel']
        mid_channels = cfg['mid_channels']
        out_channels = cfg['out_channels']
        dense_channels = cfg['dense_channels']
        num = cfg['num']

        self.conv1 = nn.Sequential(
            nn.Conv2d(3, self.in_channel, 7, stride=2, padding=3, bias=False, padding_mode='zeros'),
            nn.BatchNorm2d(self.in_channel),
            nn.ReLU(),
            nn.MaxPool2d(kernel_size=3, stride=2, padding=0)
        )
        self.conv2 = self._make_layers(mid_channels[0], out_channels[0], dense_channels[0], num[0], stride=1)
        self.conv3 = self._make_layers(mid_channels[1], out_channels[1], dense_channels[1], num[1], stride=2)
        self.conv4 = self._make_layers(mid_channels[2], out_channels[2], dense_channels[2], num[2], stride=2)
        self.conv5 = self._make_layers(mid_channels[3], out_channels[3], dense_channels[3], num[3], stride=2)
        self.pool = nn.AdaptiveAvgPool2d((1,1))
        self.fc = nn.Linear(cfg['out_channels'][3] + (num[3] + 1) * cfg['dense_channels'][3], cfg['classes']) # fc层需要计算

    def _make_layers(self, mid_channel, out_channel, dense_channel, num, stride):
        layers = []
        # is_shortcut=True表示进行shortcut操作,则将浅层的特征进行一次卷积后与进行第三次卷积的特征图相加(ResNet方式)和concat(DeseNet方式)操作
        # 第一次使用Block可以满足浅层特征的利用,后续重复的Block则不需要线层特征,因此后续的Block的is_shortcut=False(默认值)
        layers.append(Block(self.in_channel, mid_channel, out_channel, dense_channel, stride=stride, groups=self.group, is_shortcut=True))
        self.in_channel = out_channel + dense_channel*2
        for i in range(1, num):
            layers.append(Block(self.in_channel, mid_channel, out_channel, dense_channel, stride=1, groups=self.group))
             # 由于Block包含DenseNet在叠加特征图,所以第一次是2倍dense_channel,后面每次都会多出1倍dense_channel
            self.in_channel +=  dense_channel
        return nn.Sequential(*layers)

    def forward(self, x):
        x = self.conv1(x)
        x = self.conv2(x)
        x = self.conv3(x)
        x = self.conv4(x)
        x = self.conv5(x)
        x = self.pool(x)
        x = torch.flatten(x, start_dim=1)
        x = self.fc(x)
        return x
2.2.2 DPN92和DPN98
def DPN92(n_class=4):
    cfg = {
        "group" : 32,
        "in_channel" : 64,
        "mid_channels" : (96, 192, 384, 768),
        "out_channels" : (256, 512, 1024, 2048),
        "dense_channels" : (16, 32, 24, 128),
        "num" : (3, 4, 20, 3),
        "classes" : (n_class)
    }
    return DPN(cfg)

def DPN98(n_class=4):
    cfg = {
        "group" : 40,
        "in_channel" : 96,
        "mid_channels" : (160, 320, 640, 1280),
        "out_channels" : (256, 512, 1024, 2048),
        "dense_channels" : (16, 32, 32, 128),
        "num" : (3, 6, 20, 3),
        "classes" : (n_class)
    }
    return DPN(cfg)

model = DPN92().to(device)
model
这里使用模型DPN92,输出结果如下图所示(由于结果太大,只截取前后部分)

(中间部分省略)

2.2.3 查看模型详情
# 统计模型参数量以及其他指标
import torchsummary as summary
summary.summary(model, (3, 224, 224))
结果输出如下(由于结果太长,只展示最前面和最后面):

(中间部分省略)

2.3 训练模型
2.3.1 编写训练函数
# 训练循环
def train(dataloader, model, loss_fn, optimizer):
    size = len(dataloader.dataset)  # 训练集的大小
    num_batches = len(dataloader)   # 批次数目, (size/batch_size,向上取整)

    train_loss, train_acc = 0, 0  # 初始化训练损失和正确率

    for X, y in dataloader:  # 获取图片及其标签
        X, y = X.to(device), y.to(device)

        # 计算预测误差
        pred = model(X)          # 网络输出
        loss = loss_fn(pred, y)  # 计算网络输出pred和真实值y之间的差距,y为真实值,计算二者差值即为损失

        # 反向传播
        optimizer.zero_grad()  # grad属性归零
        loss.backward()        # 反向传播
        optimizer.step()       # 每一步自动更新

        # 记录acc与loss
        train_acc  += (pred.argmax(1) == y).type(torch.float).sum().item()
        train_loss += loss.item()

    train_acc  /= size
    train_loss /= num_batches

    return train_acc, train_loss
2.3.2 编写测试函数
def test(dataloader, model, loss_fn):
    size = len(dataloader.dataset)  # 训练集的大小
    num_batches = len(dataloader)   # 批次数目, (size/batch_size,向上取整)
    test_loss, test_acc = 0, 0  # 初始化测试损失和正确率

    # 当不进行训练时,停止梯度更新,节省计算内存消耗
   # with torch.no_grad():
    for imgs, target in dataloader:  # 获取图片及其标签
        with torch.no_grad():
            imgs, target = imgs.to(device), target.to(device)

            # 计算误差
            tartget_pred = model(imgs)          # 网络输出
            loss = loss_fn(tartget_pred, target)  # 计算网络输出和真实值之间的差距,targets为真实值,计算二者差值即为损失

            # 记录acc与loss
            test_loss += loss.item()
            test_acc  += (tartget_pred.argmax(1) == target).type(torch.float).sum().item()

    test_acc  /= size
    test_loss /= num_batches

    return test_acc, test_loss
2.3.3 正式训练
import copy

optimizer = torch.optim.Adam(model.parameters(), lr = 1e-4)
loss_fn = nn.CrossEntropyLoss() #创建损失函数

epochs = 40

train_loss = []
train_acc = []
test_loss = []
test_acc = []

best_acc = 0 #设置一个最佳准确率,作为最佳模型的判别指标

if hasattr(torch.cuda, 'empty_cache'):
    torch.cuda.empty_cache()


for epoch in range(epochs):

    model.train()
    epoch_train_acc, epoch_train_loss = train(train_dl, model, loss_fn, optimizer)
    #scheduler.step() #更新学习率(调用官方动态学习率接口时使用)

    model.eval()
    epoch_test_acc, epoch_test_loss = test(test_dl, model, loss_fn)

    #保存最佳模型到best_model
    if epoch_test_acc > best_acc:
        best_acc = epoch_test_acc
        best_model = copy.deepcopy(model)

    train_acc.append(epoch_train_acc)
    train_loss.append(epoch_train_loss)
    test_acc.append(epoch_test_acc)
    test_loss.append(epoch_test_loss)

    #获取当前的学习率
    lr = optimizer.state_dict()['param_groups'][0]['lr']
    template = ('Epoch: {:2d}. Train_acc: {:.1f}%, Train_loss: {:.3f}, Test_acc:{:.1f}%, Test_loss:{:.3f}, Lr: {:.2E}')
    print(template.format(epoch+1, epoch_train_acc*100, epoch_train_loss, epoch_test_acc*100, epoch_test_loss, lr))

PATH = './J3_best_model.pth'
torch.save(model.state_dict(), PATH)


print('Done')
结果输出如下:

2.4 结果可视化
import matplotlib.pyplot as plt
#隐藏警告
import warnings
warnings.filterwarnings("ignore")               #忽略警告信息
plt.rcParams['font.sans-serif']    = ['SimHei'] # 用来正常显示中文标签
plt.rcParams['axes.unicode_minus'] = False      # 用来正常显示负号
plt.rcParams['figure.dpi']         = 100        #分辨率

epochs_range = range(epochs)

plt.figure(figsize=(12, 3))
plt.subplot(1, 2, 1)

plt.plot(epochs_range, train_acc, label='Training Accuracy')
plt.plot(epochs_range, test_acc, label='Test Accuracy')
plt.legend(loc='lower right')
plt.title('Training and Validation Accuracy')

plt.subplot(1, 2, 2)
plt.plot(epochs_range, train_loss, label='Training Loss')
plt.plot(epochs_range, test_loss, label='Test Loss')
plt.legend(loc='upper right')
plt.title('Training and Validation Loss')
plt.show()结果输出如下:文章来源:https://www.toymoban.com/news/detail-636920.html
 文章来源地址https://www.toymoban.com/news/detail-636920.html
到了这里,关于CNN(四):ResNet与DenseNet结合--DPN的文章就介绍完了。如果您还想了解更多内容,请在右上角搜索TOY模板网以前的文章或继续浏览下面的相关文章,希望大家以后多多支持TOY模板网!


![[当人工智能遇上安全] 13.威胁情报实体识别 (3)利用keras构建CNN-BiLSTM-ATT-CRF实体识别模型](https://imgs.yssmx.com/Uploads/2024/04/855121-1.png)


