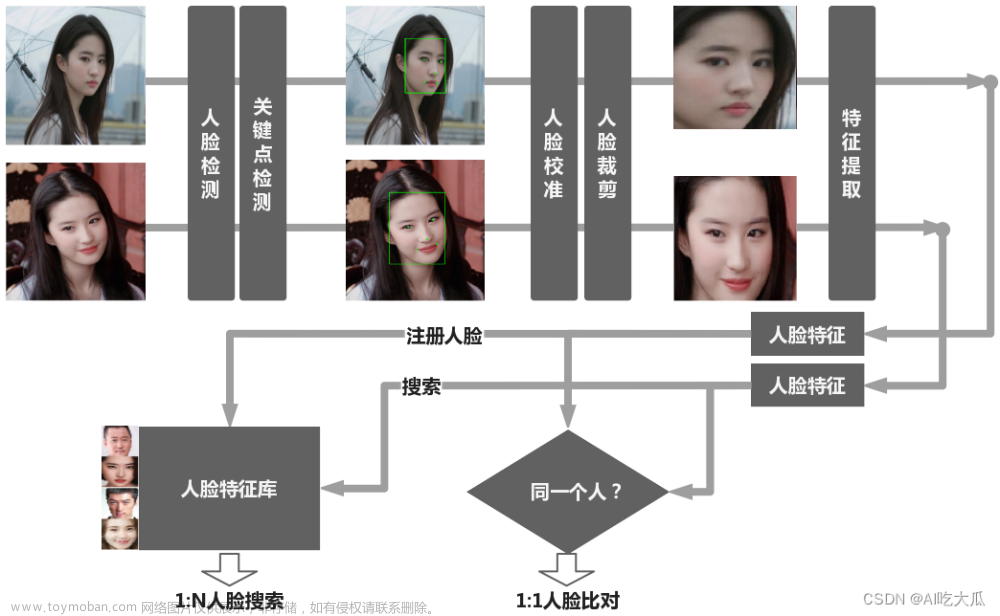
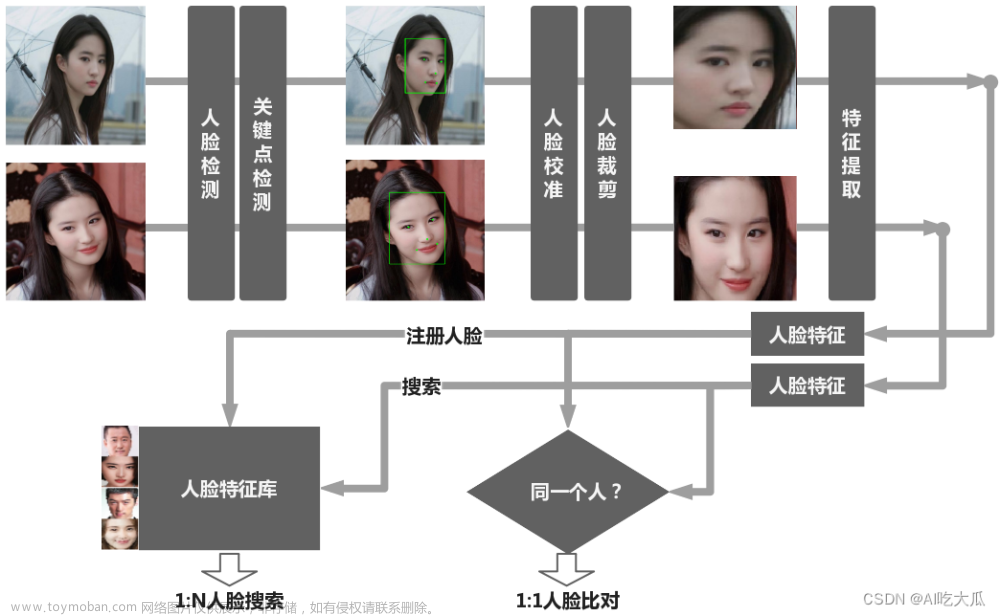
1、安装face_recognition库
pip install face_recognitionface_recognition库的人脸识别是基于业内领先的C++开源库dlib中的深度学习模型,安装face_recognition库的同时会一并安装dlib深度学习框架。
2、face_recognition库的使用
1)load_image_file加载要识别的人脸图像
这个方法主要是用于加载要识别的人脸图像,返回的数据是numpy数组,记录了图片的所有像素的特征向量。
obama_image = face_recognition.load_image_file("ZXH.jpg")2)face_locations定位图中所有人脸的像素位置
该方法返回值是一个列表形式,列表中每一行是一张人脸的位置信息,包括[top,right,bottom,left]。
import face_recognition
import cv2

image = face_recognition.load_image_file("ZXH.jpg")
face_locations = face_recognition.face_locations(image)
for face_location in face_locations:
    top, right, bottom, left = face_location
    star = (left, top)
    end = (right, bottom)
    cv2.rectangle(image, star, end, (0, 0, 255), thickness=2)
cv2.imshow('window', image)
cv2.waitKey()
3)face_encodings获取图像中所有面部编码信息
该方法返回值是一个编码列表,参数仍是要识别的图像对象。每张人脸的编码信息是一个128维向量。
import face_recognition


image = face_recognition.load_image_file("ZXH.jpg")
face_encodings = face_recognition.face_encodings(image)
for face_encoding in face_encodings:
    print("信息编码长度为:{}\n编码信息为:{}".format(len(face_encoding), face_encoding))
4)compare_faces由面部编码信息进行面部识别匹配
该方法主要用于匹配两个面部特征编码,利用这两个特征向量的内积来衡量相似度,根据阈值确定是否是同一个人。
第一个参数是多张脸的面部编码列表,第二个参数是单张脸面部编码,compare_faces会将第二个参数中的编码信息与第一个参数中的所有编码信息依次匹配,返回一个布尔列表。
tolerance值可根据实际效果调整,值越小,匹配越严格。
import face_recognition

# ZXH.jpg为多人合照
image1 = face_recognition.load_image_file("ZXH.jpg")
# ZXH1.jpg为单人照
image2 = face_recognition.load_image_file("ZXH1.jpg")
# 获取多人图片的面部编码信息
known_face_encodings = face_recognition.face_encodings(image1)

# 要进行识别的单张图片的特征,只需要拿到第一个人脸的编码信息
compare_face_encoding = face_recognition.face_encodings(image2)[0]
# 注意第二个参数,只能是单个面部特征编码,不能列表
matches = face_recognition.compare_faces(known_face_encodings, compare_face_encoding,tolerance=0.39)

print(matches)
5)face_distance获得比较面部的欧式距离
该方法给定面部编码列表,将其与已知面部编码比较,获得每个比较面部的欧式距离,距离就是面孔的相似程度,返回一个列表。
face_distances = face_recognition.face_distance(known_face_encodings, face_encoding)
# 参数:
# know_face_encodings:已知多目标编码列表
# face_encoding:要比较的人脸编码
完整代码
import face_recognition
import cv2
import numpy as np
import pyzed.sl as sl


# Get a reference to webcam #0 (the default one)
# video_capture = cv2.VideoCapture(0)

cam = sl.Camera()
init = sl.InitParameters()
init.camera_resolution = sl.RESOLUTION.HD720
init.depth_mode = sl.DEPTH_MODE.PERFORMANCE
status = cam.open(init)
if status != sl.ERROR_CODE.SUCCESS:
    print(repr(status))
    exit(1)

runtime = sl.RuntimeParameters()
mat = sl.Mat()

print("  Quit : CTRL+C\n")


# Load a sample picture and learn how to recognize it.
obama_image = face_recognition.load_image_file("ZXH.jpg")
obama_face_encoding = face_recognition.face_encodings(obama_image)[0]

# Load a second sample picture and learn how to recognize it.
biden_image = face_recognition.load_image_file("CW.jpg")
biden_face_encoding = face_recognition.face_encodings(biden_image)[0]

# Create arrays of known face encodings and their names
known_face_encodings = [
    obama_face_encoding,
    biden_face_encoding
]
known_face_names = [
    "ZXH",
    "CW"
]

# Initialize some variables
face_locations = []
face_encodings = []
face_names = []
process_this_frame = True

while True:
    # Grab a single frame of video
    # ret, frame = video_capture.read()
    if (cam.grab(runtime) == sl.ERROR_CODE.SUCCESS):
        cam.retrieve_image(mat, sl.VIEW.LEFT)
        frame = mat.get_data()
        # 将图像从BGR格式转换为RGB格式
        # frame = cv2.cvtColor(image, cv2.COLOR_BGR2RGB)
        # Only process every other frame of video to save time
        # if process_this_frame:
        # Resize frame of video to 1/4 size for faster face recognition processing
        small_frame = cv2.resize(frame, (0, 0), fx=0.25, fy=0.25)

        # Convert the image from BGR color (which OpenCV uses) to RGB color (which face_recognition uses)
        rgb_small_frame = small_frame[:, :, ::-1]
        cv2.imwrite("new.jpg", rgb_small_frame)
        rgb_small_frame = face_recognition.load_image_file("new.jpg")
        # Find all the faces and face encodings in the current frame of video
        face_locations = face_recognition.face_locations(rgb_small_frame)
        face_encodings = face_recognition.face_encodings(rgb_small_frame, face_locations)

        face_names = []
        for face_encoding in face_encodings:
            # See if the face is a match for the known face(s)
            matches = face_recognition.compare_faces(known_face_encodings, face_encoding)
            name = "Unknown"

            # # If a match was found in known_face_encodings, just use the first one.
            # if True in matches:
            #     first_match_index = matches.index(True)
            #     name = known_face_names[first_match_index]

            # Or instead, use the known face with the smallest distance to the new face
            face_distances = face_recognition.face_distance(known_face_encodings, face_encoding)
            best_match_index = np.argmin(face_distances)
            if matches[best_match_index]:
                name = known_face_names[best_match_index]

            face_names.append(name)

    process_this_frame = not process_this_frame

    # Display the results
    for (top, right, bottom, left), name in zip(face_locations, face_names):
        # Scale back up face locations since the frame we detected in was scaled to 1/4 size
        top *= 4
        right *= 4
        bottom *= 4
        left *= 4

        # Draw a box around the face
        cv2.rectangle(frame, (left, top), (right, bottom), (0, 0, 255), 2)

        # Draw a label with a name below the face
        cv2.rectangle(frame, (left, bottom - 35), (right, bottom), (0, 0, 255), cv2.FILLED)
        font = cv2.FONT_HERSHEY_DUPLEX
        cv2.putText(frame, name, (left + 6, bottom - 6), font, 1.0, (255, 255, 255), 1)

    # Display the resulting image
    cv2.imshow('Video', frame)

    # Hit 'q' on the keyboard to quit!
    if cv2.waitKey(1) & 0xFF == ord('q'):
        break

    # Release handle to the webcam
cv2.destroyAllWindows()
cam.close()
问题1:
compute_face_descriptor(): incompatible function arguments. The following argument types are supported:
    1. (self: _dlib_pybind11.face_recognition_model_v1, img: numpy.ndarray[(rows,cols,3),numpy.uint8], face: _dlib_pybind11.full_object_detection, num_jitters: int = 0, padding: float = 0.25) -> _dlib_pybind11.vector
    2. (self: _dlib_pybind11.face_recognition_model_v1, img: numpy.ndarray[(rows,cols,3),numpy.uint8], num_jitters: int = 0) -> _dlib_pybind11.vector
    3. (self: _dlib_pybind11.face_recognition_model_v1, img: numpy.ndarray[(rows,cols,3),numpy.uint8], faces: _dlib_pybind11.full_object_detections, num_jitters: int = 0, padding: float = 0.25) -> _dlib_pybind11.vectors

...
解决办法:
改变尺寸后的图像无法进行编码,先将其保存成图片,再打开,即可进行编码。
# BGR2RGB
rgb_small_frame = small_frame[:, :, ::-1]
cv2.imwrite("new.jpg", rgb_small_frame)
rgb_small_frame = face_recognition.load_image_file("new.jpg")
参考链接 Github开源人脸识别项目face_recognition - 知乎
Python中因为浅拷贝导致调用face_recognition.encodings(img)出现的典型问题_vivisol的博客-CSDN博客文章来源:https://www.toymoban.com/news/detail-642094.html
采用face_recognition进行人脸识别时,解决摄像头太远人脸太小导致无法检测的问题_small_frame[:, :, ::-1]_SAME999ABC的博客-CSDN博客 文章来源地址https://www.toymoban.com/news/detail-642094.html
到了这里,关于face_recognition人脸识别与人脸检测的文章就介绍完了。如果您还想了解更多内容,请在右上角搜索TOY模板网以前的文章或继续浏览下面的相关文章,希望大家以后多多支持TOY模板网!


