单片机外部晶振故障后自动切换内部晶振——以STM32为例
| 作者 | 日期 | 版本 | 说明 |
|---|---|---|---|
| Dog Tao | 2023.08.02 | V1.0 | 1. 发布初始版本。 |
| Dog Tao | 2023.08.10 | V1.1 | 1. 修改了STM32F103时钟系统的配图位置。 |
背景
时钟信号是单片机的心跳,对嵌入式系统的长期稳定运行有着至关重要的作用。现代单片机的时钟信号一般都支持外部时钟、外部晶体振荡器、内部RC振荡器等形式的输入。外部晶体振荡器(晶振)由于其高精度、高稳定性、低温飘、低成本的特性,广泛应用于各类对通讯、时间、性能要求严格的场合。
外部晶振与内部振荡器
-
外部晶振:这种时钟源来自于微控制器外部的晶振或者振荡器。晶振是一种机械振动器件,利用压电效应或反压电效应产生精确的频率。外部晶振的主要优点是精度高,稳定性好。但是,他们可能需要额外的电路空间,并且可能更容易受到环境因素如温度和震动的影响。
-
内部振荡器:这是一种集成在微控制器内部的时钟源。它通常是基于RC(电阻-电容)网络的振荡器。内部振荡器的优点是它们不需要额外的硬件,更便宜,更节省空间。但是,他们的频率精度和稳定性通常较低。
在实际应用中,选择哪种时钟源取决于具体的设计需求。对于需要高精度和稳定性的应用,通常会选择外部晶振。对于成本和空间更为重要的应用,内部振荡器可能是一个更好的选择。
STM32F103时钟系统
STM32F103的时钟系统相当复杂,主要有四种时钟源:高速内部(HSI)时钟,高速外部(HSE)时钟,低速内部(LSI)时钟,以及低速外部(LSE)时钟。
- 高速内部(HSI)时钟:一个自校准的内部RC振荡器,提供8MHz的时钟。
- 高速外部(HSE)时钟:可以连接到一个外部4-16 MHz的晶振或者用户提供的时钟源。
- 低速内部(LSI)时钟:一个内部RC振荡器,提供40kHz的时钟,主要供独立看门狗和自动唤醒单元使用。
- 低速外部(LSE)时钟:可以连接到一个外部32.768 kHz的晶振,主要用于RTC(实时时钟)和LCD。
如果使用外部晶振(HSE),STM32F103的最大系统时钟频率可以达到72 MHz。如果使用内部振荡器(HSI),STM32F103的最大系统时钟频率可以达到64 MHz。
STM32F103的时钟系统
STM32F407时钟系统
STM32F407的时钟系统与STM32F103的类似,也包括HSI,HSE,LSI和LSE四种时钟。但是其高速内部时钟频率达到了16MHz。
在STM32F407中,无论是16 MHz的HSI还是最高可以到24 MHz的HSE,都可以通过PLL倍频到168 MHz作为系统时钟频率。
代码实现
系统时钟设置流程
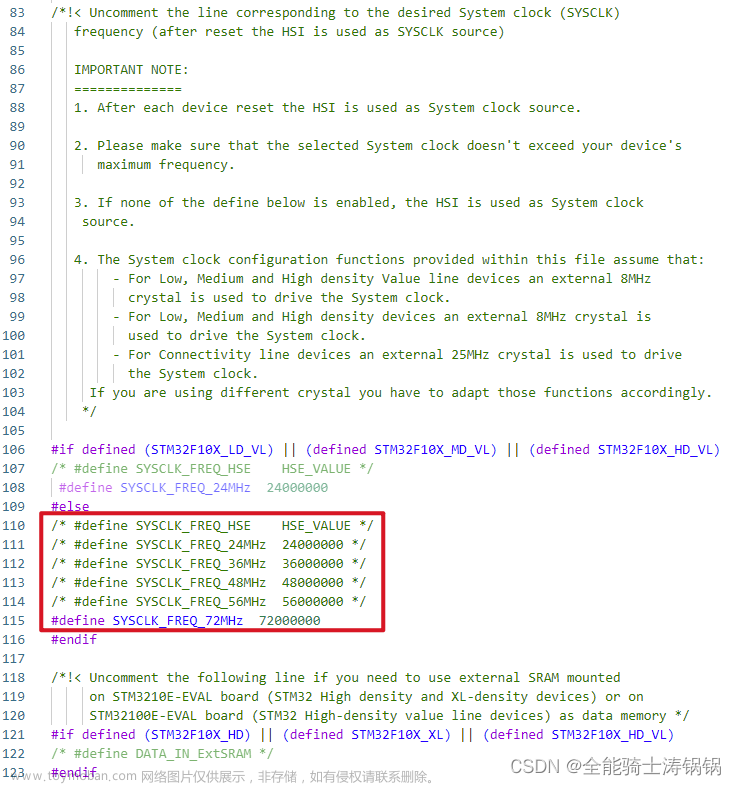
在STM32F103的标准库函数中,“system_stm32f10x.c”文件提供了多个不同频率的系统时钟设置方法,可以通过宏定义的方式条件编译指定时钟频率的设置函数,如下图所示: 基于标准库函数的系统时钟设置调用路径依次为:
- 启动文件“startup_stm32f103x8.s”调用位于“system_stm32f10x.c”文件中的
SystemInit()函数。 -
SystemInit()函数调用SetSysClock()函数。 -
SetSysClock()函数根据上述宏定义调用不同的时钟设置函数,将系统时钟设置为指定频率。 - 使用全局变量
SystemCoreClock可获取当前系统的时钟频率。
时钟源检测与切换
在上述位于“system_stm32f10x.c”文件中系统时钟设置函数中已经内置了相关功能的模板,以SetSysClockTo72()函数为例:
/**
  * @brief  Sets System clock frequency to 72MHz and configure HCLK, PCLK2
  *         and PCLK1 prescalers.
  * @note   This function should be used only after reset.
  * @param  None
  * @retval None
  */
static void SetSysClockTo72(void)
{
  __IO uint32_t StartUpCounter = 0, HSEStatus = 0;

  /* SYSCLK, HCLK, PCLK2 and PCLK1 configuration ---------------------------*/
  /* Enable HSE */
  RCC->CR |= ((uint32_t)RCC_CR_HSEON);

  /* Wait till HSE is ready and if Time out is reached exit */
  do
  {
    HSEStatus = RCC->CR & RCC_CR_HSERDY;
    StartUpCounter++;
  } while((HSEStatus == 0) && (StartUpCounter != HSE_STARTUP_TIMEOUT));

  if ((RCC->CR & RCC_CR_HSERDY) != RESET)
  {
    HSEStatus = (uint32_t)0x01;
  }
  else
  {
    HSEStatus = (uint32_t)0x00;
  }

  if (HSEStatus == (uint32_t)0x01)
  {
    /* Enable Prefetch Buffer */
    FLASH->ACR |= FLASH_ACR_PRFTBE;

    /* Flash 2 wait state */
    FLASH->ACR &= (uint32_t)((uint32_t)~FLASH_ACR_LATENCY);
    FLASH->ACR |= (uint32_t)FLASH_ACR_LATENCY_2;


    /* HCLK = SYSCLK */
    RCC->CFGR |= (uint32_t)RCC_CFGR_HPRE_DIV1;

    /* PCLK2 = HCLK */
    RCC->CFGR |= (uint32_t)RCC_CFGR_PPRE2_DIV1;

    /* PCLK1 = HCLK */
    RCC->CFGR |= (uint32_t)RCC_CFGR_PPRE1_DIV2;

#ifdef STM32F10X_CL
    /* Configure PLLs ------------------------------------------------------*/
    /* PLL2 configuration: PLL2CLK = (HSE / 5) * 8 = 40 MHz */
    /* PREDIV1 configuration: PREDIV1CLK = PLL2 / 5 = 8 MHz */

    RCC->CFGR2 &= (uint32_t)~(RCC_CFGR2_PREDIV2 | RCC_CFGR2_PLL2MUL |
                              RCC_CFGR2_PREDIV1 | RCC_CFGR2_PREDIV1SRC);
    RCC->CFGR2 |= (uint32_t)(RCC_CFGR2_PREDIV2_DIV5 | RCC_CFGR2_PLL2MUL8 |
                             RCC_CFGR2_PREDIV1SRC_PLL2 | RCC_CFGR2_PREDIV1_DIV5);

    /* Enable PLL2 */
    RCC->CR |= RCC_CR_PLL2ON;
    /* Wait till PLL2 is ready */
    while((RCC->CR & RCC_CR_PLL2RDY) == 0)
    {
    }


    /* PLL configuration: PLLCLK = PREDIV1 * 9 = 72 MHz */
    RCC->CFGR &= (uint32_t)~(RCC_CFGR_PLLXTPRE | RCC_CFGR_PLLSRC | RCC_CFGR_PLLMULL);
    RCC->CFGR |= (uint32_t)(RCC_CFGR_PLLXTPRE_PREDIV1 | RCC_CFGR_PLLSRC_PREDIV1 |
                            RCC_CFGR_PLLMULL9);
#else
    /*  PLL configuration: PLLCLK = HSE * 9 = 72 MHz */
    RCC->CFGR &= (uint32_t)((uint32_t)~(RCC_CFGR_PLLSRC | RCC_CFGR_PLLXTPRE |
                                        RCC_CFGR_PLLMULL));
    RCC->CFGR |= (uint32_t)(RCC_CFGR_PLLSRC_HSE | RCC_CFGR_PLLMULL9);
#endif /* STM32F10X_CL */

    /* Enable PLL */
    RCC->CR |= RCC_CR_PLLON;

    /* Wait till PLL is ready */
    while((RCC->CR & RCC_CR_PLLRDY) == 0)
    {
    }

    /* Select PLL as system clock source */
    RCC->CFGR &= (uint32_t)((uint32_t)~(RCC_CFGR_SW));
    RCC->CFGR |= (uint32_t)RCC_CFGR_SW_PLL;

    /* Wait till PLL is used as system clock source */
    while ((RCC->CFGR & (uint32_t)RCC_CFGR_SWS) != (uint32_t)0x08)
    {
    }
  }
  else
  { /* If HSE fails to start-up, the application will have wrong clock
         configuration. User can add here some code to deal with this error */
  }
}
因此,只需要设计实现当外部晶振启动失败后的情况即可,函数框架如下:
static void SetSysClockTo72(void)
{
  __IO uint32_t StartUpCounter = 0, HSEStatus = 0;

  /* 省略无关内容 */

  if (HSEStatus == (uint32_t)0x01)
  {
    /* HSE启动成功 */
  }
  else
  {
  	/* 自定内容:HSE启动失败,尝试启动内部振荡器,并更新系统时钟 */
  	SetSysClockTo48_HSI();
  	SystemCoreClockUpdate();
  }
}
使用内部振荡器
HSE启动失败,尝试启动内部振荡器,并更新系统时钟的自定义代码示例如下:
static void SetSysClockTo48_HSI()
{
   /* 开启HSI 即内部晶振时钟 */
	RCC->CR |= (uint32_t)0x00000001;

	/*选择HSI为PLL的时钟源HSI必须2分频给PLL*/
	RCC->CFGR |= (uint32_t)RCC_CFGR_PLLSRC_HSI_Div2;

	/*PLLCLK=8/2*12=48MHz   设置倍频得到时钟源PLL的频率*/
	RCC->CFGR |= (uint32_t)RCC_CFGR_PLLMULL12;

	/* PLL不分频输出  */
	RCC->CFGR |= (uint32_t)RCC_CFGR_HPRE_DIV1;

	/* 使能 PLL时钟 */
	RCC->CR |= RCC_CR_PLLON;

	/* 等待PLL时钟就绪*/
	while((RCC->CR & RCC_CR_PLLRDY) == 0)
	{
	}

	/* 选择PLL为系统时钟的时钟源 */
	RCC->CFGR &= (uint32_t)((uint32_t)~(RCC_CFGR_SW));
	RCC->CFGR |= (uint32_t)RCC_CFGR_SW_PLL;

	/* 等到PLL成为系统时钟的时钟源*/
	while ((RCC->CFGR & (uint32_t)RCC_CFGR_SWS) != (uint32_t)0x08)
	{
	}
}
使用内部振荡器设置系统时钟之后,需要调用预设的SystemCoreClockUpdate()完成时钟频率的更新(更新全局变量SystemCoreClock的值)。文章来源:https://www.toymoban.com/news/detail-645042.html
/**
  * @brief  Update SystemCoreClock variable according to Clock Register Values.
  *         The SystemCoreClock variable contains the core clock (HCLK), it can
  *         be used by the user application to setup the SysTick timer or configure
  *         other parameters.
  *
  * @note   Each time the core clock (HCLK) changes, this function must be called
  *         to update SystemCoreClock variable value. Otherwise, any configuration
  *         based on this variable will be incorrect.
  *
  * @note   - The system frequency computed by this function is not the real
  *           frequency in the chip. It is calculated based on the predefined
  *           constant and the selected clock source:
  *
  *           - If SYSCLK source is HSI, SystemCoreClock will contain the HSI_VALUE(*)
  *
  *           - If SYSCLK source is HSE, SystemCoreClock will contain the HSE_VALUE(**)
  *
  *           - If SYSCLK source is PLL, SystemCoreClock will contain the HSE_VALUE(**)
  *             or HSI_VALUE(*) multiplied by the PLL factors.
  *
  *         (*) HSI_VALUE is a constant defined in stm32f1xx.h file (default value
  *             8 MHz) but the real value may vary depending on the variations
  *             in voltage and temperature.
  *
  *         (**) HSE_VALUE is a constant defined in stm32f1xx.h file (default value
  *              8 MHz or 25 MHz, depedning on the product used), user has to ensure
  *              that HSE_VALUE is same as the real frequency of the crystal used.
  *              Otherwise, this function may have wrong result.
  *
  *         - The result of this function could be not correct when using fractional
  *           value for HSE crystal.
  * @param  None
  * @retval None
  */
void SystemCoreClockUpdate (void)
{
  uint32_t tmp = 0, pllmull = 0, pllsource = 0;

#ifdef  STM32F10X_CL
  uint32_t prediv1source = 0, prediv1factor = 0, prediv2factor = 0, pll2mull = 0;
#endif /* STM32F10X_CL */

#if defined (STM32F10X_LD_VL) || defined (STM32F10X_MD_VL) || (defined STM32F10X_HD_VL)
  uint32_t prediv1factor = 0;
#endif /* STM32F10X_LD_VL or STM32F10X_MD_VL or STM32F10X_HD_VL */

  /* Get SYSCLK source -------------------------------------------------------*/
  tmp = RCC->CFGR & RCC_CFGR_SWS;

  switch (tmp)
  {
    case 0x00:  /* HSI used as system clock */
      SystemCoreClock = HSI_VALUE;
      break;
    case 0x04:  /* HSE used as system clock */
      SystemCoreClock = HSE_VALUE;
      break;
    case 0x08:  /* PLL used as system clock */

      /* Get PLL clock source and multiplication factor ----------------------*/
      pllmull = RCC->CFGR & RCC_CFGR_PLLMULL;
      pllsource = RCC->CFGR & RCC_CFGR_PLLSRC;

#ifndef STM32F10X_CL
      pllmull = ( pllmull >> 18) + 2;

      if (pllsource == 0x00)
      {
        /* HSI oscillator clock divided by 2 selected as PLL clock entry */
        SystemCoreClock = (HSI_VALUE >> 1) * pllmull;
      }
      else
      {
 #if defined (STM32F10X_LD_VL) || defined (STM32F10X_MD_VL) || (defined STM32F10X_HD_VL)
       prediv1factor = (RCC->CFGR2 & RCC_CFGR2_PREDIV1) + 1;
       /* HSE oscillator clock selected as PREDIV1 clock entry */
       SystemCoreClock = (HSE_VALUE / prediv1factor) * pllmull;
 #else
        /* HSE selected as PLL clock entry */
        if ((RCC->CFGR & RCC_CFGR_PLLXTPRE) != (uint32_t)RESET)
        {/* HSE oscillator clock divided by 2 */
          SystemCoreClock = (HSE_VALUE >> 1) * pllmull;
        }
        else
        {
          SystemCoreClock = HSE_VALUE * pllmull;
        }
 #endif
      }
#else
      pllmull = pllmull >> 18;

      if (pllmull != 0x0D)
      {
         pllmull += 2;
      }
      else
      { /* PLL multiplication factor = PLL input clock * 6.5 */
        pllmull = 13 / 2;
      }

      if (pllsource == 0x00)
      {
        /* HSI oscillator clock divided by 2 selected as PLL clock entry */
        SystemCoreClock = (HSI_VALUE >> 1) * pllmull;
      }
      else
      {/* PREDIV1 selected as PLL clock entry */

        /* Get PREDIV1 clock source and division factor */
        prediv1source = RCC->CFGR2 & RCC_CFGR2_PREDIV1SRC;
        prediv1factor = (RCC->CFGR2 & RCC_CFGR2_PREDIV1) + 1;

        if (prediv1source == 0)
        {
          /* HSE oscillator clock selected as PREDIV1 clock entry */
          SystemCoreClock = (HSE_VALUE / prediv1factor) * pllmull;
        }
        else
        {/* PLL2 clock selected as PREDIV1 clock entry */

          /* Get PREDIV2 division factor and PLL2 multiplication factor */
          prediv2factor = ((RCC->CFGR2 & RCC_CFGR2_PREDIV2) >> 4) + 1;
          pll2mull = ((RCC->CFGR2 & RCC_CFGR2_PLL2MUL) >> 8 ) + 2;
          SystemCoreClock = (((HSE_VALUE / prediv2factor) * pll2mull) / prediv1factor) * pllmull;
        }
      }
#endif /* STM32F10X_CL */
      break;

    default:
      SystemCoreClock = HSI_VALUE;
      break;
  }

  /* Compute HCLK clock frequency ----------------*/
  /* Get HCLK prescaler */
  tmp = AHBPrescTable[((RCC->CFGR & RCC_CFGR_HPRE) >> 4)];
  /* HCLK clock frequency */
  SystemCoreClock >>= tmp;
}
总结
本文所述的设计方法,能够在外部晶振故障后自动切换到内部晶振,提高系统的可靠性与稳定性。注意,上述示例只在单片机启动时进行时钟源检测,因此,如果是处理运行时的突发时钟故障,需要设计配套的看门狗,在系统陷入异常状态后自动重启系统。文章来源地址https://www.toymoban.com/news/detail-645042.html
到了这里,关于单片机外部晶振故障后自动切换内部晶振——以STM32为例的文章就介绍完了。如果您还想了解更多内容,请在右上角搜索TOY模板网以前的文章或继续浏览下面的相关文章,希望大家以后多多支持TOY模板网!


