说明
Zookeeper中的客户端配置认证可以使用两种方法:digest和Kerberos。
客户端鉴权配置
authProvider.1=org.apache.zookeeper.server.auth.SASLAuthenticationProvider
该配置是用于启用Zookeeper SASL认证提供程序的选项,它是Zookeeper中一种基于Kerberos的身份验证方式。SASL(Simple Authentication and Security Layer)是一种通用的安全联接层协议,通常用于安全认证。
具体来说,配置项"authProvider.1=org.apache.zookeeper.server.auth.SASLAuthenticationProvider"指定了SASLAuthenticationProvider作为ZooKeeper的认证提供程序。这意味着ZooKeeper使用SASL协议来进行认证,而不是常规的用户名和密码方式。
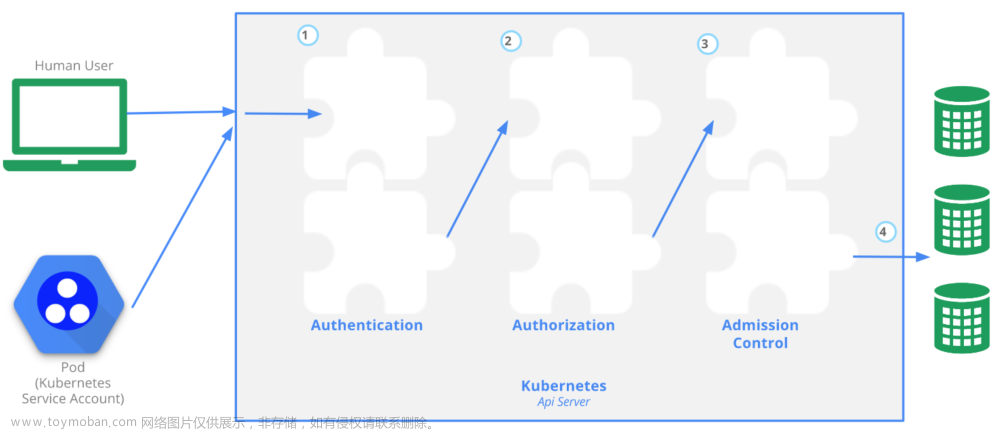
在ZooKeeper中,SASL认证需要依赖Kerberos环境的支持。客户端需要通过Kerberos进行认证后才能访问Zookeeper服务。当客户端访问Zookeeper时,Zookeeper服务会向Kerberos服务器索取票据,对客户端进行身份验证,并验证可访问的Zookeeper节点权限。
总之,该配置的作用是启用SASL认证提供程序,以增强ZooKeeper服务的安全性和可靠性。
Simply put
In ZooKeeper, client authentication can be configured by using the following steps:
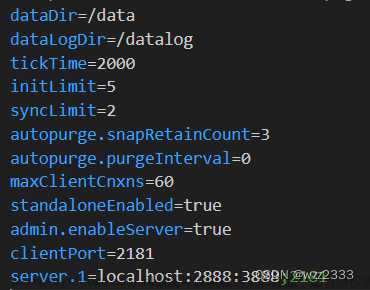
- Enable authentication in the ZooKeeper server configuration file ( zoo.cfg ). Set the authProvider parameter to specify the authentication provider class. For example:
authProvider.1=org.apache.zookeeper.server.auth.SASLAuthenticationProvider
- Configure the authentication provider properties in the server configuration file. The properties depend on the chosen authentication provider. For example, for SASL authentication, you would configure the jaasLoginRenew property:
jaasLoginRenew=true
- Create a JAAS (Java Authentication and Authorization Service) configuration file. This file specifies the login modules and their options for authentication. For example, you can create a file named zookeeper_jaas.conf with the following content:
Server {
    org.apache.zookeeper.server.auth.DigestLoginModule required
    user_admin="admin_password";
};
This example uses the DigestLoginModule for authentication and defines a user “user_admin” with the password “admin_password”.
- Specify the JAAS configuration file location in the ZooKeeper server JVM arguments. Add the following argument to the server start command:
-Djava.security.auth.login.config=<path_to_jaas_config_file>
-
Restart the ZooKeeper server for the changes to take effect.
-
On the client side, create a configuration file ( zoo.cfg ) and set the authProvider parameter to the same authentication provider class used on the server side.
-
Specify the login credentials for the client application in the client JVM arguments. Add the following argument to the client application start command:
-Dzookeeper.sasl.client.username=<username>
-Dzookeeper.sasl.client.password=<password>
Replace and with the appropriate credentials.文章来源:https://www.toymoban.com/news/detail-647221.html
- Connect to ZooKeeper using the client application, and the authentication will be performed based on the configured provider and credentials.
Note that the specific steps and configuration options may vary depending on the version of ZooKeeper and the chosen authentication provider. It is recommended to consult the ZooKeeper documentation and relevant resources for your specific use case.文章来源地址https://www.toymoban.com/news/detail-647221.html
到了这里,关于Zookeeper中的客户端配置认证(zoo_client.conf)的文章就介绍完了。如果您还想了解更多内容,请在右上角搜索TOY模板网以前的文章或继续浏览下面的相关文章,希望大家以后多多支持TOY模板网!