回顾一些定义
NestJS 部分
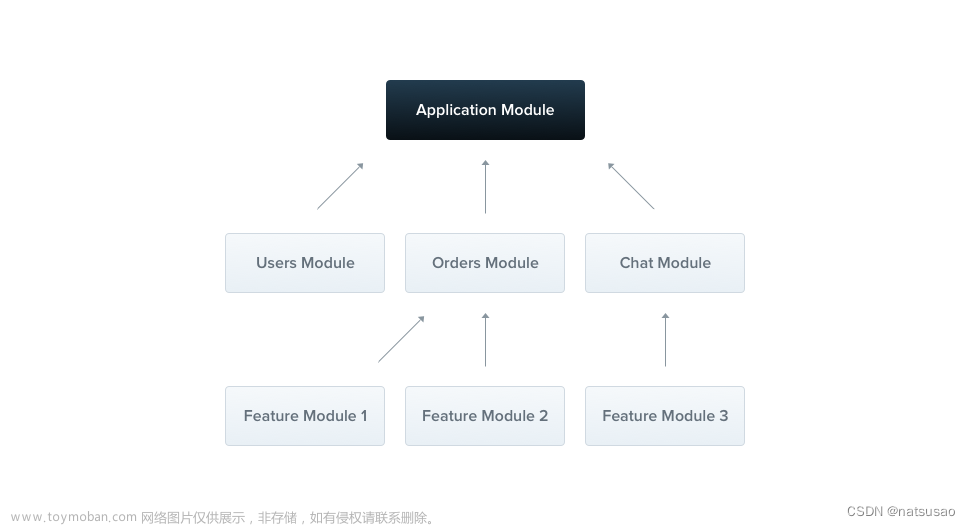
Module 模块结构

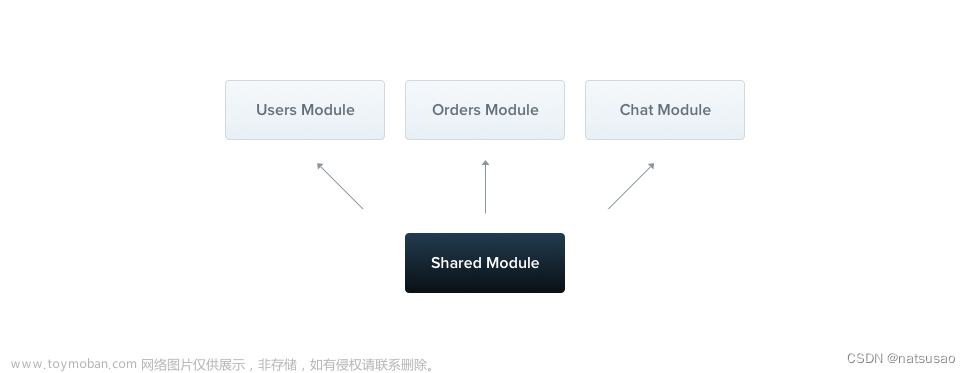
模块是一个图状引用关系。
模块的实例化有三种模式。默认情况是 singletones 模式,也就是模块可能被引用,但不同的引用处拿的是同一个共享实例,也就是说一个进程有一个唯一的实例被共享。

模块(Module)是 nestjs 的最基础的代码组织结构,Provider 、Controller 等等需要依托 Module 存在。
IoC 与 Provider 概念
绝大多数情境下,nestjs 的 IoC 其实就是利用 typescript 的修饰器(decorator)的编译能力来提前预定好服务的提供者(provider)跟消费者的对应关系。
这里的 Provider 可以是 nestjs 中的 Service 类(事实上 service 这个概念并不严格),也可以是任意的比如数组、字符串等的数据结构,只要 Inject 进去对应的使用地方即可(需要对象标记为 Injectable)。
使用的时候跟 IoC 提供对应的 key 即可拿出来。这个 key 默认写法下是 Service Class 本身,当然也可以自己指定。
一般写法,key 为 Class 定义本身:
@Module({
  imports: [TypeOrmModule.forFeature([UserEntity], 'webdb')],
  providers: [UserService], // UserService 的 key 就是它本身的 Class 定义
  exports: [UserService],
  controllers: [UserController],
})
export class UserModule {}
指定 key 写法,自由发挥:
@Module({
  imports: [TypeOrmModule.forFeature([UserEntity], 'webdb')],
  providers: [
    {
      provide: `userServiceWhatever`,
      useClass: UserService,
    },
  ],
  controllers: [UserController],
  exports: ['userServiceWhatever'],
})
export class UserModule {}
注意到 exports 也不再是填写 UserService 类定义,而是刚刚指定的 Provider 的 key。
同时,使用这种写法之后,nestjs 的构造函数的类型语法糖就无法使用了。这是因为 key 不再是 Provider 的 Class 定义,nestjs 也就无法根据构造函数的类型进行自动的注入。
因此需要用 Inject 显式指定 key:
Guard 概念

守卫的概念可以类比中间件。但跟中间件不同,nestjs 认为中间件 next 的写法并不知道下一步 handler 的逻辑,会引起难以理解和不确定的问题。相反守卫则可以明确知道下一步修饰的是什么,它也可以拿到对应的上下文 Context 来进行操作,语义上会更明确。(我持保留意见)
But middleware, by its nature, is dumb. It doesn’t know which handler will be executed after calling the next() function. On the other hand, Guards have access to the ExecutionContext instance, and thus know exactly what’s going to be executed next. They’re designed, much like exception filters, pipes, and interceptors, to let you interpose processing logic at exactly the right point in the request/response cycle, and to do so declaratively. This helps keep your code DRY and declarative.
NestJS guard document
守卫的直接作用对象是 Controller ,作用域可以是整个 Controller 也可以是具体 Controller 下的某个路径。
作用整个 Controller 的例子:
@Controller('user')
@UseGuards(JwtAuthGuard, RolesGuard)
export class UserController {
  constructor(
    @Inject('userServiceWhatever') private readonly userService?: UserService,
  ) {}

  @Get('testjwt')
  async testJwt(@Query('echo') echo: string): Promise<string> {
    return echo;
  }
作用 Controller 下某个路径的例子:
@Controller('auth')
export class AuthController {
  constructor(
    private readonly authService: AuthService,
  ) {}

  @UseGuards(LocalAuthGuard)
  @Post('login')
  async login(@Request() req: AuthenticatedRequest): Promise<AccessToken> {
    const token = await this.authService.login(req.user);
    return token;
  }
 }
守卫可以 Use 多个,同时发挥作用。Use 多个时需要注意 Guard 顺序。后面的鉴权步骤里就是此例子。
HTTP 鉴权部分
暴论私货
HTTP 鉴权可以是一个很大的命题,但也可以粗暴的分两个部分来看:
- 数据传递协议
- 授权机制
(1)数据传递协议方面,最简单的最暴力的即在 body 或者 query 又或者是 params 里面带上 username 、password 或者 apikey 。
# 举例说明
curl --location 'http://127.0.0.1/auth/login' \
--header 'Content-Type: application/json' \
--data '{
    "username":"admin",
    "password":"admin"
}'
但更符合标准的做法是,将这些信息放在HTTP头的 Authorization 中带上。
比如上面的基础的 username + password 的鉴权可以按照
Basic <Base64 encoded username and password>
格式在 Authorization 中携带上来。
# Basic base64(username:passworld)
curl --location 'http://127.0.0.1:9000/web/auth/login' \
--header 'Content-Type: application/json' \
--header 'Authorization: Basic YWRtaW46MTIzNDU2' \
--data '{}'
而其他的鉴权方法也可以是 Authorization 标头里的变种。比如 JWT 的 token 可以变成:
# 随便签发了一个 {a:1} 的 JWT,可以反 base64 观察。
curl --location 'http://127.0.0.1:9000/web/auth/login' \
--header 'Content-Type: application/json' \
--header 'Authorization: Bearer eyJhbGciOiJIUzI1NiJ9.eyJhIjoxfQ.0PrV7l38kwq5la4NPUUl4KnUDB4R42c8OAduhooPvng' \
--data '{}'
其中 Bearer 是持票人的意思,意为是后面这个用户的权限。
这个标准不强制(比如后面的 passport-local 的策略里就不采用这种方式而采用单独的参数),但我个人非常喜欢和推荐。这让 HTTP 报文变得整洁。
基本上传输层面就是这样,没什么其他的花活了。
(2)授权机制方面简短来说,也无非就几种:
-
最粗暴的,直接给一个类似密码的东西给用户,访问时在Authorization 中带上,后端接收到后验证即可。此密码是唯一生成的,所以后端既能验证密码对不对,也能根据密码找到对应的用户。
服务类的调用会非常常用这种(角色少、过程快捷、相对安全)。不同场景下的名字不同,比如 apikey、secret、appkey 等等。 -
用户名、密码组合验证。也叫 Basic 验证,这种就不用多说了。
-
JWT 验证。这种的基础原理简而言之就是给你签发一张加了保护的、不可更改的、别人一拿到就能辨真假的通行证。打个比方是给你盖了公章的护照。拿着护照就可以通行其他地方,你自己并不能修改护照的内容。同时由于护照在你的手上,护照签发机关也不能随时召回或者修改。过期失效了你就得重新找签发机关进行重签。这种原理的实现形式非常多,JWT 只是一种用三段式(head、payload、sign)来表达这种原理的规范。
-
OAuth 验证。这种方式简而言之就是,在验明用户正身之后(不管是用户名密码还是其他的登录验证方式),让用户拿到临时的密码,指定好这个密码的访问权限之后,让用户自主的去二次派发。派发到的第三方再用密码兑换一个临时的访问凭证 aceess_token ,必要时同时提供 refresh_token 功能保持长时间联系。这种形式常用于需要三方交互的场景,比如接入用户的微信登录。
-
其他的验证方式就不一一介绍了。要么不常用,要么只是变种。比如 Digest Auth 其实是用户名密码验证的加强版。但其实在 https 大行其道的现代,基本没什么用处了。
很多时候我们需要复用很多种鉴权方式共同作用,而不是依靠单一的某种鉴权方式来完成目标。下面的 passport 鉴权例子会提到。
Passport 组件的应用
Passport 看上去很高级,但说白了,它解决的问题很简单。即按照固定的 strategy (策略)插件自动的读取藏在 header 或者是 body 里面的信息,再序列化回去放在指定的 context 或者其他什么地方中。
经过 strategy 后的其他服务直接就能根据 context 访问到序列化后的用户信息。比如 uid 、权限信息、是否登陆有效等等。
passport 有比较丰富的插件可选,介绍我们将会用到的三个典型的。
passport-jwt 插件
提供了从头部提取 jwt 并验证 jwt 合理性的能力。
passport-local 插件
提供了从消息暴力拿出 username 跟 password 的能力,并用于后续验证跟序列化的能力。
passport-http-bearer 插件
裸提取 Authorization 头里的 Bearer 的插件。提取之后自己做逻辑。
NestJS 配合 Passport 鉴权思路
整个服务器可以划分三种不同的授权策略:
(1)第一种,用来提供内部的服务api调用的鉴权。由于是内部服务直接的调用,因此简单的在 Authorization 里带上 apikey 即可。用到 passport-http-bearer 即可。
(2)第二种,用来进行最开始的用户鉴权。这一步可以延申很多,比如接入第三方登录等等,就不讨论了。只说说最简单的用户名密码形式。这就是 passport-local 的用武之地。
(3)第三种,在用户登录完成之后,提供的用 jwt 签发的长时效 token,同时带一个可以刷新的 refresh token 用以自动刷新 token 延长免登录。一般来说 refresh token 时效会比 token 长很多。这么设计可以让一直处于活跃的用户不需要一直重签也能保证不需要重新进行第二种的鉴权。
为了配合第三种授权,前端在发送信息的 Axios 里,需要处理token失败的错误号,并至少发起一次 token 刷新然后重新发起。重试失败后才可判断为登录失效并跳转到登录页面。
Passport 配合 Nestjs 非常简单:
1、安装 @nestjs/passport 包,包里有 passport 需要拓展的 Guard 的逻辑类以及 Strategy 策略类;
2、对应需求,自定义好继承自 passport Strategy 的 Strategy 类,主要是处理一下序列化问题。定义好之后,需要在对应的 module 里将自己作为 provider 注册进去 nestjs 的 IoC,这样具体的 Guard 才能找到它;
3、对应需求,自定义好继承自 passport Guard 的 Guard 类,这里几乎没有要自定义的部分,基本上只要指定用哪个 Strategy 就行了。比如:
import { Injectable } from '@nestjs/common';
import { AuthGuard } from '@nestjs/passport';

@Injectable()
export class LocalAuthGuard extends AuthGuard('local') {}
就是简单的说此 Guard 需要用到 local 策略(亦即 username 跟 password)。如果完全不 extend 一个新的守护类,而直接用 passport 带的 AuthGuard 默认的就是这种策略。
具体的Nestjs实施
安装 @nestjs/passport
npm install @nestjs/passport
安装三个即将用到的 passport 插件
#提取 bearer 中的 api_key 等
npm install passport-http-bearer
#jwt验证
npm install passport-jwt
#username、password 组合验证
npm install passport-local
新建一个 auth module,专门处理各种各样的权限操作
略,参考 nestjs 的 module 创建
自定义各种 strategy,应对不同的鉴权策略
基础的 local strategy
使用 passport-local 包里提供的 Strategy 初始化好 PassportStrategy 基础类,并指定指定好 username、passport 的获取位置(可以设置从 head 中获取,也可以设置为从 body 中获取)。
获取到 username 跟 password 之后,就可以转而在 validate 接口中做验证了。验证好的 user 会序列化到上下文的 req 中。
import { Injectable, UnauthorizedException } from '@nestjs/common';
import { PassportStrategy } from '@nestjs/passport';
import { AuthService } from '../auth.service';
import { Strategy } from 'passport-local';
import { UserPrincipal } from '../interface/user-principal.interface';

//用于用户名密码组合检验
@Injectable()
export class LocalStrategy extends PassportStrategy(Strategy) {
  constructor(private authService: AuthService) {
    super({
      usernameField: 'username',
      passwordField: 'password',
    });
  }

  async validate(username: string, password: string): Promise<UserPrincipal> {
    console.log(`local validate, ${username}, ${password}`);
    const user: UserPrincipal = await this.authService.validateUser(
      username,
      password,
    );
    if (!user) {
      throw new UnauthorizedException();
    }
    return user;
  }
}
记得在对应的 auth.module 里引入为 Provider (以让下面的 Guard 取用)。
对应的 Guard 写法:
import { Injectable } from '@nestjs/common';
import { AuthGuard } from '@nestjs/passport';

@Injectable()
export class LocalAuthGuard extends AuthGuard('local') {}
很简单,指定为 local 类型的 AuthGuard 即可。 Guard 会自动去找对应的 provider 进行验证逻辑。
用于 apikey 的 apiKey strategy
比较简单粗暴,直接取出 bearer 对比即可。
import { Injectable, UnauthorizedException } from '@nestjs/common';
import { PassportStrategy } from '@nestjs/passport';
import { Strategy } from 'passport-http-bearer';

//直接定死先
const DEFAULT_API_TOKEN = 'apiSecreat;

//用于api key 的检查
@Injectable()
export class ApiSecretStrategy extends PassportStrategy(
  Strategy,
  'api-secret',
) {
  async validate(token: string) {
    if (token != DEFAULT_API_TOKEN) {
      throw new UnauthorizedException();
    }

    return 'ok';
  }
}
需要注意的是,取 bearer 的策略不一定应用在一个地方,所以加以了区分。方式是 PassportStrategy 的第二个参数,即名字。
对应的 guard 这样定义即可:
import { Injectable } from '@nestjs/common';
import { AuthGuard } from '@nestjs/passport';

@Injectable()
export class ApiSecretGuard extends AuthGuard('api-secret') {}
用于前端 api 鉴权的 JWT strategy
在前端使用 local 验证登录之后,就可以采用 jwt token 的方式已经鉴权了。而不需要重复走比较长的 local 路线。
stategy 如下:
import { Inject, Injectable } from '@nestjs/common';
import { PassportStrategy } from '@nestjs/passport';
import { ExtractJwt, Strategy } from 'passport-jwt';
import { JwtPayload } from '../interface/jwt-payload.interface';
import { UserPrincipal } from '../interface/user-principal.interface';
import jwtConfig from '../../../config/jwt.config';
import { ConfigType } from '@nestjs/config';

//用于JWT权限检验

// 1. Given a JWT token `XXX`, access */profile* with header `Authorization:Bearer XXX`.
// 2. `JwtAuthGuard` will trigger `JwtStrategy`, and calls `validate` method, and store the result back to `request.user`.
@Injectable()
export class JwtStrategy extends PassportStrategy(Strategy) {
  constructor(@Inject(jwtConfig.KEY) config: ConfigType<typeof jwtConfig>) {
    super({
      // The `jwtFromRequest` specifies the approach to extract token,  it can be from HTTP cookie or request header `Authorization` .
      jwtFromRequest: ExtractJwt.fromAuthHeaderAsBearerToken(),
      // If `ignoreExpiration` is false, when decoding the JWT token, it will check expiration date.
      ignoreExpiration: false,
      //The `secretOrKey` is used to sign the JWT token or decode token.
      secretOrKey: config.secretKey,
    });
  }

  //In the `validate` method, the payload is the content of  **decoded** JWT claims. You can add custom validation based on the claims.
  validate(payload: JwtPayload): UserPrincipal {
    return {
      email: payload.email,
      username: payload.sub,
      roles: payload.roles,
    };
  }
}
基本代码很简单,这里的 jwt 就是在 local 鉴权时 sign 进去的。payload 信息可以拿到对应的 uid 等信息。每一次 api guard 后的请求都能在 req.user 里拿到。
对应的 guard 写法如下:
import { Injectable } from '@nestjs/common';
import { AuthGuard } from '@nestjs/passport';

@Injectable()
export class JwtAuthGuard extends AuthGuard('jwt') {}
只需要指明是 jwt 的策略即可。
用于前端 api 刷新鉴权的 JWT refresh strategy
如果直接签好一个固定的 jwt ,不能主动更新,那么可预见的是 jwt 在过期的一瞬间会导致页面登录失效。
这样的体验感是极差的。而每次请求都重新去刷新 jwt ,无疑会让 jwt 形同虚设,不断的使用最大代价的 local 策略进行验证。
所以应该在签发一个普通的 token 的同时,也设置一个刷新 token(同样也是 jwt),刷新 token 比api token 时长应该更长。
这样可以分情况决定策略:
1、普通 token 过期,刷新 token 有效。前端应该重新向后端发起刷新请求,拿到新的普通 token 以及新的刷新 token ,再次发起上次失败的请求;
2、普通 token 过期,刷新 token 也过期了。这种情况才会直接判定登录彻底失效。
由于刷新 token 也采用了 jwt 策略,所以需要在对应的 strategy 加上名字 jwt-refresh-token 加以区分:
import { Inject, Injectable } from '@nestjs/common';
import { PassportStrategy } from '@nestjs/passport';
import { ExtractJwt, Strategy } from 'passport-jwt';
import {
  JwtRefreshTokenPayload,
  JwtRefreshToken,
} from '../interface/jwt-payload.interface';
import jwtConfig from '../../../config/jwt.config';
import { ConfigType } from '@nestjs/config';

//用于JWT权限检验

// 1. Given a JWT token `XXX`, access */profile* with header `Authorization:Bearer XXX`.
// 2. `JwtAuthGuard` will trigger `JwtStrategy`, and calls `validate` method, and store the result back to `request.user`.
@Injectable()
export class JwtRefreshTokenStrategy extends PassportStrategy(
  Strategy,
  'jwt-refresh-token',
) {
  constructor(@Inject(jwtConfig.KEY) config: ConfigType<typeof jwtConfig>) {
    super({
      // The `jwtFromRequest` specifies the approach to extract token,  it can be from HTTP cookie or request header `Authorization` .
      jwtFromRequest: ExtractJwt.fromAuthHeaderAsBearerToken(),
      // If `ignoreExpiration` is false, when decoding the JWT token, it will check expiration date.
      ignoreExpiration: false,
      //The `secretOrKey` is used to sign the JWT token or decode token.
      secretOrKey: config.secretKey,
    });
  }

  //In the `validate` method, the payload is the content of  **decoded** JWT claims. You can add custom validation based on the claims.
  validate(payload: JwtRefreshTokenPayload): JwtRefreshToken {
    return {
      sub: payload.sub,
    };
  }
}
跟着在对应的 guard 取用:
import { Injectable } from '@nestjs/common';
import { AuthGuard } from '@nestjs/passport';

@Injectable()
export class JwtRefreshTokenAuthGuard extends AuthGuard('jwt-refresh-token') {}
此 guard 只修饰刷新 token 的 controller 即可。文章来源:https://www.toymoban.com/news/detail-647720.html
@UseGuards(JwtRefreshTokenAuthGuard)
@Post('refreshToken')
async refreshToken(
  @Request() req: AuthenticatedRefreshTokenRequest,
): Promise<AccessToken> {
  this.logger.log(`recive refreshToken:${JSON.stringify(req.sub)}`);
  const token = await this.authService.refresh(req.sub);
  return token;
}
至此整个基础的鉴权体系就完毕了,剩下的就是根据自己的需求进行拓展。文章来源地址https://www.toymoban.com/news/detail-647720.html
到了这里,关于nestjs 基础、使用 passport 来进行鉴权的文章就介绍完了。如果您还想了解更多内容,请在右上角搜索TOY模板网以前的文章或继续浏览下面的相关文章,希望大家以后多多支持TOY模板网!


![[云计算学习3] Linux基础 : 使用chrony搭建时间服务器并让下游NTP同步时间](https://imgs.yssmx.com/Uploads/2024/02/618573-1.gif)


