我们刚接手一台刚安装好服务器系统之后,可以对系统进行一些基础优化:
常规设定:
centos:
1.关闭 iptables
2.关闭 selinux
3.设定 Chrony

Ubuntu:
4. /etc/security/limits.conf
5. /etc/sysctl.conf
1.首先使用国内阿里云的yum源(默认是国外的yum源仓库 中间会经过很多路由器到国内所速度慢,效率不高,所以换成国内的)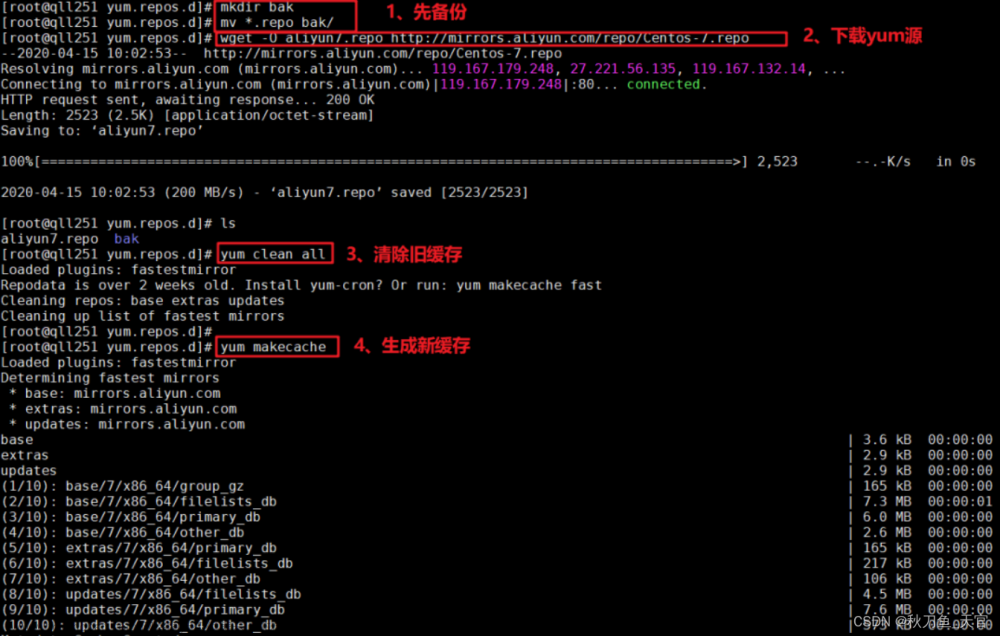
把原来官方默认的源先不要删除!做个备份; 或者直接再写个repo源;再清除重新生成新的缓存
[root@client7 ~]# cd /etc/yum.repos.d
[root@client7 yum.repos.d]# mkdir backup
[root@client7 yum.repos.d]# mv *.backup
[root@client7 yum.repos.d]# ll
total 4
drwxr-xr-x. 2 root root  220 Mar 20  2021 backup
-rw-r--r--. 1 root root 2552 Mar 20  2021 base.repo

[root@client7 yum.repos.d]# cat base.repo
[base]
name=base
baseurl=https://mirrors.aliyun.com/centos/$releasever/os/$basearch/
        https://mirrors.huaweicloud.com/centos/$releasever/os/$basearch/
        https://mirrors.cloud.tencent.com/centos/$releasever/os/$basearch/
        https://mirrors.tuna.tsinghua.edu.cn/centos/$releasever/os/$basearch/
        http://mirrors.163.com/centos/$releasever/os/$basearch/
        http://mirrors.sohu.com/centos/$releasever/os/$basearch/
gpgcheck=1
gpgkey=file:///etc/pki/rpm-gpg/RPM-GPG-KEY-CentOS-$releasever

[epel]
name=epel
baseurl=https://mirrors.aliyun.com/epel/$releasever/$basearch/
        https://mirrors.huaweicloud.com/epel/$releasever/$basearch/
        https://mirrors.cloud.tencent.com/epel/$releasever/$basearch/
        https://mirrors.tuna.tsinghua.edu.cn/epel/$releasever/$basearch/
gpgcheck=1
gpgkey=https://mirrors.aliyun.com/epel/RPM-GPG-KEY-EPEL-$releasever

[extras]
name=extras
baseurl=https://mirrors.aliyun.com/centos/$releasever/extras/$basearch/
        https://mirrors.huaweicloud.com/centos/$releasever/extras/$basearch/
        https://mirrors.cloud.tencent.com/centos/$releasever/extras/$basearch/
        https://mirrors.tuna.tsinghua.edu.cn/centos/$releasever/extras/$basearch/
        http://mirrors.163.com/centos/$releasever/extras/$basearch/
        http://mirrors.sohu.com/centos/$releasever/extras/$basearch/
gpgcheck=1
gpgkey=file:///etc/pki/rpm-gpg/RPM-GPG-KEY-CentOS-$releasever

[updates]
name=updates
baseurl=https://mirrors.aliyun.com/centos/$releasever/updates/$basearch/
        https://mirrors.huaweicloud.com/centos/$releasever/updates/$basearch/
        https://mirrors.cloud.tencent.com/centos/$releasever/updates/$basearch/
        https://mirrors.tuna.tsinghua.edu.cn/centos/$releasever/updates/$basearch/
        http://mirrors.163.com/centos/$releasever/updates/$basearch/
        http://mirrors.sohu.com/centos/$releasever/updates/$basearch/
gpgcheck=1
gpgkey=file:///etc/pki/rpm-gpg/RPM-GPG-KEY-CentOS-$releasever

[centosplus]
name=centosplus
baseurl=https://mirrors.aliyun.com/centos/$releasever/centosplus/$basearch/
        https://mirrors.huaweicloud.com/centos/$releasever/centosplus/$basearch/
        https://mirrors.cloud.tencent.com/centos/$releasever/centosplus/$basearch/
        https://mirrors.tuna.tsinghua.edu.cn/centos/$releasever/centosplus/$basearch/
        http://mirrors.163.com/centos/$releasever/centosplus/$basearch/
        http://mirrors.sohu.com/centos/$releasever/centosplus/$basearch/
gpgcheck=1
gpgkey=file:///etc/pki/rpm-gpg/RPM-GPG-KEY-CentOS-$releasever
2.安装常用的软件工具包
CentOS: 存在即忽略
    yum install -y tree nmap sysstat gcc gcc-c++ make telnet lrzsz tree screen tmux man-pages strace tmux man-pages strace  autoconf glibc glibc-devel pcre pcre-devel openssl openssl-devel mailx systemd-devel zlib-devel vim  lsof tcpdump  net-tools bc bzip2 zip unzip nfs-utils  apr* redhat-rpm-config bash-completion
 bash-completion epel-release chrony dos2unix wget

Ubuntu: 存在即忽略
    apt purge ufw lxd lxd-client lxcfs liblxc-common
    apt install iproute2 ntpdate tcpdump telnet traceroute nfs-kernel-server nfs-common lrzsz tree openssl libssl-dev libpcre3 libpcre3-dev zlib1g-dev vim ntpdate  traceroute gcc g++ make libsensors4 openssh-server iotop unzip zip
3.关闭SELinux ?
SELinux 是什么?
(Security-Enhanced Linux)是由美国国家安全局(NSA)和Linux社区共同开发的,它是一种访问控制体系,在这种访问控制体系下,进程只能访问进程任务中需要的文件。

因为Linux中的权限管理是针对文件的,而不是针对进程,所以root启动了某个进程,这个进程是可以操作任何文件,而seLinux在Linux文件权限之外增加了对进程的进程的限制,蓑衣进程只能在进程允许的范围内进行操作。

-临时关闭SElinux,可在命令行执行如下命令
[root@Client7 ~]# setenforce    #表示 0启动;1关闭
usage:  setenforce [ Enforcing | Permissive | 1 | 0 ]

[root@Client8 ~]# getenforce  #[| 1 | 0 ]
setenforce: SELinux is disabled

说明:数字0表示Permissive,相当于disabled ;数字1表示开启selinux
提示:修改配置SELinux后,要想使生效,必须要重启系统。因此,可配合使用 setenforce 0 这个临时关闭
命令,这样在重启前后都可以使得SELinux关闭生效了,也就是无需立刻重启服务器了,因为在生产环境下Linux服务器不能随意重启!

- 修改配置文件,使得关闭SELinux永久生效
vim /etc/selinux/config     修改#SELINUX=enforcing;改为SELINUX=disabled,即可
sed -i 's/enforcing/disabled/g' /etc/selinux/config
4.修改网卡名ens33 为标准网卡名称 eth0
[root@Centos7 ~]# cat /etc/default/grub   #修改完网卡参数后,增加内核参数
GRUB_TIMEOUT=5
GRUB_DISTRIBUTOR="$(sed 's, release .*$,,g' /etc/system-release)"
GRUB_DEFAULT=saved
GRUB_DISABLE_SUBMENU=true
GRUB_TERMINAL_OUTPUT="console"
GRUB_CMDLINE_LINUX="crashkernel=auto spectre_v2=retpoline rd.lvm.lv=centos/root net.ifnames=0 biosdevname=0  rd.lvm.lv=centos/swap rhgb quiet"
GRUB_DISABLE_RECOVERY="true"
[root@Centos7 ~]# grub2-mkconfig -o /boot/grub2/grub.cfg    #运行命令
5.关闭防火墙
关闭防火墙的目的 是为了初学者学习更方便,将来学了iptables技术后再统一开启。再企业实际环境中,一般配置外网IP的Linux服务器才需要开启防火墙,但即使有外网IP,对于高并发高流量的业务服务器仍然不能开启,因为会有较大性能损失,会导致网站访问很慢,这种情况只能在前端加更好的硬件防火墙了。
[root@qll251 ~]# iptables -F
[root@qll251 ~]# /etc/init.d/iptables stop
iptables:将链设置为政策 ACCEPT:filter                        [确定]
iptables:清除防火墙规则:  [确定]
iptables:正在卸载模块:    [确定]

[root@qll251 ~]# chkconfig iptables off
[root@qll251 ~]# service iptables stop
-----------------------------------
或者:版本6:
1\关闭防火墙永久生效,重启后不能复原:
永久关闭:chkconfig iptables off       永久开启:chkconfig iptables  on
查看状态:chkconfig --list iptables

2\即时生效,重启后能复原:
关闭:service  iptables  stop      开启:service iptables  start
重启:service iptables restart     查看:service iptables  status

版本7:
1\暂时关闭防火墙                       2\永久关闭防火墙
systemctl stop  firewalld               systemctl  disable  firewalld
3\重启防火墙                          4\永久关闭后重启
systemctl enable firewalld              chkconfig iptables on  //暂时还没有试过

版本8:
1\永久禁用CentOS 8中的防火墙              2\验证防火墙状态是否已经被永久关闭
   systemctl disable firewalld            systemctl  status firewalld
3\ 屏蔽防火墙守护进程服务
   systemctl  mask --now firewalld

开启/关闭ubuntu防火墙方法
先安装:sudo apt-get  install  ufw
使用方法:
启用:sudo ufw  enable    或者 sudo ufw default deny
关闭:sudo ufw  disable   查看状态:sudo ufw  status(inactive状态是防火墙关闭状态,active是开启状态)
- 精简集开机系统启动的服务
Linux 服务器在运行过程中,会有很多默认的服务在运行,而且这些服务通常是没有用的,这些服务占用了系统资源,严重存在安全隐患,可以关闭这些没用的服务。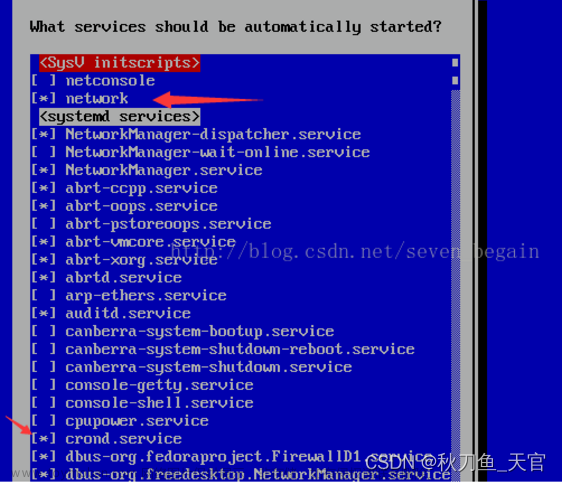
A、但是系统必须开启的这五项服务
(1)sshd:远程连接服务,必须需要开启,要不然无法远程连接Linux。
(2)crond: 定时任务非必须但是很重要;一次性计划任务:at 周期计划任务:crontab
(3)rsyslog:是操作系统中提供的一种机制,系统的守护程序通常会使用rsyslong将各种信息写到系统日志文件中
(4)sysstat:该服务包括监控系统性能及效率的一组工具。这些工具对于收集系统的性能数据很有帮助:核心工具包:ostat:cpu使用率及硬盘吞吐效率工具、 mpstat:提供单个或者多个处理器的数据、 sar负责收集,报告并存储系统活跃的信息 、network:系统启动时,若想关闭或者激活各个网络接口,就必须启动该服务
(5)**network:**系统启动时,若想关闭或者激活各个网络接口,就必须启动该服务 .
chkconfig 是管理系统服务(service)的命令行工具。所谓系统服务(service),就是随系统启动而启动,随系统关闭而关闭的程序。
chkconfig --list ; egrep -v "sshd;network;rsyslog;sysstat;crond" ;grep 3:on ;awk'{print "chkconfig",$1,"off"}';bash
或 chkconfig --list | grep '3:on' | grep -vE 'sshd|rsyslog|network|crond|sysstat' | awk '{print "chkconfig",$1,"off"}' | bash
验证以上5个服务是否开机自启
chkconfig --list ; egrep "sshd;network;rsyslong;sysstat;crond"

B、删除特殊的用户和用户组
Linux当中有很多系统默认的用户,是可以删除的;可以删除的用户组:adm.lp,news, uucp,games,dip 等。
# head -n 13 /etc/passwd |tail -n 10

adm:x:3:4:adm:/var/adm:/sbin/nologin
lp:x:4:7:lp:/var/spool/lpd:/sbin/nologin
sync:x:5:0:sync:/sbin:/bin/sync
shutdown:x:6:0:shutdown:/sbin:/sbin/shutdown
halt:x:7:0:halt:/sbin:/sbin/halt
mail:x:8:12:mail:/var/spool/mail:/sbin/nologin
operator:x:11:0:operator:/root:/sbin/nologin
games:x:12:100:games:/usr/games:/sbin/nologin
ftp:x:14:50:FTP User:/var/ftp:/sbin/nologin
nobody:x:99:99:Nobody:/:/sbin/nologin
7.最小化原则安装
最小化原则 对Linux系统安全来说极其重要:具体包括如下几个基本方面:
*安装Linux系统最小化,即选包最小化,yum安装软件包也要最小化,无用的包不装
*开机自启动服务最小化,即无用的服务不开启。
*操作命令最小化。例如:能用“rm -f test.txt” 就不用“rm -fr test.txt”.
*登陆linux用户最小化。平台没有特殊需求不登陆root,用普通用户登录即可。
*普通用户授权权限最小化,即只给用户必须的管理系统的命令,不能啥都可以干。
*Linux系统文件及目录的权限设置最小化,禁止随意创建,更改,删除文件
*程序服务运行最小化,即程序服务运行应尽量不用root身份运行。
8.更改SSH服务端远程登录的配置
#vi /etc/ssh/sshd_config 配置完sshd生效 /etc/init.d/sshd restart & service sshd restart & systemctl restart sshd.service
参数说明:
(1)#Port 22   端口不要使用22 Port 端口号(默认是22),我们可以随意改但尽量不要使用0到1024之间的端口号(因为port的取值范围是 0 - 65535(即2的16次方)),这里我改为了10680。
(2)#UseDNS no 是否使用DNS,默认yes,设置为no之后登录速度会快
(3)#PermitRootLogin no  //设置不允许root登录;PermitRootLogin 是否允许使用ssh服务root登录(默认yes),改为no。
(4)#GSSAPIAuthentication no   //解决ssh链接慢的问题
(5)#PasswordAuthentication yes  //密码验证是必须的,默认yes
(6)#PermitEmptyPasswords no  //检查空密码是否允许登录;PermitEmptyPasswords 是否允许空密码(默认no)
(7)#LoginGraceTime 2m  //当使用者连接上ssh server的时候,会出现输入密码的画面,在这个画面中,多久没有成功连接上就强迫断线
9.设置Linux服务器的时间同步
1.傻瓜式定时任务配置
echo '*/5 * * * * /usr/sbin/ntpdate time.nist.gov >/dev/null 2>&1' >>/var/spool/cron/root
2.chrony.conf 文件加入公共时钟
root@centos8 ~]#vi  /etc/chrony.conf
# Use public servers from the pool.ntp.org project.
# Please consider joining the pool (http://www.pool.ntp.org/join.html).
尾部添加     格式server XXXXX   iburst
server ntp.aliyun.com iburst
server time.cloud.tencent.com iburst
server 210.72.145.44 iburst
10.加大服务器文件描述符
简单说,在Unix/Linux里面,你的服务只要开启了一个进程,就要占用文件描述符的。Linux默认为1024.如果描述符少了,访问量多了,你的服务器是支撑不了,所以要把描述符加大。
#临时修改文件
[root@CentOS8 ~]#ulimit -n
1024
[root@CentOS8 ~]#ulimit -HSn 65535
[root@CentOS8 ~]#ulimit -n
65535

#永久修改(需要改配置文件 vim /etc/security/limits.conf);这里直接追加即可

echo '*                -      nofile          65535'>>/etc/security/limits.conf
tail -l /etc/security/limits.conf             #这里不用ulimit -n ;tail显示尾端
#*               soft    core            0
#*               hard    rss             10000
#@student        hard    nproc           20
#@faculty        soft    nproc           20
#@faculty        hard    nproc           50
#ftp             hard    nproc           0
#@student        -       maxlogins       4

# End of file
*                -      nofile          65535
[root@Ubuntu1804 ~#logout     #注销,重新启用账户
11、禁止ping
echo 'net.ipv4.icmp_echo_ignore_all = 1' >>/etc/sysctl.conf
sysctl -p
12.设置命令行提示符颜色,以区分生产环境和测试环境
echo 'PS1="\[\e[1;33m\][\u@\h \W]\\$\[\e[0m\]"' > /etc/profile.d/env.sh
source /etc/profile.d/env.sh
13、将服务器新加普通用户及强密码
- 用户密码一般情况下要求大于8位数,尽量使用强密码,含有数字,大小写及特殊符号三部分组成。
- 尽量不使用root用户登录,避免权限过大,可以把普通用户变为root用户
useradd gaosh    ;例如 增加个普通用户(gaosh)
passwd gaosh     ; 已创建的用户gaosh设置密码

#修改 /etc/passwd文件
root限制登录:
root:x:0:0:root:/root:/bin/bash    <====
改为:
root:x:0:0:root:/root:/sbin/nologin

#普通用户改为root用户:
gaosh:x:1012:1010::/home/gaosh:/bin/bash
改为
gaosh:x:0:0::/home/gaosh:/bin/bash  <====
14.隐藏Linux版本信息
系统版本信息的保存位置
#cat /etc/issue
CentOS Linux release 8.2.2004 (Core)
\S
Kernel \r on an \m
#cat /etc/issue.net
CentOS Linux release 8.2.2004 (Core)
\S
Kernel \r on an \m
所以,执行以下命令清除系统版本信息
#> /etc/issue
#> /etc/issue.net

 文章来源:https://www.toymoban.com/news/detail-647754.html
15.内核参数优化 (关于CentOS7)文章来源地址https://www.toymoban.com/news/detail-647754.html
# cat /etc/sysctl.conf
#CTCDN系统优化参数

#关闭ipv6
net.ipv6.conf.all.disable_ipv6 = 1
net.ipv6.conf.default.disable_ipv6 = 1

# 避免放大攻击
net.ipv4.icmp_echo_ignore_broadcasts = 1

# 开启恶意icmp错误消息保护
net.ipv4.icmp_ignore_bogus_error_responses = 1

#关闭路由转发
net.ipv4.ip_forward = 0
net.ipv4.conf.all.send_redirects = 0
net.ipv4.conf.default.send_redirects = 0

#开启反向路径过滤
net.ipv4.conf.all.rp_filter = 1
net.ipv4.conf.default.rp_filter = 1

#处理无源路由的包
net.ipv4.conf.all.accept_source_route = 0
net.ipv4.conf.default.accept_source_route = 0

#关闭sysrq功能
kernel.sysrq = 0

#core文件名中添加pid作为扩展名
kernel.core_uses_pid = 1

# 开启SYN洪水攻击保护
net.ipv4.tcp_syncookies = 1

#修改消息队列长度
kernel.msgmnb = 65536
kernel.msgmax = 65536

#设置最大内存共享段大小bytes
kernel.shmmax = 68719476736
kernel.shmall = 4294967296

#timewait的数量,默认180000
net.ipv4.tcp_max_tw_buckets = 6000
net.ipv4.tcp_sack = 1
net.ipv4.tcp_window_scaling = 1
net.ipv4.tcp_rmem = 4096        87380   4194304
net.ipv4.tcp_wmem = 4096        16384   4194304
net.core.wmem_default = 8388608
net.core.rmem_default = 8388608
net.core.rmem_max = 16777216
net.core.wmem_max = 16777216

#每个网络接口接收数据包的速率比内核处理这些包的速率快时,允许送到队列的数据包的最大数目
net.core.netdev_max_backlog = 262144

#限制仅仅是为了防止简单的DoS 攻击
net.ipv4.tcp_max_orphans = 3276800

#未收到客户端确认信息的连接请求的最大值
net.ipv4.tcp_max_syn_backlog = 262144
net.ipv4.tcp_timestamps = 0

#内核放弃建立连接之前发送SYNACK 包的数量
net.ipv4.tcp_synack_retries = 1

#内核放弃建立连接之前发送SYN 包的数量
net.ipv4.tcp_syn_retries = 1

#启用timewait 快速回收
net.ipv4.tcp_tw_recycle = 1

#开启重用。允许将TIME-WAIT sockets 重新用于新的TCP 连接
net.ipv4.tcp_tw_reuse = 1
net.ipv4.tcp_mem = 94500000 915000000 927000000
net.ipv4.tcp_fin_timeout = 1

#当keepalive 起用的时候,TCP 发送keepalive 消息的频度。缺省是2 小时
net.ipv4.tcp_keepalive_time = 30

#允许系统打开的端口范围
net.ipv4.ip_local_port_range = 1024    65000

#修改防火墙表大小,默认65536
#net.netfilter.nf_conntrack_max=655350
#net.netfilter.nf_conntrack_tcp_timeout_established=1200

# 确保无人能修改路由表
net.ipv4.conf.all.accept_redirects = 0
net.ipv4.conf.default.accept_redirects = 0
net.ipv4.conf.all.secure_redirects = 0
net.ipv4.conf.default.secure_redirects = 0

————————————————以上完毕,感谢观看!
到了这里,关于【Linux的开胃小菜】Linux系统安装后初始化配置操作的文章就介绍完了。如果您还想了解更多内容,请在右上角搜索TOY模板网以前的文章或继续浏览下面的相关文章,希望大家以后多多支持TOY模板网!


