一. 引言
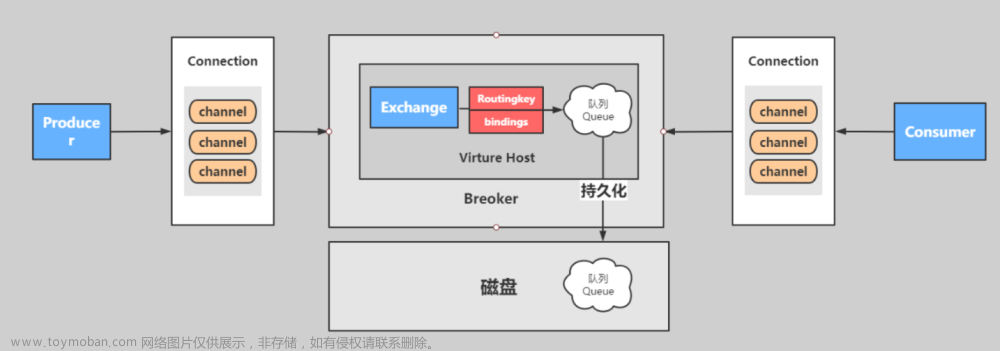
本文主要描述SpringBoot如何与RabbitMQ建立连接,建立多少个连接,以及如何接收消息
二. 相关概念
- ConnectionFactory接口,是客户端与RabbitMQ服务器的tcp socket连接工厂,负责根据服务器地址创建Connection
- Connection是客户端与RabbitMQ服务器的socket连接,它封装了socket协议相关的逻辑(比如接收和发送消息)
- Channel是RabbitMQ客户端与服务器交互的最重要的一个接口,大部分的业务操作是在Channel接口中完成的,包括定义Queue、定义Exchange、绑定Queue与Exchange、发布消息、接收消息等。Channel之间是完全隔离的
Channel与Connection的区别?
- 职责不同。Channel负责封装业务,Connection负责封装Socket连接
- 多线程和性能因素。建立和销毁一个Connection的开销比较大,而Channel是一个建立在Connection内部的逻辑连接,建立和销毁的成本比较低。
注意:在Connection底层,当有多个Channel发送消息时,也是排队发送的。
三. 连接代码实现
-
在https://blog.csdn.net/qq_43216019/article/details/128824328?spm=1001.2014.3001.5501中介绍了如何实现消息接收功能,其中RabbitListenerAnnotationBeanPostProcessor中类中,没扫描到一个消息接收方法,就定义为如下实例:
RabbitListenerEndpoint(接口) SimpleRabbitListenerEndpoint(实现:表示RabbitListenerConfigurer接口所实现类的endPoint MethodRabbitListenerEndpoint(实现:表示@RabbitListener+@RabbitHandler注解方法对应的endpoint)) -
同时在每个RabbitListenerAnnotationBeanPostProcessor类中,对于每一个endpoint,最终都会回调RabbitListenerEndpointRegistery的doStart方法,伪代码:
public void registerListenerContainer(RabbitListenerEndpoint endpoint, RabbitListenerContainerFactory<?> factory, boolean startImmediately) { synchronized(this.listenerContainers) { //创建SimpleMessageListenerContainer实例 MessageListenerContainer container = this.createListenerContainer(endpoint, factory); this.listenerContainers.put(id, container); if (StringUtils.hasText(endpoint.getGroup()) && this.applicationContext != null) { Object containerGroup; if (this.applicationContext.containsBean(endpoint.getGroup())) { containerGroup = (List)this.applicationContext.getBean(endpoint.getGroup(), List.class); } else { containerGroup = new ArrayList(); this.applicationContext.getBeanFactory().registerSingleton(endpoint.getGroup(), containerGroup); } ((List)containerGroup).add(container); } if (this.contextRefreshed) { container.lazyLoad(); } //启动调用SimpleMessageListenerContainer的start方法 if (startImmediately) { this.startIfNecessary(container); } } } -
在SimpleMessagelistenerContainer类中,start方法最终会调用的dostart方法,伪代码:
protected void doStart() { Assert.state(!this.consumerBatchEnabled || this.getMessageListener() instanceof BatchMessageListener || this.getMessageListener() instanceof ChannelAwareBatchMessageListener, "When setting 'consumerBatchEnabled' to true, the listener must support batching"); this.checkListenerContainerAware(); super.doStart(); synchronized(this.consumersMonitor) { if (this.consumers != null) { throw new IllegalStateException("A stopped container should not have consumers"); } else { //根据@RabbitListener注解中定义的concurrency数量初始化consumer的个数 对于每个consumer生成一个BlockingQueueConsumer实例 int newConsumers = this.initializeConsumers(); if (this.consumers == null) { this.logger.info("Consumers were initialized and then cleared (presumably the container was stopped concurrently)"); } else if (newConsumers <= 0) { if (this.logger.isInfoEnabled()) { this.logger.info("Consumers are already running"); } } else { Set<SimpleMessageListenerContainer.AsyncMessageProcessingConsumer> processors = new HashSet(); Iterator var4 = this.consumers.iterator(); while(var4.hasNext()) { //对于每个BlockingQueueConsumer,生成AsyncMessageProcessingConsumer,并启动一个线程启动这个consumer,实际上调用了BlockingQueueConsumer实例的start方法 BlockingQueueConsumer consumer = (BlockingQueueConsumer)var4.next(); SimpleMessageListenerContainer.AsyncMessageProcessingConsumer processor = new SimpleMessageListenerContainer.AsyncMessageProcessingConsumer(consumer); processors.add(processor); this.getTaskExecutor().execute(processor); if (this.getApplicationEventPublisher() != null) { this.getApplicationEventPublisher().publishEvent(new AsyncConsumerStartedEvent(this, consumer)); } } this.waitForConsumersToStart(processors); } } } } -
BlockingQueueConsumer的start方法启动consumer
public void start() throws AmqpException {

        try {
            this.resourceHolder = ConnectionFactoryUtils.getTransactionalResourceHolder(this.connectionFactory, this.transactional);
            this.channel = this.resourceHolder.getChannel();
            ClosingRecoveryListener.addRecoveryListenerIfNecessary(this.channel);
        } catch (AmqpAuthenticationException var2) {
            throw new FatalListenerStartupException("Authentication failure", var2);
        }

    }
注意:每个监听线程都会调用以上方法创建connection和channel,那么connection和channel的数量岂不是一致?
CachingConnectionFactory bean的createConnection负责创建connection:
public final Connection createConnection() throws AmqpException {
    ......
        Object var1 = this.connectionMonitor;
        synchronized(this.connectionMonitor) {
            if (this.cacheMode == CachingConnectionFactory.CacheMode.CHANNEL) {
                //当第一个线程创建connection时,this.connection.target为空,所以调用父类方法创建真实的connection。
                //当第二个以上的线程创建connection时,直接返回之前创建好的connection。
                if (this.connection.target == null) {
                    this.connection.target = super.createBareConnection();
                    ......
                }
                return this.connection;
            }
            ......
        }
    }
}
所以系统即使有多个线程,也仅仅创建了一个connection,而每个线程创建了自己独立的channel。文章来源:https://www.toymoban.com/news/detail-650899.html
后续继续学习记录AMQP协议相关知识文章来源地址https://www.toymoban.com/news/detail-650899.html
到了这里,关于SpringBoot如何与RabbitMQ建立连接的文章就介绍完了。如果您还想了解更多内容,请在右上角搜索TOY模板网以前的文章或继续浏览下面的相关文章,希望大家以后多多支持TOY模板网!


