目录
一、理论
1.Zabbix监控Tomcat
二、实验
1.Zabbix监控Tomcat
三、问题
1.获取软件包失败
2.tomcat 配置 JMX remote monitor不生效
3.Zabbix客户端日志报错
一、理论
1.Zabbix监控Tomcat
(1)环境
zabbix服务端:192.168.204.214
zabbix客户端:192.168.204.215
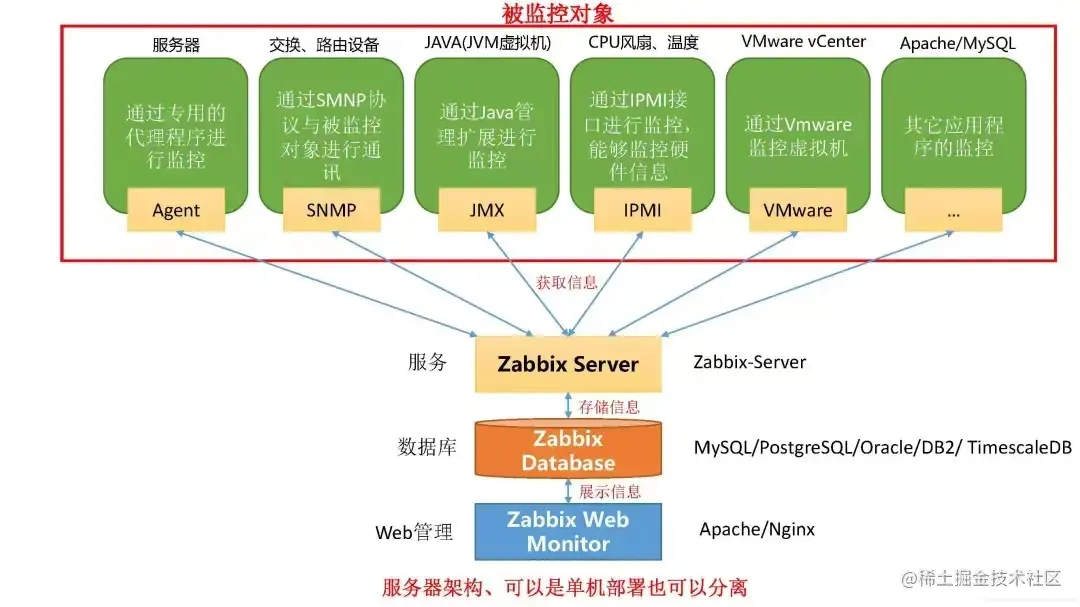
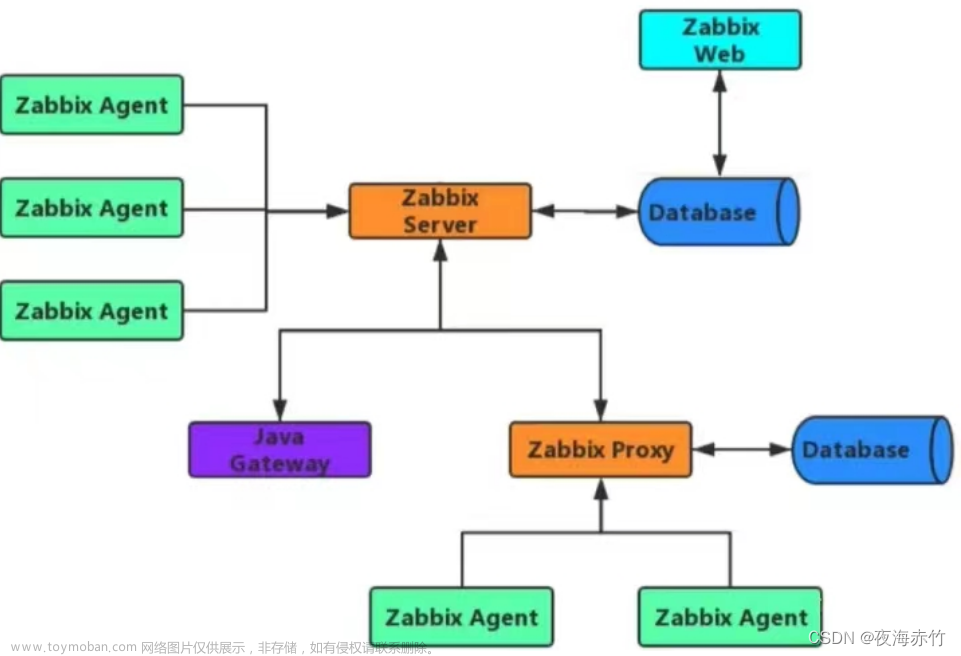
原理:

(2)客户端安装tomcat(yum方式)
yum install tomcat -y

Systemctl start tomcat

cd /var/lib/tomcat/webapps

mkdir test

cd test
(3)添加动态网页内容
vim index.jsp                                                                   # 添加动态页面内容:

<%@ page language="java" import="java.util.*" pageEncoding="UTF-8"%>

<html>

<head>

<title>test</title>

</head>

<body>

<% out.println("动态页面:test tomcat01");%>

</body>

</html>

#页面输出内容为test tomcat01,tomcat02服务器上则将01改为02方便查看实验效果

#创建动态资源页面
(3)修改配置
vim /etc/tomcat/server.xml
#修改主配置文件内容125行,原有内容不需要更改,对比此段内容添加即可

<Host name="localhost"  appBase="webapps"

            unpackWARs="true" autoDeploy="true"

            xmlNamespaceAware="false">

<Context docBase="/var/lib/tomcat/webapps/test"

path="" reloadable="true" />

#指定自己的tomcat页面访问文件路径
(4)重新启动
systemctl restart tomcat(5)服务端器安装zabbix-java-gateway
wget https://mirrors.tuna.tsinghua.edu.cn/zabbix/zabbix/4.0/rhel/7/x86_64/zabbix-java-gateway-4.0.14-1.el7.x86_64.rpm(6)安装zabbix-java-gateway
yum -y localinstall zabbix-java-gateway-4.0.14-1.el7.x86_64.rpm(7)编辑gateway配置文件
vim /etc/zabbix/zabbix_java_gateway.conf去掉LISTEN_IP、LISTEN_PORT(监听端口)、START_POLLERS(进程数)的注释符号
LISTEN_IP定义被监控机器的地址,不指定默认监听全部机器 编辑server配置文件
vim /etc/zabbix/zabbix_server.conf
定义以下3个配置参数:
JavaGateway=192.168.204.214

JavaGatewayPort=10052

StartJavaPollers=5
启动zabbix-java-gateway服务:
systemctl start zabbix-java-gateway重启zabbix-server服务:
systemctl restart zabbix-server
(4)查看监听端口
netstat -lntp |grep java
(5)开启JMX
客户端器编辑tomcat配置文件
vim /usr/libexec/tomcat/server添加以下内容:
CATALINA_OPTS="$CATALINA_OPTS \
  -Dcom.sun.management.jmxremote \
  -Dcom.sun.management.jmxremote.port=8008 \
  -Dcom.sun.management.jmxremote.ssl=false \
  -Djava.rmi.server.hostname=192.168.204.215 \
  -Dcom.sun.management.jmxremote.authenticate=false"
hostname定义客户端地址,端口8008(默认12345)
(6)脚本、重启tomcat:
脚本
vim /opt/tomcat.sh

#!/bin/bash
a=`netstat -natp |grep 8080|awk '{print $6}'|grep 'LISTEN'`
if [[ $a = 'LISTEN' ]];then
   echo "0"  #表示tomcat启动中
else
   echo "1"  #表示tomcat未启动
fi


#添加权限
chmod 777 /opt/tomcat.sh
添加可识别配置文件
vim zabbix_agent2.conf

UserParameter=tomcat.status,source /opt/tomcat.sh
#实现对脚本的监控

chmod +s /bin/nestat
#加上权限,避免netstat在服务端报错
验证
zabbix_get -s '192.168.204.215' -p 10050 -k 'tomcat.status'重启
systemctl restart tomcat
(7)查看监听端口9999
netstat -lntp |grep 8008(8)进入zabbix前端页面添加主机
与普通情况添加监控主机不同,监控B机器的tomcat需要配置JMX接口 模板链接JMX相关的两个模板:
Template App Apache Tomcat JMX
Template App Generic Java JMX
当JMX图标变绿即表示配置成功
二、实验
1.Zabbix监控Tomcat
(1)安装

(2) 启动

(3)设置文件

(4)监听端口
 (5)安装zabbix-java-gateway
下载

安装zabbix-java-gateway
(6) 编辑gateway配置文件

去掉LISTEN_IP、LISTEN_PORT(监听端口)、START_POLLERS(进程数)的注释符号
LISTEN_IP定义被监控机器的地址,不指定默认监听全部机器
(7) 编辑server配置文件
定义以下3个配置参数:


(8)启动zabbix-java-gateway服务

(9) 重启zabbix-server服务

(10)查看监听端口
(11)开启JMX
客户端器编辑tomcat配置文件


重启 监听端口

(12)脚本、重启tomcat
脚本


赋权


重启


(13)验证
授权

验证
0是tomcat启动中

(14)进入zabbix前端页面添加主机
进入zabbix前端页面添加主机
与普通情况添加监控主机不同,监控B机器的tomcat需要配置JMX接口 模板链接JMX相关的两个模板:
Template App Apache Tomcat JMX
Template App Generic Java JMX
当JMX图标变绿即表示配置成功:


监控项


监控JVM


(15)自定义监控tomcat


三、问题
1.获取软件包失败
(1)报错
(2)原因分析
证书过期
(3)解决方法
命令结尾附加
--no-check-certificate成功

2.tomcat 配置 JMX remote monitor不生效
(1)原因分析
centos 7 上的 tomcat 配置 JMX remote monitor,由于tomcat安装方法的不同,jmx 配置方法也有所不同
(2)解决方法
①配置 $CATALINA_OPTS
打开tomcat启动文件 /usr/libexec/tomcat/server,在变量 $FLAGS 赋值语句下面添加:
CATALINA_OPTS="$CATALINA_OPTS \
-Dcom.sun.management.jmxremote \
-Dcom.sun.management.jmxremote.port=8008 \
-Dcom.sun.management.jmxremote.ssl=false \
-Djava.rmi.server.hostname=192.168.204.215 \
-Dcom.sun.management.jmxremote.authenticate=true \
-Dcom.sun.management.jmxremote.password.file=/usr/share/tomcat/conf/jmxremote.password \
-Dcom.sun.management.jmxremote.access.file=/usr/share/tomcat/conf/jmxremote.access"
配置分析:
-Dcom.sun.management.jmxremote: 启用 jmxremote 功能;
-Dcom.sun.management.jmxremote.port=8008:jmxremote 监听端口,用于客户端连接,样例设为 8008;
-Dcom.sun.management.jmxremote.ssl=false:是否启用 SSL 连接,样例设为 false;
-Dcom.sun.management.jmxremote.authenticate=true:开启用户认证连接;
-Dcom.sun.management.jmxremote.password.file=/usr/share/tomcat/conf/jmxremote.password:认证用户密码文件,样例设为 /usr/share/tomcat/conf/jmxremote.password;
-Dcom.sun.management.jmxremote.access.file=/usr/share/tomcat/conf/jmxremote.access:认证用户权限配置文件,样例设为 /usr/share/tomcat/conf/jmxremote.access。

如果不启用用户认证,将选项 Dcom.sun.management.jmxremote.authenticate 的值设为false,也无需再设置选项 Dcom.sun.management.jmxremote.password.file 和 Dcom.sun.management.jmxremote.access.file。
②JMX 远程连接的用户认证文件
从 jre 的安装目录找到 jmxremote.access 和 jmxremote.password.template,复制到 $CATALINA_OPTS 中设置的认证文件位置,将 jmxremote.password.template 重命名为 jmxremote.password。
cp /usr/lib/jvm/jre/lib/management/jmxremote.access /usr/share/tomcat/conf/
cp /usr/lib/jvm/jre/lib/management/jmxremote.password.template /usr/share/tomcat/conf/jmxremote.password
jmxremote.access 文件末尾添加认证用户名和用户权限,示例中 jmxuser 为用户名,readwrite 为该用户的 jmx 权限:
jmxuser readwrite
jmxremote.password 文件末尾添加认证用户名和用户密码,示例中 jmxuser 为用户名,与 jmxremote.access 中一致,jmxpassword 为该用户的 jmx 远程连接密码:
jmxuser jmxpassword
③最后,更改文件权限和属主:
cd /usr/share/tomcat/conf/
chmod 600 jmxremote.password jmxremote.access
chown tomcat.tomcat jmxremote.password jmxremote.access
④firewalld 设置
可以直接关闭 firewalld:
systemctl stop firewalld
systemctl disable firewalld
或者针对 JMX 监听的端口(包括两个随机端口和选项 -Dcom.sun.management.jmxremote.port 指定的固定端口)设置开放规则。首先查看java 监听的端口:
ss -lnp | grep java
任何开放端口:
firewall-cmd --add-port=8008/tcp --add-port=<random-port-1>/tcp --add-port=<random-port-2>/tcp
重启 tomcat 后随机端口会变,这时候又要重新设置端口规则。
重启 tomcat,JMX 连接
使用 JDK 自带的 jconsole 或 VisualVM 连接 JVM Remote。

3.Zabbix客户端日志报错
(1)报错

(2)原因分析
因为使用了netstat -p参数。
权限问题,zabbix_agentd是zabbix用户启动的,默认不能执行netstat -p等命令,导致从服务器取到的自动发现脚本为空
(Not all processes could be identified, non-owned process info
will not be shown, you would have to be root to see it all.)
(3)解决方法
为了方便普通用户执行一些特权命令,SUID/SGID程序允许普通用户以root身份暂时执行该程序,并在执行结束后再恢复身份。
chmod +s /bin/netstat 文章来源:https://www.toymoban.com/news/detail-652238.html
成功 文章来源地址https://www.toymoban.com/news/detail-652238.html
到了这里,关于分布式应用:Zabbix监控Tomcat的文章就介绍完了。如果您还想了解更多内容,请在右上角搜索TOY模板网以前的文章或继续浏览下面的相关文章,希望大家以后多多支持TOY模板网!


![[zabbix] 分布式应用之监控平台zabbix的认识与搭建](https://imgs.yssmx.com/Uploads/2024/02/786442-1.png)


