1.前言
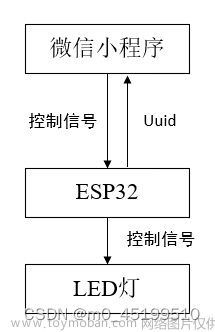
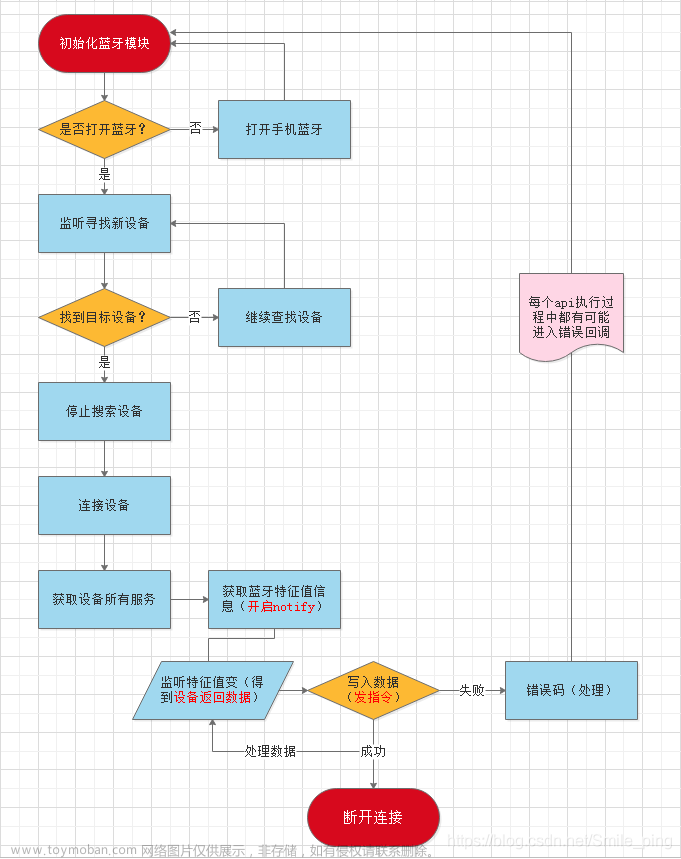
微信小程序中连接蓝牙设备,信息写入流程
1、检测当前使用设备(如自己的手机)是否支持蓝牙/蓝牙开启状态
wx:openBluetoothAdapter({})
2、如蓝牙已开启状态,检查蓝牙适配器的状态
wx.getBluetoothAdapterState({})
3、添加监听蓝牙适配器状态变化
wx.onBluetoothAdapterStateChange({})
4、搜索附近蓝牙设备
wx.startBluetoothDevicesDiscovery({})
5、监听搜索的到设备
wx.onBluetoothDeviceFound({})
遍历设备列表找到和macAddr(看自己家的蓝牙装置的物理地址)匹配的设备的deviceId
6、连接想要连接的切匹配成功的设备
wx.createBLEConnection({})
7、获取连接成功的设备的设备服务servicesID
wx.getBLEDeviceServices({})
8、获取设备特征id
wx.getBLEDeviceCharacteristics({})
9、向设备写入指令
wx.writeBLECharacteristicValue({})
以下是代码重点,本人亲测有效,集官网和百家之所长,汇聚之大成,入我门来,使君不负观赏
2. 小程序前端index.wxml
<wxs module="utils">
module.exports.max = function(n1, n2) {
return Math.max(n1, n2)
}
module.exports.len = function(arr) {
arr = arr || []
return arr.length
}
</wxs>
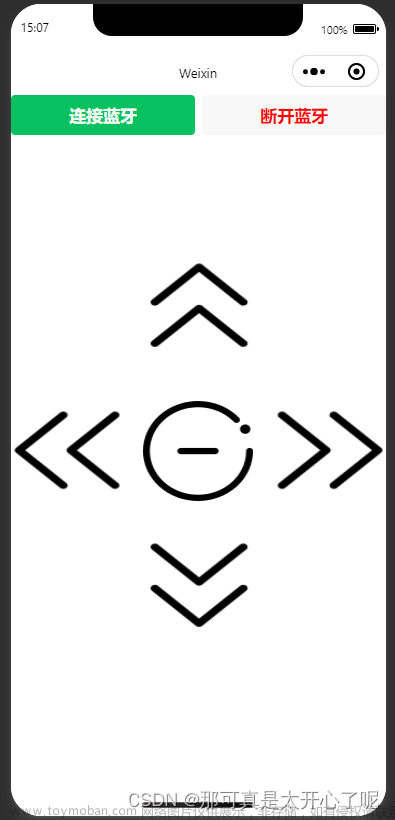
<button bindtap="openBluetoothAdapter" class="primary-btn" >开始扫描</button>
<button bindtap="closeBLEConnection" class="default-btn" >断开连接</button>
<button bindtap="opendeng" class="sumit-btn" >开灯</button>
<button bindtap="guandeng" class="warn-btn" >关灯</button>
<view class="devices_summary">已发现 {{devices.length}} 个外围设备:</view>
<scroll-view class="device_list" scroll-y scroll-with-animation>
<view wx:for="{{devices}}" wx:key="index"
data-device-id="{{item.deviceId}}"
data-name="{{item.name || item.localName}}"
bindtap="createBLEConnection"
class="device_item"
hover-class="device_item_hover">
<view style="font-size: 16px; color: #333;">{{item.name}}</view>
<view style="font-size: 10px">信号强度: {{item.RSSI}}dBm ({{utils.max(0, item.RSSI + 100)}}%)</view>
<view style="font-size: 10px">UUID: {{item.deviceId}}</view>
<view style="font-size: 10px">Service数量: {{utils.len(item.advertisServiceUUIDs)}}</view>
</view>
</scroll-view>
<view class="connected_info" wx:if="{{connected}}">
<view>
<icon class="icon-box-img" type="success" size="33"></icon>
<view class="icon-box-text"> {{name}}连接成功!!!</view>
</view>
</view>
3.小程序index.wxss
page {
  color: #333;
}
.icon-box-img{
  height: 20px;
 float: left;
 margin-left: 20%;
}
.icon-box-text{
  height: 30px;
   line-height: 30px;
  margin-left:5px;
 float: left;
}

.primary-btn{
  margin-top: 30rpx;
  /* border: rgb(7, 80, 68) 1px solid; */
  color: rgb(241, 238, 238);
  background-color: rgb(14, 207, 46);
}
.default-btn{
  margin-top: 30rpx;
  /* border: #333 1px solid; */
  color: rgb(243, 236, 236);
  background-color: rgb(189, 112, 25);
}

.warn-btn{
  margin-top: 30rpx;
  /* border: #333 1px solid; */
  color: rgb(240, 231, 231);
  background-color: rgb(235, 10, 10);
}
.sumit-btn{
  margin-top: 30px;
  width: 60px;
  color: rgb(240, 231, 231);
  background-color: rgb(10, 100, 235);
}

.devices_summary {
  margin-top: 30px;
  padding: 10px;
  font-size: 16px;
}
.device_list {
  height: 300px;
  margin: 50px 5px;
  margin-top: 0;
  border: 1px solid #EEE;
  border-radius: 5px;
  width: auto;
}
.device_item {
  border-bottom: 1px solid #EEE;
  padding: 10px;
  color: #666;
}
.device_item_hover {
  background-color: rgba(0, 0, 0, .1);
}
.connected_info {
  position: fixed;
    bottom: 10px;
    width: 80%;
    margin-left: 6%;
    background-color: #F0F0F0;
    padding: 10px;
    padding-bottom: 20px;
    margin-bottom: env(safe-area-inset-bottom);
    font-size: 18px;
    /* line-height: 20px; */
    color: #1da54d;
    text-align: center;
    /* height: 20px; */
    box-shadow: 0px 0px 3px 0px;
}
.connected_info .operation {
  position: absolute;
  display: inline-block;
  right: 30px;
}
4.小程序 index.ts
const app = getApp()

function inArray(arr, key, val) {
  for (let i = 0; i < arr.length; i++) {
    if (arr[i][key] === val) {
      return i;
    }
  }
  return -1;
}

// ArrayBuffer转16进度字符串示例
function ab2hex(buffer) {
  var hexArr = Array.prototype.map.call(
    new Uint8Array(buffer),
    function (bit) {
      return ('00' + bit.toString(16)).slice(-2)
    }
  )
  return hexArr.join('');
}

Page({
  data: {
    devices: [],
    connected: false,
    chs: [],
  },
  getCeshi() {
    wx.navigateTo({
      url: '/pages/main/main',
    })
  },
  // 搜寻周边蓝牙
  openBluetoothAdapter() {
    //console.log('openBluetoothAdapter success')
    wx.openBluetoothAdapter({
      success: (res) => {
        console.log('openBluetoothAdapter success', res)
        this.startBluetoothDevicesDiscovery()
      },
      fail: (res) => {
        if (res.errCode === 10001) {
          wx.onBluetoothAdapterStateChange(function (res) {
            console.log('onBluetoothAdapterStateChange', res)
            if (res.available) {
              this.startBluetoothDevicesDiscovery()
            }
          })
        }
      }
    })
  },
  // 停止搜寻周边蓝牙
  getBluetoothAdapterState() {
    wx.getBluetoothAdapterState({
      success: (res) => {
        console.log('getBluetoothAdapterState', res)
        if (res.discovering) {
          this.onBluetoothDeviceFound()
        } else if (res.available) {
          this.startBluetoothDevicesDiscovery()
        }
      }
    })
  },
  // 开始搜寻附近的蓝牙外围设备
  startBluetoothDevicesDiscovery() {
    if (this._discoveryStarted) {
      return
    }
    this._discoveryStarted = true
    wx.startBluetoothDevicesDiscovery({
      allowDuplicatesKey: true,
      success: (res) => {
        console.log('startBluetoothDevicesDiscovery success', res)
        this.onBluetoothDeviceFound()
      },
    })
  },
  //停止搜寻附近的蓝牙外围设备。若已经找到需要的蓝牙设备并不需要继续搜索时,建议调用该接口停止蓝牙搜索。
  stopBluetoothDevicesDiscovery() {
    wx.stopBluetoothDevicesDiscovery()
  },
  //监听搜索到新设备的事件
  onBluetoothDeviceFound() {
    wx.onBluetoothDeviceFound((res) => {
      res.devices.forEach(device => {
        if (!device.name && !device.localName) {
          return
        }
        const foundDevices = this.data.devices
        const idx = inArray(foundDevices, 'deviceId', device.deviceId)
        const data = {}
        if (idx === -1) {
          data[`devices[${foundDevices.length}]`] = device
        } else {
          data[`devices[${idx}]`] = device
        }
        this.setData(data)
      })
    })
  },
  //连接蓝牙低功耗设备。
  createBLEConnection(e) {
    const ds = e.currentTarget.dataset
    const deviceId = ds.deviceId
    const name = ds.name
    wx.createBLEConnection({
      deviceId,
      success: (res) => {
        this.setData({
          connected: true,
          name,
          deviceId,
        })
        this.getBLEDeviceServices(deviceId)
      }
    })
    this.stopBluetoothDevicesDiscovery()
  },
  closeBLEConnection() {
    wx.closeBLEConnection({
      deviceId: this.data.deviceId
    })
    this.setData({
      connected: false,
      chs: [],
      canWrite: false,
    })
  },
  //获取蓝牙低功耗设备所有服务。
  getBLEDeviceServices(deviceId) {
    console.log('deviceId ========', deviceId)
    wx.getBLEDeviceServices({
      deviceId,
      success: (res) => {
        for (let i = 0; i < res.services.length; i++) {
          //获取通过设备id多个特性服务serviceid (包含 读、写、通知、等特性服务)
         //   console.log('serviceId ========', res.services[2].uuid)

         // 通过上边注释解封,排查到判断服务id 中第三个服务id  代表写入服务
        //  isPrimary代表 :判断服务id是否为主服务
         // if (res.services[2].isPrimary) {
         //  this.getBLEDeviceCharacteristics(deviceId, res.services[2].uuid)
        //  }
           //判断通过(设备id获取的多个特性服务)中是否有与(蓝牙助手获取的写入特性服务),相一致的serviceid
          if (res.services[i].uuid=="0000FFE0-0000-1000-8000-00805F9B34FB") {
            this.getBLEDeviceCharacteristics(deviceId, res.services[i].uuid)
          }
        }
      }
    })
  },
  //获取蓝牙低功耗设备某个服务中所有特征 (characteristic)。
  getBLEDeviceCharacteristics(deviceId, serviceId) {
    console.info("蓝牙的deviceId====" + deviceId);
    console.info("蓝牙服务的serviceId====" + serviceId);
    wx.getBLEDeviceCharacteristics({
      deviceId,
      serviceId,
      success: (res) => {
        console.log('getBLEDeviceCharacteristics success', res.characteristics)
        for (let i = 0; i < res.characteristics.length; i++) {
          let item = res.characteristics[i]
          if (item.properties.read) {
            wx.readBLECharacteristicValue({
              deviceId,
              serviceId,
              characteristicId: item.uuid,
            })
          }
          if (item.properties.write) {
            this.setData({
              canWrite: true
            })
            this._deviceId = deviceId
            this._serviceId = serviceId
            this._characteristicId = item.uuid

            console.info("写入(第一步)的characteristicId====" + item.uuid);
            //初始化调用 写入信息的方法  1:代表开灯
            this.writeBLECharacteristicValue("1")
          }
          if (item.properties.notify || item.properties.indicate) {
            wx.notifyBLECharacteristicValueChange({
              deviceId,
              serviceId,
              characteristicId: item.uuid,
              state: true,
            })
          }
        }
      },
      fail(res) {
        console.error('getBLEDeviceCharacteristics', res)
      }
    })
    // 操作之前先监听,保证第一时间获取数据
    wx.onBLECharacteristicValueChange((characteristic) => {
      const idx = inArray(this.data.chs, 'uuid', characteristic.characteristicId)
      const data = {}
      if (idx === -1) {
        data[`chs[${this.data.chs.length}]`] = {
          uuid: characteristic.characteristicId,
          value: ab2hex(characteristic.value)
        }
      } else {
        data[`chs[${idx}]`] = {
          uuid: characteristic.characteristicId,
          value: ab2hex(characteristic.value)
        }
      }

      this.setData(data)
    })
  },

/**
 * 写入的数据 格式转换
 * @param str
 * @returns 字符串 转 ArrayBuffer
 */
hex2buffer(str) {
  console.info("写入的数据====" + str);
  //字符串 转 十六进制
  var val = "";
  for (var i = 0; i < str.length; i++) {
      if (val == "")
          val = str.charCodeAt(i).toString(16);
      else
          val += "," + str.charCodeAt(i).toString(16);
  }
  //十六进制 转 ArrayBuffer
  var buffer = new Uint8Array(val.match(/[\da-f]{2}/gi).map(function (h) {
      return parseInt(h, 16)
  })).buffer;

  return buffer;
},
//开灯
opendeng() {

  // 调用写入信息的方法 向蓝牙设备发送一个开灯的参数数据 ,  1:代表开灯
  var writeValue ="1";
  this.writeBLECharacteristicValue(writeValue)

},
//关灯
guandeng() {

    // 调用写入信息的方法 向蓝牙设备发送一个关灯的参数数据 ,  0:代表关灯
     var writeValue ="0";
     this.writeBLECharacteristicValue(writeValue)

},
writeBLECharacteristicValue(writeValue) {
  // 向蓝牙设备发送一个0x00的16进制数据
 // let buffer = new ArrayBuffer(1)
 // let dataView = new DataView(buffer)
 //  dataView.setUint8(0, 0)
 //调用hex2buffer()方法,转化成ArrayBuffer格式
 console.log('获取传递参数writeValue的数据为=====',writeValue)
 var buffer =this.hex2buffer(writeValue);
  console.log('获取二进制数据',buffer)
  //向低功耗蓝牙设备特征值中写入二进制数据。
  wx.writeBLECharacteristicValue({
    deviceId: this._deviceId,
    serviceId: this._serviceId,
    characteristicId: this._characteristicId,
    value: buffer,
    success (res) {
      console.log('成功写数据writeBLECharacteristicValue success', res)
      //如果 uni.writeBLECharacteristicValue 走 success ,证明你已经把数据向外成功发送了,但不代表设备一定就收到了。通常设备收到你发送过去的信息,会返回一条消息给你,而这个回调消息会在 uni.onBLECharacteristicValueChange 触发
    },
     fail(res) {
      console.error('失败写数据getBLEDeviceCharacteristics', res)
    }
  })
},
//断开与蓝牙低功耗设备的连接。
  closeBluetoothAdapter() {
    wx.closeBluetoothAdapter()
    this._discoveryStarted = false
  },
})
5.疑难点
1.如果你不确定写入的特性服务值

可以通过(安卓)蓝牙助手获取特性值 deviceId(mac地址)、serviceId、characteristicId

(苹果手机)蓝牙助手获得特性值deviceId(uuid地址)、serviceId、characteristicId
注意:手机品类不同获取的deviceId的名称不同,但serviceId、characteristicId,是相同的
1.安卓手机(蓝牙助手获取的信息)

2.苹果手机(蓝牙助手)获取的信息


FFF0代表的serviceId全称:0000FFF0-0000-1000-8000-00805F9B34FB
FFF3代表的characteristicId全称:0000FFF3-0000-1000-8000-00805F9B34FB文章来源:https://www.toymoban.com/news/detail-654790.html
最后:文章来源地址https://www.toymoban.com/news/detail-654790.html
祝愿你能一次成功
(代码直接复制粘贴到你的小程序中,替换下你自己设备的写入特性serviceId值),
就可以测试了
最后如果还满意,记得点下赞、收藏加关注、我也好回关,相互进步!!!!!!!!!!
到了这里,关于微信小程序 蓝牙设备连接,控制开关灯的文章就介绍完了。如果您还想了解更多内容,请在右上角搜索TOY模板网以前的文章或继续浏览下面的相关文章,希望大家以后多多支持TOY模板网!