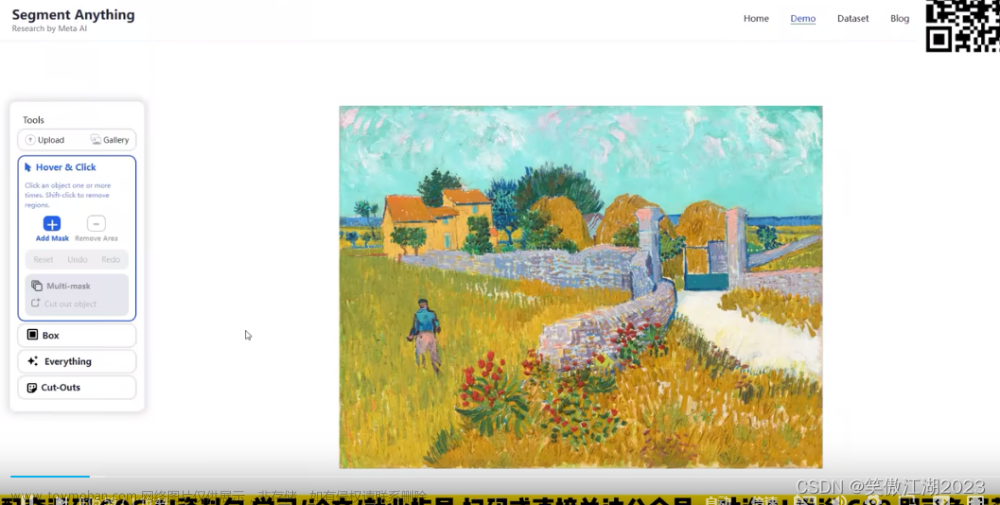
【唐宇迪】CV不存在?Meta最新的计算机视觉Segment Anything Meta终极模型,强到离谱!-人工智能/计算机视觉/深度学习/机器学习_哔哩哔哩_bilibili4月5日最新发布,Meta正式推出模型SAM(Segment Anything Model)称这一模型可用于识别图像和视频中的物体,甚至是从未被训练学习过的物品。技术论文也一并推出,标题甚至只有两个单词——Segment Anything(分割一切),喜欢记得多多支持。, 视频播放量 15478、弹幕量 142、点赞数 447、投硬币枚数 239、收藏人数 1044、转发人数 139, 视频作者 跟着唐宇迪学AI, 作者简介 全网同名!大家好,我是唐宇迪,一名计算机博士,专注于机器学习与计算机视觉领域。感谢关注~~~,相关视频:CV界不存在了?体验下Meta最新的Segment Anything Meta计算机新模型实现“终极抠图”,segment-anything是趋势,但是牛逼吹的太大了,【AI绘画】破解Diffusion扩散模型,[小白向-深度学习装机指南] 01 双4090 涡轮版开箱启动 vlog(gpu burn,cpu burn),Segment Anything上线一天8.2k star,Segment Anything 图像分割 VS 清明上河图,计算机视觉(CV)方向就业情况分析,听说很卷?,我大抵是难毕业了,效果巨烂。Yolov5+deepsort+1DCNN,任正非谈ChatGPT,ChatGPT结合Python和MATLAB科研绘图,王炸。https://www.bilibili.com/video/BV18T411W7ph/?spm_id_from=333.337.search-card.all.click&vd_source=4aed82e35f26bb600bc5b46e65e25c22Segment Anything | Meta AIhttps://segment-anything.com/demo
Segment Anything(sam)项目整理汇总[2023.7.15] - 知乎0.背景sam是一个无监督的分割图像的基础模型,分割效果非常好,具体细节可看论文解读。 https://zhuanlan.zhihu.com/p/620355474自从sam模型发布以来,基于sam的二次应用及衍生项目越来越多,将其应用于各种任务,…https://zhuanlan.zhihu.com/p/630529550https://github.com/dinglufe/segment-anything-cpp-wrapperhttps://github.com/dinglufe/segment-anything-cpp-wrapperSegment Anything模型部分结构和代码解析 - 知乎0x0. 前言上个月Meta提出的Segment Anything Model(SAM)希望在视觉领域通过Prompt+基础大模型的套路来解决目标分割的问题。经过实测,在大多数场景中SAM的表现都足够惊艳,并且基于SAM的各种二创工作也爆发了比…https://zhuanlan.zhihu.com/p/627756899【论文阅读】Segment Anything - 知乎引用@misc{kirillov2023segment, title={Segment Anything}, author={Alexander Kirillov and Eric Mintun and Nikhila Ravi and Hanzi Mao and Chloe Rolland and Laura Gustafson and Tete Xiao and Spencer Whi…https://zhuanlan.zhihu.com/p/619962145【论文解读】MetaAi SAM(Segment Anything) 分割一切 - 知乎0.测试 近期比较火的chatgpt和ai画图(stable diffusion/controlNet),通过输入文本进行智能回答或者生成图片,刚在想没有一种类似的方法通过提示语实现目标检测和图像分割,Meta AI就开源了SAM(Segment Anything)…https://zhuanlan.zhihu.com/p/620355474【论文阅读】Segment Anything - 知乎引用@misc{kirillov2023segment, title={Segment Anything}, author={Alexander Kirillov and Eric Mintun and Nikhila Ravi and Hanzi Mao and Chloe Rolland and Laura Gustafson and Tete Xiao and Spencer Whi…https://zhuanlan.zhihu.com/p/619962145sam后续也出了很多工作:
segment anything:原版sam
fast segment anything:和sam没啥关系,yolov8的实例分割,后处理。
mobile sam:sam的蒸馏版本。
从效果上说sam>mobilesam>fastsam,fastsam和mobilesam的泛化性都一般,fastsam最差。
clicks:点,box:框,everything:全图画点。
abstract:数据闭环,1100万张图,10亿mask。可以在一些新的数据分布和任务中直接zero-shot。
1.introduction
foundation models没在数据分布上训练也可以泛化,借助于prompt。本文的核心是构建了一个数据引擎,task,model,dataset。
task:给定prompt输出,prompt可以是文本或者空间上点,只要可以编码成向量就可以,点和框的坐标编码成向量。存在歧义涉及多个对象,输出也是这些对象中至少一个合理的mask。
model:image encoder(VIT),prompt encoder(任意的prompt,point,box,mask prompt一堆点,text prompt),mask decoder,从一个prompt中进行解码只需要50ms进行交互。
data engine:assisted-manual,semi-automatic,fully automatic。
dataset:1100万张图,10亿mask。

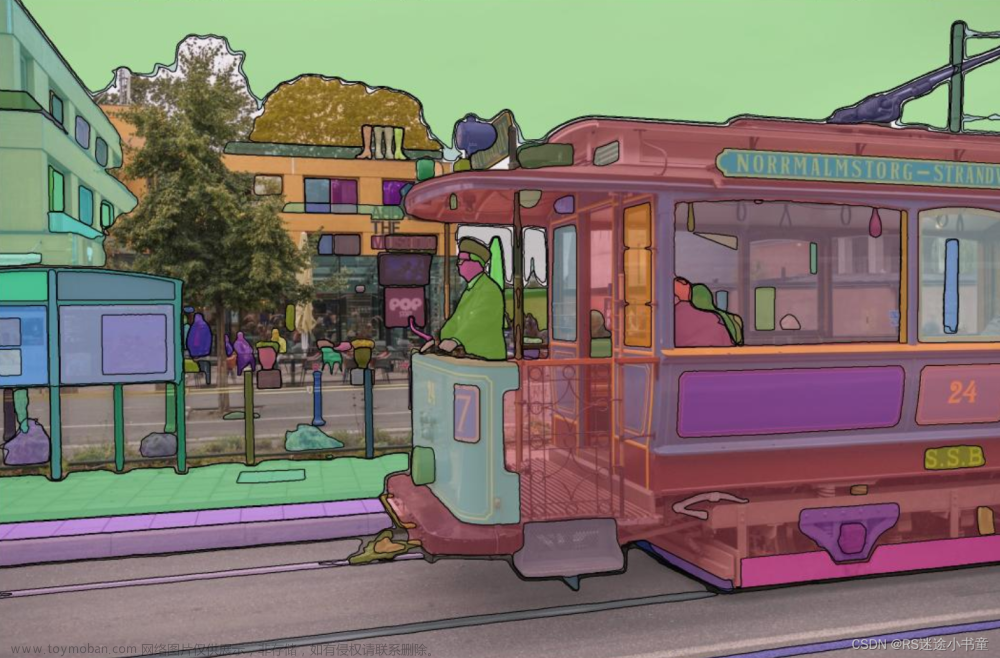
标注数据示例:

2.segment anything task
pre-training:vit->mae,text->clip.
3.segment anything model

Image encoder:MAE,ViT-H/16 with 14x14 windowed,16倍下采样,1024x1024降采样成64x64。
Prompt encoder:sparse points,boxes,text and dense masks。点和框通过positional encodings,text通过clip,masks使用卷积嵌入并与图像embeddings相加。变成256维向量。
mask decoder:mask decoder通过image embeddings,prompt embeddings,将oputput token映射到mask,修改了transformer decoder block,我们修改的decoder使用了prompt self-attention和cross-attention,其实就是在vit编码后的image embeddings中,使用通过编码后的embeddings去检索,最终得到mask。分成四个步骤:1.对token的自注意力,2.token(指的是文本/点/框/mask)作为query的cross-attention,3.逐点mlp更新每个token;3.把image embeddings作为query的cross attention,每个自/交叉注意力和mlp之间都有一个残差连结,正则化层和训练时0.1的dropout,下一个解码器从前一层获取更新的token和更新的image embeddings,使用2个解码器,在每个注意力层,位置编码被添加到image embeddings中,整个原始提示被重新添加到token query和kv中。
运行完解码器后,上采样4倍更新后的image embeddings,使用2个转置卷积层,现在相当于输入图像缩小了4倍,然后,使用token query的cross attention,将更新后的输出token传给一个3层mlp,该mlp输出一个与放大后image embeddings的通道维度相匹配的向量,预测一个在扩大4倍的image embeddings和mlp输出之间具有空间点积的mask。
该transformer使用256维嵌入,mlp是2048维,mlp仅用于token,对于这些token,一般较小,但在64x64维image embeddings的cross attention中,我们通过减少qkv的通道维度,128,来提高计算效率,所有的注意力层都使用8个head。

self-attention是prompt之间的attention,明确各自要找的目标,cross-attention是每个token去image embeddings中去检索自己对应的区域。image embedding是256x64x64,token和image存在相互更新。2个decoder,第一个decoder是在64x64上,第二个decoder做了上采样4,是在256x256上做,prompt在第二个decoder时也加了position encoding。
efficiency:cpu上50ms。
mask generation:
sam = sam_model_registry[config.model_type](checkpoint=config.sam_checkpoint)
sam.to(device=device)

predictor = SamPredictor(sam)
mask_generator = SamAutomaticMaskGenerator(predictor)

masks=mask_generator(image)->
automatic_mask_generator.SamAutomaticMaskGenerator.generator()->
- _generate_mask()-> 979x684x3
utils.amg.generate_crop_boxes(im_size,n_layers=0,overlap_ratio=512/1500)->
- crop_boxes:[0,0,684,979],layer_idxs:[0]->
- _process_crop(image,crop_box,crop_layer,orig_size:979x684)->
- self.predictor.set_image()->
predictor.SamPredictor.set_image()->
# 要转成RGB
- input_image=self.transform.apply_image(image)->

<sd_webui_add.modules_add.sam.utils.transforms.ResizeLongestSide object at 0x7fb50c135e80>
utils.transforms.ResizeLongestSide.apply_image()->
-- target_size:1024x715=self.get_preprocess_shape(979,684,1024)->
-- input_image_torch = input_image_torch.permute(2, 0, 1).contiguous()[None, :, :, :] 1x3x1024x715->
-- self.set_torch_image(input_image_torch,image.shape[:2])->
-- input_image=self.model.preprocess(transformed_image)->
modeling.sam.Sam.preprocess()->
--- x=F.pad(x,) x:1x3x1024x1024->
-- self.features=self.model.image_encoder(input_image)->
modeling.image_encoder.ImageEncoderViT.forward()->
--- x=self.patch_embed(x)->
PatchEmbed(
  (proj): Conv2d(3, 1280, kernel_size=(16, 16), stride=(16, 16))
)
--- self.pos_embed:1x64x64x1280->
self.blocks:ModuleList(
  (0-31): 32 x Block(
    (norm1): LayerNorm((1280,), eps=1e-06, elementwise_affine=True)
    (attn): Attention(
      (qkv): Linear(in_features=1280, out_features=3840, bias=True)
      (proj): Linear(in_features=1280, out_features=1280, bias=True)
    )
    (norm2): LayerNorm((1280,), eps=1e-06, elementwise_affine=True)
    (mlp): MLPBlock(
      (lin1): Linear(in_features=1280, out_features=5120, bias=True)
      (lin2): Linear(in_features=5120, out_features=1280, bias=True)
      (act): GELU(approximate='none')
    )
  )
)
self.neck:
Sequential(
  (0): Conv2d(1280, 256, kernel_size=(1, 1), stride=(1, 1), bias=False)
  (1): LayerNorm2d()
  (2): Conv2d(256, 256, kernel_size=(3, 3), stride=(1, 1), padding=(1, 1), bias=False)
  (3): LayerNorm2d()
)
x:1x256x64x64->
- points_scale=np.array(cropped_im_size)[None,::-1] [[684,979]]->
- points_for_image = self.point_grids[crop_layer_idx] * points_scale :1024x2->
- batch_data=self._process_batch(points,cropped_im_size,crop_box,orig_size)->
-- transformed_points=self.predictor.transform.apply_coords(points,im_size) points:64x2,im_size:979x684->
modeling.transformer.ResizeLongstSide.apply_coords->
-- self.get_preprocess_shape(979,684,1024)->
-- coords:对原始输入图进行缩放同时对坐标也进行更改 64x2
- in_points:64x2,in_labels:64 [1,1,1,1,.....]->
- masks,iou_preds,_ = self.predictor.predict_torch(in_points,in_labels)->
predictor.SamPredictor.predict_torch()->
-- points=(point_coords,point_label)->
-- sparse_embeddings,dense_embeddings=self.model.prompt_encoder(points:)
modeling.prompt_encoder.forward()->
--- point_embeddings=self._embed_points(coords,labels)->
--- points:64x1x2,labels:64x1,
--- point_embedding=self.pe_layer.forward_with_coords(points:64x2x2,self.input_image_size:1024x1024)->
--- self._pe_encoding(coords.to(torch.float))->
# 在处理归一化坐标时,将其进行位置编码,以提供关于坐标位置的额外信息,self.positional_encoding_gaussian_matrix 是一个预先定义的矩阵,用于位置编码操作。
--- coords:64x2x2,self.positional_encoding_gaussian_matrix:2x128->
--- coords=coords@self.positional_encoding_gaussian_matrix ->
--- coords=2*np.pi*coords
--- point_embedding:64x2x256->
-- sparse_embeddings:64x2x256  dense_embeddings:64x256x64x64 ->
-- low_res_masks, iou_predictions = self.model.mask_decoder(
            image_embeddings=self.features:1x256x64x64,
            image_pe=self.model.prompt_encoder.get_dense_pe():1x256x64x64,
            sparse_prompt_embeddings=sparse_embeddings,
            dense_prompt_embeddings=dense_embeddings,
            multimask_output=multimask_output)->
modeling.mask_decoder.MaskDecoder.predict()->
-- image_embeddings:1x256x64x64,image_pe:1x256x64x64,sparse_prompt_embeddings:64x2x256,dense_prompt_embeddings:64x256x64x64->
-- masks,iou_pred=self.predict_masks()->
-- iou_token:Embedding(1,256) mask_tokens:Embedding(4,256)->
-- tokens:64x7x256->
-- src = torch.repeat_interleave(image_embeddings, tokens.shape[0], dim=0) 64x256x64x64->
-- pos_src = torch.repeat_interleave(image_pe, tokens.shape[0], dim=0) 64x256x64x64->
transformer = TwoWayTransformer(
  (layers): ModuleList(
    (0-1): 2 x TwoWayAttentionBlock(
      (self_attn): Attention(
        (q_proj): Linear(in_features=256, out_features=256, bias=True)
        (k_proj): Linear(in_features=256, out_features=256, bias=True)
        (v_proj): Linear(in_features=256, out_features=256, bias=True)
        (out_proj): Linear(in_features=256, out_features=256, bias=True)
      )
      (norm1): LayerNorm((256,), eps=1e-05, elementwise_affine=True)
      (cross_attn_token_to_image): Attention(
        (q_proj): Linear(in_features=256, out_features=128, bias=True)
        (k_proj): Linear(in_features=256, out_features=128, bias=True)
        (v_proj): Linear(in_features=256, out_features=128, bias=True)
        (out_proj): Linear(in_features=128, out_features=256, bias=True)
      )
      (norm2): LayerNorm((256,), eps=1e-05, elementwise_affine=True)
      (mlp): MLPBlock(
        (lin1): Linear(in_features=256, out_features=2048, bias=True)
        (lin2): Linear(in_features=2048, out_features=256, bias=True)
        (act): ReLU()
      )
      (norm3): LayerNorm((256,), eps=1e-05, elementwise_affine=True)
      (norm4): LayerNorm((256,), eps=1e-05, elementwise_affine=True)
      (cross_attn_image_to_token): Attention(
        (q_proj): Linear(in_features=256, out_features=128, bias=True)
        (k_proj): Linear(in_features=256, out_features=128, bias=True)
        (v_proj): Linear(in_features=256, out_features=128, bias=True)
        (out_proj): Linear(in_features=128, out_features=256, bias=True)
      )
    )
  )
  (final_attn_token_to_image): Attention(
    (q_proj): Linear(in_features=256, out_features=128, bias=True)
    (k_proj): Linear(in_features=256, out_features=128, bias=True)
    (v_proj): Linear(in_features=256, out_features=128, bias=True)
    (out_proj): Linear(in_features=128, out_features=256, bias=True)
  )
  (norm_final_attn): LayerNorm((256,), eps=1e-05, elementwise_affine=True)
)
-- hs, src = self.transformer(src, pos_src, tokens) hs:64x7x256,src:64x4096x256->
-- iou_token_out:64x256,mask_tokens_out:64x4x256->
self.output_upscaling= Sequential(
  (0): ConvTranspose2d(256, 64, kernel_size=(2, 2), stride=(2, 2))
  (1): LayerNorm2d()
  (2): GELU(approximate='none')
  (3): ConvTranspose2d(64, 32, kernel_size=(2, 2), stride=(2, 2))
  (4): GELU(approximate='none')
)
-- upscaled_embedding:torch.Size([64, 32, 256, 256])
-- self.output_hypernetworks_mlps[i](mask_tokens_out[:, i, :])
-- masks = (hyper_in @ upscaled_embedding.view(b, c, h * w)).view(b, -1, h, w) 64x6x256x256->
-- iou_pred=self.iou_prediction_head(iou_token_out) iou_token_out:64x256->
self.layers=ModuleList(
  (0-1): 2 x Linear(in_features=256, out_features=256, bias=True)
  (2): Linear(in_features=256, out_features=4, bias=True)
)
-- masks:64x4x256x256,iou_pred:64x4->

-- masks=self.model.postprocess_masks(low_res_masks,self.input_size:1024x715,self.original_size:979x684)-> 去除填充部分并返回原图大小
modeling.sam.Sam.postprocess_masks->
--- masks = F.interpolate(
            masks,
            (self.image_encoder.img_size 1024, self.image_encoder.img_size),
            mode="bilinear",
            align_corners=False) 64x3x1024x1024
--- masks = masks[..., : input_size[0], : input_size[1]]
--- masks = F.interpolate(masks, original_size, mode="bilinear", align_corners=False) 64x3x979x684->

automatic_mask_generator.SamAutomaticMaskGenerator._process_batch->
-- data["stability_score"] = calculate_stability_score(
            data["masks"] 191x979x684, self.predictor.model.mask_threshold 0.0, self.stability_score_offset 1.0)->
utils.amg.calculate_stability_score->
-- keep_mask = data["stability_score"] >= self.stability_score_thresh->
-- data["masks"] = data["masks"] > self.predictor.model.mask_threshold->
-- data["boxes"] = batched_mask_to_box(data["masks"])  ->
-- data["masks"] = uncrop_masks(data["masks"], crop_box, orig_h, orig_w)
-- data["rles"] = mask_to_rle_pytorch(data["masks"])
- keep_by_nms=batched_nms()->
训练:
在训练期间模拟交互式分割设计,以相等的概率随机为目标mask选择前景点或者边界框,点是均匀从gt mask中采样的,框被视为gt mask的边界框,每个坐标都被添加了随机噪声,标准查等于box变成的10%,最大为20个像素。
从第一个prompt中做出预测后,后续点从前一个mask预测和gt mask之间的差异区域中采样,如果误差区域是FN则作为前景,是FP则作为背景,将前一次迭代中的mask预测作为额外的提示给模型,为了给下一次迭代提供最大的信息,提供了无阈值mask,而不是二值化后的mask,当返回多个mask时,传递给下一次迭代并用于采样下一点的mask是具有最高预测iou的mask。
在8个迭代采样点之后收益递减,模拟交互设计的采样点操作。文章来源:https://www.toymoban.com/news/detail-655626.html
使用adamw优化器,warmup进行250次迭代。文章来源地址https://www.toymoban.com/news/detail-655626.html
到了这里,关于segment anything的文章就介绍完了。如果您还想了解更多内容,请在右上角搜索TOY模板网以前的文章或继续浏览下面的相关文章,希望大家以后多多支持TOY模板网!