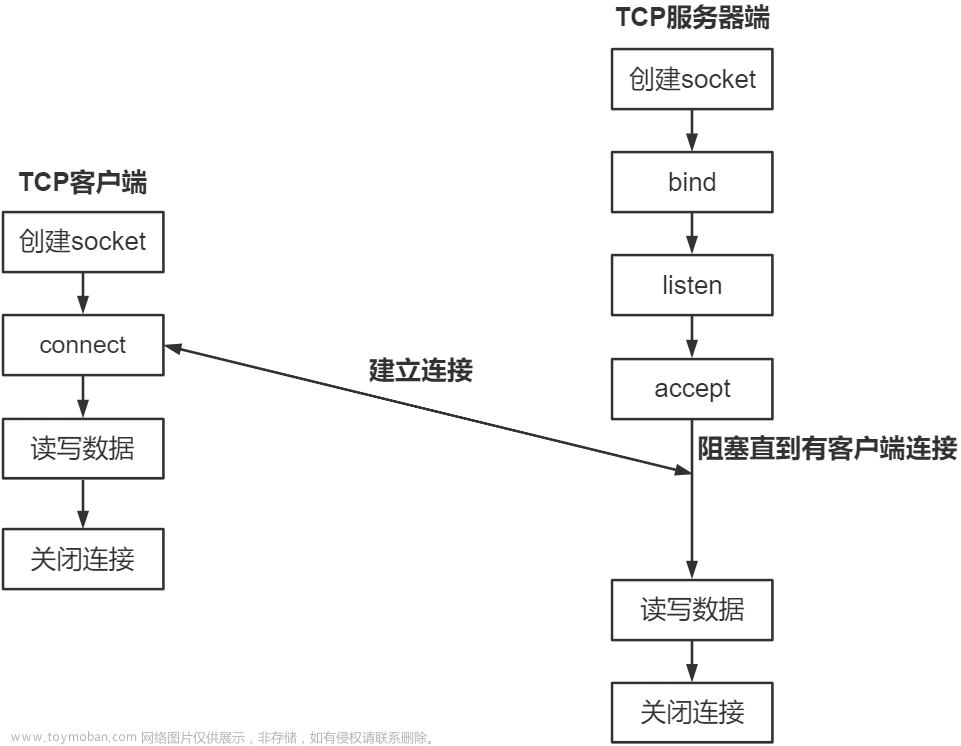
一、Socket通信
Socket:即套接字,其本身并不是一种通信协议,它是封装了TCP/IP、UDP 协议的API实现。在创建Socket对象后,底层会完成TCP/IP的三次握手等(UDP协议对应的API是DatagramSocket)。
1.1 建立Socket连接
// 创建Socket时,需要指定服务端的IP及端口号;下面以百度首页IP为例
Socket socket = new Socket("110.242.68.4", 80);
1.2 Socket通信
在建立了Socket连接后,就可以和服务端进行Socket通信了。常用的Socket通信包含发送数据、接收数据两种。
1.2.1 发送数据
// 1.从Socket 对象获得OutputStream对象
OutputStream outputStream = socket.getOutputStream();
// 2.把需要发送的数据写到OutputStream
outputStream.write(("hello from BC").getBytes("utf-8"));
// 3.发送数据
outputStream.flush();
1.2.2 接收数据
// 1.从Socket 对象获得InputStream对象;
// 如果服务端发送的时候字符串数据,用BufferedReader处理更方便一些
InputStream inputStream = socket.getInputStream()
BufferedReader bufferedReader = new BufferedReader(inputStream);
// 2.从用BufferedReader中读取一行数据
bufferedReader.readLine();
1.3 断开Socket连接
// 1.关闭Socket相关的输入输出流(如果之前有用到的话)
outputStream.close();
bufferedReader.close();
// 2.断开Socket连接
// socket.close();
二、HTTP/HTTPS通信
开发中一般不会直接用到Socket通信(即代码中硬编码后端的ip地址&端口号来发送/接收数据),常用的是HTTP/HTTPS通信(即访问某个域名来发送/接收数据,例如访问 ‘www.baidu.com’ 来发送或接收数据)。
Android开发中,封装了HTTP/HTTPS通信的API是:HttpURLConnection / HttpsURLConnection(HttpClient6.0已经废弃,不再介绍)。需要注意的是,这两个API不能在主线程进行网络请求,否则会抛NetworkOnMainThreadException异常。此外记得在manifest中声明网络权限。
<!-- 权限级别: normal -->
<uses-permission android:name="android.permission.INTERNET"/>
<uses-permission android:name="android.permission.ACCESS_NETWORK_STATE"/>
<uses-permission android:name="android.permission.ACCESS_WIFI_STATE"/>
<uses-permission android:name="android.permission.CHANGE_WIFI_STATE"/>
2.1 HttpURLConnection
2.1.1 接收数据
// 在子线程进行网络请求
private ThreadPoolExecutor threadPoolExecutor = new ThreadPoolExecutor(
        8, 8,
        180L, TimeUnit.SECONDS,
        new LinkedBlockingQueue()
    );

// 发送请求并读取html数据
private void sendRequest() {
    threadPoolExecutor.execute(new Runnable() {
        @Override
        public void run() {
            HttpURLConnection urlConnection = null;
            try {
                URL url = new URL("http://www.baidu.com/");
                // 1.创建连接对象
                urlConnection = (HttpURLConnection) url.openConnection();
                // 2.建立连接&读取数据
                if(urlConnection.getResponseCode() == HttpURLConnection.HTTP_OK){
                    BufferedReader reader = new BufferedReader(new InputStreamReader(urlConnection.getInputStream()));
                    String inputLine;
                    while ((inputLine = reader.readLine()) != null) {
                        Log.d("BCHttpDemo",inputLine);
                    }
                }
            } catch (Throwable throwable) {
                throwable.printStackTrace();
            } finally {
                // 3.断开连接
                urlConnection.disconnect();
            }
        }
    });
}
运行后,logcat结果如下所示,可以看到已经输出了百度首页的HTML数据:
<!DOCTYPE html>
<!--STATUS OK--><html> <head><meta http-equiv=content-type content=text/html;charset=utf-8><meta http-equiv=X-UA-Compatible content=IE=Edge><meta content=always name=referrer><link rel=stylesheet type=text/css href=https://ss1.bdstatic.com/5eN1bjq8AAUYm2zgoY3K/r/www/cache/bdorz/baidu.min.css><title>百度一下,你就知道</title></head> <body link=#0000cc> <div id=wrapper> <div id=head> <div class=head_wrapper> <div class=s_form> <div class=s_form_wrapper> <div id=lg> <img hidefocus=true src=//www.baidu.com/img/bd_logo1.png width=270 height=129> </div> <form id=form name=f action=//www.baidu.com/s class=fm> <input type=hidden name=bdorz_come value=1> <input type=hidden name=ie value=utf-8> <input type=hidden name=f value=8> <input type=hidden name=rsv_bp value=1> <input type=hidden name=rsv_idx value=1> <input type=hidden name=tn value=baidu><span class="bg s_ipt_wr"><input id=kw name=wd class=s_ipt value maxlength=255 autocomplete=off autofocus=autofocus></span><span class="bg s_btn_wr"><input type=submit id=su value=百度一下 class="bg s_btn" autofocus></span> </form> </div> </div> <div id=u1> <a href=http://news.baidu.com name=tj_trnews class=mnav>新闻</a> <a href=https://www.hao123.com name=tj_trhao123 class=mnav>hao123</a> <a href=http://map.baidu.com name=tj_trmap class=mnav>地图</a> <a href=http://v.baidu.com name=tj_trvideo class=mnav>视频</a> <a href=http://tieba.baidu.com name=tj_trtieba class=mnav>贴吧</a> <noscript> <a href=http://www.baidu.com/bdorz/login.gif?login&tpl=mn&u=http%3A%2F%2Fwww.baidu.com%2f%3fbdorz_come%3d1 name=tj_login class=lb>登录</a> </noscript> <script>document.write('<a href="http://www.baidu.com/bdorz/login.gif?login&tpl=mn&u='+ encodeURIComponent(window.location.href+ (window.location.search === "" ? "?" : "&")+ "bdorz_come=1")+ '" name="tj_login" class="lb">登录</a>');
</script> <a href=//www.baidu.com/more/ name=tj_briicon class=bri style="display: block;">更多产品</a> </div> </div> </div> <div id=ftCon> <div id=ftConw> <p id=lh> <a href=http://home.baidu.com>关于百度</a> <a href=http://ir.baidu.com>About Baidu</a> </p> <p id=cp>©2017 Baidu <a href=http://www.baidu.com/duty/>使用百度前必读</a> <a href=http://jianyi.baidu.com/ class=cp-feedback>意见反馈</a> 京ICP证030173号 <img src=//www.baidu.com/img/gs.gif> </p> </div> </div> </div> </body> </html>
2.1.2 发送数据
发送数据常用的方式是GET方式、POST方式等。
2.1.2.1 GET方式
GET方式把需要发送的数据以key-value的形式拼接到url后面即可,如下所示:
// 请求参数wd的值为BC
URL url = new URL("http://www.baidu.com/s?wd=BC");
2.1.2.2 POST方式
如果在发送请求时需要发送数据,则设置setDoOutput(true),并且在URLConnection.getOutputStream()中写入需要发送的数据。
private void sendRequest() {
    threadPoolExecutor.execute(new Runnable() {
        @Override
        public void run() {
            HttpURLConnection urlConnection = null;
            try {
                URL url = new URL("http://www.baidu.com/s?wd=BC");
                // 1.创建连接对象
                urlConnection = (HttpURLConnection) url.openConnection();
                // 2.设置需要发送数据
                urlConnection.setDoOutput(true);
                // 3.设置发送数据的格式Content-Type,例子中传送一个json
                urlConnection.setRequestProperty("Content-Type", "application/json; charset=UTF-8");
                JSONObject jsonObject = new JSONObject();
                jsonObject.put("name", "BC");
                OutputStream outputStream = urlConnection.getOutputStream();
                // 4.发送数据
                outputStream.write(jsonObject.toString().getBytes("UTF-8"));
                // 5.建立连接
                if(urlConnection.getResponseCode() == HttpURLConnection.HTTP_OK){
                    BufferedReader reader = new BufferedReader(new InputStreamReader(urlConnection.getInputStream()));
                    String inputLine;
                    while ((inputLine = reader.readLine()) != null) {
                        Log.d("BCHttpDemo",inputLine);
                    }
                }
            } catch (Throwable throwable) {
                throwable.printStackTrace();
            } finally {
                // 6.断开连接
                urlConnection.disconnect();
            }
        }
    });
}
抓包可以看到发送的数据如下所示:
2.2 HttpsURLConnection
HttpsURLConnection继承自HttpURLConnection,在http的基础上实现了https协议的相关功能。HttpsURLConnection的使用方式与HttpURLConnection类似,指定为"https"的URL在URL.openConnection()后就可返回对应的HttpsURLConnection:
HttpsURLConnection urlConnection = null;
try {
    // scheme为"https"
    URL url = new URL("https://www.baidu.com/");
    // 建立连接
    urlConnection = (HttpsURLConnection) url.openConnection();
    if(urlConnection.getResponseCode() == HttpURLConnection.HTTP_OK){
        // ...省略
    }
} catch (Throwable throwable) {
    throwable.printStackTrace();
} finally {
    // 断开连接
    urlConnection.disconnect();
}
2.3 charles抓包
如果想在demo中结合Charles工具抓包,除了打开Charles的ssl抓包功能外,还需要在app中加入如下网络安全配置:
- 新建网络配置文件res/xml/network_security_config.xml,内容如下:
<?xml version="1.0" encoding="utf-8"?>
<network-security-config>
    <domain-config cleartextTrafficPermitted="true">
        <domain includeSubdomains="true">www.baidu.com</domain>
    </domain-config>
    <debug-overrides>
        <trust-anchors>
            <!-- Trust user added CAs while debuggable only -->
            <certificates src="user" />
        </trust-anchors>
    </debug-overrides>
</network-security-config>
- 在AndroidManifest.xml中引入配置文件:
<application
        android:networkSecurityConfig="@xml/network_security_config"
        android:usesCleartextTraffic="true">
</application>
- 运行app后可以看到抓包请求如下:

三、HttpsURLConnection源码分析
HttpURLConnection建立网络连接关键的几步包括:
// 创建URL对象
URL url = new URL("https://www.baidu.com/s?wd=BC");
// 创建连接对象
HttpsURLConnection urlConnection = (HttpsURLConnection) url.openConnection();
// 建立连接;
urlConnection.connect();
// 建立连接&读取数据;不调用connect()直接调用getInputStream()也会执行建立连接
urlConnection.getInputStream();
其中比较重要的类有下面几个,分别分析源码:
3.1 URL
创建URL对象时,主要的方法如下:
public URL(URL context, String spec, URLStreamHandler handler)
        throws MalformedURLException
{
    int i, c;
    int start = 0;
    String newProtocol = null;
    for (i = start ; !aRef && (i < limit) &&
            ((c = spec.charAt(i)) != '/') ; i++) {
        if (c == ':') {
            String s = spec.substring(start, i).toLowerCase();
            if (isValidProtocol(s)) {
                newProtocol = s;
                start = i + 1;
            }
            break;
        }
    }
    protocol = newProtocol;
    if (handler == null &&
            (handler = getURLStreamHandler(protocol)) == null) {
        throw new MalformedURLException("unknown protocol: "+protocol);
    }
    this.handler = handler;
    handler.parseURL(this, spec, start, limit);
}

static URLStreamHandler getURLStreamHandler(String protocol) {
    URLStreamHandler handler = handlers.get(protocol);
    if (handler == null) {
        handler = createBuiltinHandler(protocol);
        synchronized (streamHandlerLock) {
            URLStreamHandler handler2 = null;
            handler2 = handlers.get(protocol);
            if (handler2 != null) {
                return handler2;
            }
            if (!checkedWithFactory && factory != null) {
                handler2 = factory.createURLStreamHandler(protocol);
            }
            if (handler2 != null) {
                handler = handler2;
            }
            if (handler != null) {
                handlers.put(protocol, handler);
            }
        }
    }
    return handler;
}

private static URLStreamHandler createBuiltinHandler(String protocol) {
    URLStreamHandler handler = null;
    if (protocol.equals("file")) {
        handler = new sun.net.www.protocol.file.Handler();
    } else if (protocol.equals("ftp")) {
        handler = new sun.net.www.protocol.ftp.Handler();
    } else if (protocol.equals("jar")) {
        handler = new sun.net.www.protocol.jar.Handler();
    } else if (protocol.equals("http")) {
        handler = (URLStreamHandler)Class.
                forName("com.android.okhttp.HttpHandler").newInstance();
    } else if (protocol.equals("https")) {
        handler = (URLStreamHandler)Class.
                forName("com.android.okhttp.HttpsHandler").newInstance();
    }
    return handler;
}
3.2 HttpHandler
继续分析url.openConnection()时的方法调用如下,源码调用了HttpsHandler.openConnection()创建连接对象:
public final class URL {
    public URLConnection openConnection() throws java.io.IOException {
        return handler.openConnection(this);
    }
}
分析HttpHandler.openConnection()如下:
public class HttpHandler extends URLStreamHandler {
    protected URLConnection openConnection(URL url) {
        return newOkUrlFactory(null).open(url);
    }

    protected OkUrlFactory newOkUrlFactory(Proxy proxy) {
        OkUrlFactory okUrlFactory = createHttpOkUrlFactory(proxy);
        okUrlFactory.client().setConnectionPool(configAwareConnectionPool.get());
        return okUrlFactory;
    }

    /**
     * 创建OkHttpClient,用于后面创建HttpURLConnection实例
     */
    public static OkUrlFactory createHttpOkUrlFactory(Proxy proxy) {
        OkHttpClient client = new OkHttpClient();
        client.setConnectTimeout(0, TimeUnit.MILLISECONDS);
        client.setReadTimeout(0, TimeUnit.MILLISECONDS);
        client.setWriteTimeout(0, TimeUnit.MILLISECONDS);
        client.setFollowRedirects(HttpURLConnection.getFollowRedirects());
        client.setFollowSslRedirects(false);
        client.setConnectionSpecs(CLEARTEXT_ONLY);
        if (proxy != null) {
            client.setProxy(proxy);
        }
        OkUrlFactory okUrlFactory = new OkUrlFactory(client);
        OkUrlFactories.setUrlFilter(okUrlFactory, CLEARTEXT_FILTER);
        ResponseCache responseCache = ResponseCache.getDefault();
        if (responseCache != null) {
            AndroidInternal.setResponseCache(okUrlFactory, responseCache);
        }
        return okUrlFactory;
    }
}
最终由OkUrlFactory创建对应的HttpURLConnectionImpl对象:
public final class OkUrlFactory implements URLStreamHandlerFactory, Cloneable {

    public HttpURLConnection open(URL url) {
        return open(url, client.getProxy());
    }

    HttpURLConnection open(URL url, Proxy proxy) {
        String protocol = url.getProtocol();
        OkHttpClient copy = client.copyWithDefaults();
        copy.setProxy(proxy);
        if (protocol.equals("http")) return new HttpURLConnectionImpl(url, copy, urlFilter);
        if (protocol.equals("https")) return new HttpsURLConnectionImpl(url, copy, urlFilter);
        throw new IllegalArgumentException("Unexpected protocol: " + protocol);
    }
}
3.3 HttpURLConnectionImpl
urlConnection.connect()、urlConnection.getResponseCode()、urlConnection.getInputStream()最终都会执行到HttpURLConnectionImpl.execute()去建立网络连接:
public class HttpURLConnectionImpl extends HttpURLConnection {

    final OkHttpClient client;
    protected HttpEngine httpEngine;

    public final InputStream getInputStream() {
        HttpEngine response = getResponse();
        return response.getResponse().body().byteStream();
    }

    private HttpEngine getResponse() throws IOException {
        // 初始化HttpEngine对象
        initHttpEngine();
        if (httpEngine.hasResponse()) {
            return httpEngine;
        }
        while (true) {
            // 发送请求
            if (!execute(true)) {
                continue;
            }
            Response response = httpEngine.getResponse();
            Sink requestBody = httpEngine.getRequestBody();
            httpEngine = newHttpEngine(followUp.method(), streamAllocation, (RetryableSink) requestBody,
                    response);
        }
    }

    /**
     * 发送请求;参数readResponse表示是否读取Response
     */
    private boolean execute(boolean readResponse) throws IOException {
        // 发送请求
        httpEngine.sendRequest();
        Connection connection = httpEngine.getConnection();
        if (connection != null) {
            route = connection.getRoute();
            handshake = connection.getHandshake();
        } else {
            route = null;
            handshake = null;
        }
        if (readResponse) {
            // 读取Response
            httpEngine.readResponse();
        }
        return true;
    }
}
3.4 HttpEngine
HttpEngine用于处理单个 HTTP 请求/响应对,使用 sendRequest() 发送HTTP 请求消息,使用 readResponse() 读取 HTTP 响应消息。
public final class HttpEngine {

    final OkHttpClient client;
    public final StreamAllocation streamAllocation;
    private HttpStream httpStream;
    private Request networkRequest;
    private Response userResponse;

    public void sendRequest() throws RequestException, RouteException, IOException {
        // 创建Request对象
        Request request = networkRequest(userRequest);
        InternalCache responseCache = Internal.instance.internalCache(client);
        Response cacheCandidate = responseCache != null
                ? responseCache.get(request)
                : null;
        long now = System.currentTimeMillis();
        cacheStrategy = new CacheStrategy.Factory(now, request, cacheCandidate).get();
        networkRequest = cacheStrategy.networkRequest;
        cacheResponse = cacheStrategy.cacheResponse;
        if (networkRequest != null) {
            // 建立连接
            httpStream = connect();
            httpStream.setHttpEngine(this);
            if (callerWritesRequestBody && permitsRequestBody(networkRequest) && requestBodyOut == null) {
                long contentLength = OkHeaders.contentLength(request);
                if (bufferRequestBody) {
                    if (contentLength > Integer.MAX_VALUE) {
                        throw new IllegalStateException("Use setFixedLengthStreamingMode() or "
                                + "setChunkedStreamingMode() for requests larger than 2 GiB.");
                    }

                    if (contentLength != -1) {
                        httpStream.writeRequestHeaders(networkRequest);
                        requestBodyOut = new RetryableSink((int) contentLength);
                    } else {
                        requestBodyOut = new RetryableSink();
                    }
                } else {
                    httpStream.writeRequestHeaders(networkRequest);
                    requestBodyOut = httpStream.createRequestBody(networkRequest, contentLength);
                }
            }
        } else {
            if (cacheResponse != null) {
                this.userResponse = cacheResponse.newBuilder()
                        .request(userRequest)
                        .priorResponse(stripBody(priorResponse))
                        .cacheResponse(stripBody(cacheResponse))
                        .build();
            } else {
                this.userResponse = new Response.Builder()
                        .request(userRequest)
                        .priorResponse(stripBody(priorResponse))
                        .protocol(Protocol.HTTP_1_1)
                        .code(504)
                        .message("Unsatisfiable Request (only-if-cached)")
                        .body(EMPTY_BODY)
                        .build();
            }
            userResponse = unzip(userResponse);
        }
    }

    /**
     * 创建Request对象
     */
    private Request networkRequest(Request request) throws IOException {
        Request.Builder result = request.newBuilder();
        if (request.header("Host") == null) {
            result.header("Host", Util.hostHeader(request.httpUrl(), false));
        }
        if (request.header("Connection") == null) {
            result.header("Connection", "Keep-Alive");
        }
        if (request.header("Accept-Encoding") == null) {
            transparentGzip = true;
            result.header("Accept-Encoding", "gzip");
        }
        if (request.header("User-Agent") == null) {
            result.header("User-Agent", Version.userAgent());
        }
        return result.build();
    }

    /**
     * 建立连接
     */
    private HttpStream connect() {
        boolean doExtensiveHealthChecks = !networkRequest.method().equals("GET");
        // StreamAllocation最终会创建一个Socket连接,暂不继续深入分析
        return streamAllocation.newStream(client.getConnectTimeout(),
                client.getReadTimeout(), client.getWriteTimeout(),
                client.getRetryOnConnectionFailure(), doExtensiveHealthChecks);
    }

    /**
     * 读取返回结果
     */
    public void readResponse() throws IOException {
        if (userResponse != null) {
            return; // Already ready.
        }
        Response networkResponse;
        if (forWebSocket) {
            httpStream.writeRequestHeaders(networkRequest);
            networkResponse = readNetworkResponse();
        } else if (!callerWritesRequestBody) {
            networkResponse = new NetworkInterceptorChain(0, networkRequest).proceed(networkRequest);
        } else {
            if (bufferedRequestBody != null && bufferedRequestBody.buffer().size() > 0) {
                bufferedRequestBody.emit();
            }
            if (sentRequestMillis == -1) {
                if (OkHeaders.contentLength(networkRequest) == -1
                        && requestBodyOut instanceof RetryableSink) {
                    long contentLength = ((RetryableSink) requestBodyOut).contentLength();
                    networkRequest = networkRequest.newBuilder()
                            .header("Content-Length", Long.toString(contentLength))
                            .build();
                }
                httpStream.writeRequestHeaders(networkRequest);
            }
            // Write the request body to the socket.
            if (requestBodyOut != null) {
                if (bufferedRequestBody != null) {
                    // This also closes the wrapped requestBodyOut.
                    bufferedRequestBody.close();
                } else {
                    requestBodyOut.close();
                }
                if (requestBodyOut instanceof RetryableSink) {
                    httpStream.writeRequestBody((RetryableSink) requestBodyOut);
                }
            }
            networkResponse = readNetworkResponse();
        }
        receiveHeaders(networkResponse.headers());
        if (cacheResponse != null) {
            if (validate(cacheResponse, networkResponse)) {
                userResponse = cacheResponse.newBuilder()
                        .request(userRequest)
                        .priorResponse(stripBody(priorResponse))
                        .headers(combine(cacheResponse.headers(), networkResponse.headers()))
                        .cacheResponse(stripBody(cacheResponse))
                        .networkResponse(stripBody(networkResponse))
                        .build();
                networkResponse.body().close();
                releaseStreamAllocation();

                // Update the cache after combining headers but before stripping the
                // Content-Encoding header (as performed by initContentStream()).
                InternalCache responseCache = Internal.instance.internalCache(client);
                responseCache.trackConditionalCacheHit();
                responseCache.update(cacheResponse, stripBody(userResponse));
                userResponse = unzip(userResponse);
                return;
            } else {
                closeQuietly(cacheResponse.body());
            }
        }
        userResponse = networkResponse.newBuilder()
                .request(userRequest)
                .priorResponse(stripBody(priorResponse))
                .cacheResponse(stripBody(cacheResponse))
                .networkResponse(stripBody(networkResponse))
                .build();
        if (hasBody(userResponse)) {
            maybeCache();
            userResponse = unzip(cacheWritingResponse(storeRequest, userResponse));
        }
    }

    /**
     * 默认支持对response gzip解压
     */
    private Response unzip(final Response response) throws IOException {
        if (!transparentGzip || !"gzip".equalsIgnoreCase(userResponse.header("Content-Encoding"))) {
            return response;
        }
        if (response.body() == null) {
            return response;
        }
        GzipSource responseBody = new GzipSource(response.body().source());
        Headers strippedHeaders = response.headers().newBuilder()
                .removeAll("Content-Encoding")
                .removeAll("Content-Length")
                .build();
        return response.newBuilder()
                .headers(strippedHeaders)
                .body(new RealResponseBody(strippedHeaders, Okio.buffer(responseBody)))
                .build();
    }
}
3.5 总结
综上所述,HttpsURLConnection底层是基于okhttp(我们后面章节再分析okhttp)实现的,其关键调用对应如下:
The End
欢迎关注我,一起解锁更多技能:BC的掘金主页~💐 BC的CSDN主页~💐💐 文章来源:https://www.toymoban.com/news/detail-657662.html
HttpURLConnectionImpl源码:https://cs.android.com/android/platform/superproject/+/master:external/okhttp/repackaged/okhttp-urlconnection/src/main/java/com/android/okhttp/internal/huc/HttpURLConnectionImpl.java
okhttp:https://square.github.io/okhttp/
Android网络开发专栏:https://juejin.cn/column/7198740450198749240
文章来源地址https://www.toymoban.com/news/detail-657662.html
到了这里,关于Android网络开发(一、Socket通信&HTTP通信)的文章就介绍完了。如果您还想了解更多内容,请在右上角搜索TOY模板网以前的文章或继续浏览下面的相关文章,希望大家以后多多支持TOY模板网!