任务要求
使用串口发送5个字节数据到电脑
1、ADC采样的结果为12位,如何使用串口发送
2、16位数据,如何通过串口发送
3、多个字节的数据,如何通过串口发送
UART规定,发送的数据位只能有6、7、8位,若直接修改发送位数,接收模块将不适配。
两种情况:
1、没有开始发送(上一次的发送已经完成,新的40位数据的发送请求没有出现)
2、40位数据的发送请求信号已出现
3、依次发送数据中
状态:
等待传输请求(Trans_Go);
Data <= Data40[7:0];
产生Send_Go,启动发送第一个字节;
接着等待Tx_Done;
判断Data40是否发送完成,若完成:回到状态一等待Trans_Go;
若未完成:启动下一个8位数据的发送;
任务:优化状态机,实现只要2个或3个状态实现发送的功能,并且易于修改为发送任意个字节的数据。
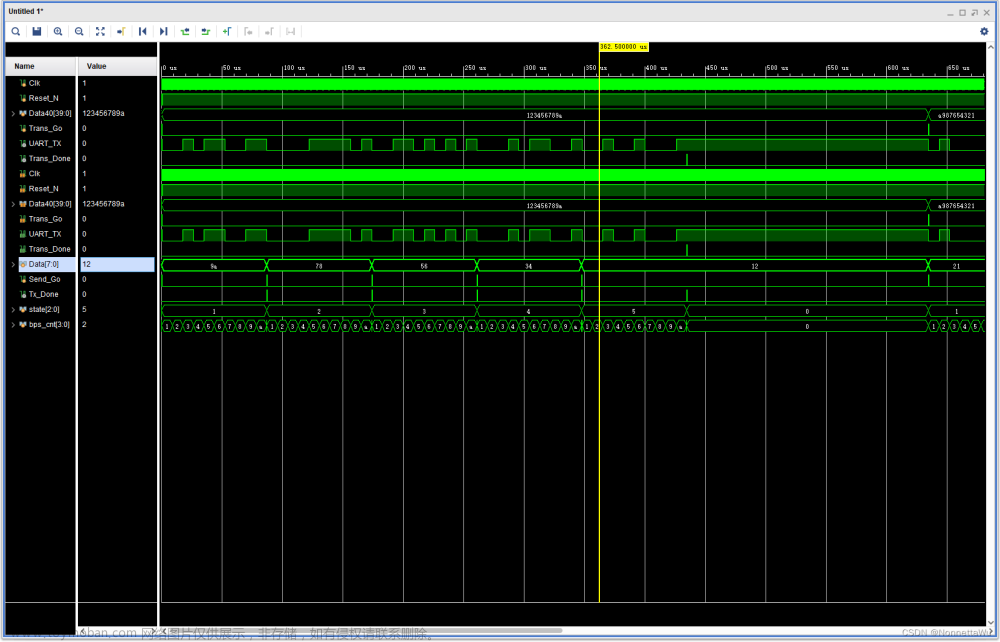
仿真波形
 文章来源:https://www.toymoban.com/news/detail-658976.html
设计文件程序
Method_One
/*Method_One*/
/*该程序较冗余,建议参考Merthod_Two*/
module UART_PC(
    Clk,
    Reset_N,
    Data40,
    Trans_Go,
    UART_TX,
    Trans_Done
);
    input Clk;
    input Reset_N;
    input [39:0]Data40;
    input Trans_Go;
    output UART_TX;
    output reg Trans_Done;

    reg [7:0]Data;
    reg Send_Go;
    wire Tx_Done;

    UART UART(
            .Clk(Clk),
            .Reset_N(Reset_N),
            .Data(Data),
            .Send_Go(Send_Go),
            .Baud_Set(4),
            .UART_TX(UART_TX),
            .Tx_Done(Tx_Done)
        );

    reg [2:0]state;
    always@(posedge Clk or negedge Reset_N)
    if(!Reset_N)begin
        state <= 0;
        Data <= 0;
        Send_Go <= 0;
        Trans_Done <= 0;
    end
    else if(state == 0)begin
        Trans_Done <= 0;
        if(Trans_Go)begin
        //产生Send_Go  启动发送第一个字节
            Data <= Data40[7:0];
            Send_Go <= 1;
            state <= 1;
        end
        else begin
        //等待传输请求_Trans_Go
            Data <= Data;
            Send_Go <= 0;
            state <= 0;
        end
   end
   else if(state == 1)begin
        if(Tx_Done)begin
            Data <= Data40[15:8];
            Send_Go <= 1;
            state <= 2;
        end
        else begin
        //等待该字节数据发送完成
            Data <= Data;
            Send_Go <= 0;
            state <= 1;
        end
    end
   else if(state == 2)begin
        if(Tx_Done)begin
            Data <= Data40[23:16];
            Send_Go <= 1;
            state <= 3;
        end
        else begin
        //等待该字节数据发送完成
            Data <= Data;
            Send_Go <= 0;
            state <= 2;
        end
    end
    else if(state == 3)begin
        if(Tx_Done)begin
            Data <= Data40[31:24];
            Send_Go <= 1;
            state <= 4;
        end
        else begin
        //等待该字节数据发送完成
            Data <= Data;
            Send_Go <= 0;
            state <= 3;
        end
    end
    else if(state == 4)begin
        if(Tx_Done)begin
            Data <= Data40[39:32];
            Send_Go <= 1;
            state <= 5;
        end
        else begin
        //等待该字节数据发送完成
            Data <= Data;
            Send_Go <= 0;
            state <= 4;
        end
    end
    else if(state == 5)begin
        if(Tx_Done)begin
            Send_Go <= 0;
            Trans_Done <= 1;
            state <= 0;
        end
        else begin
        //等待该字节数据发送完成
            Data <= Data;
            Send_Go <= 0;
            state <= 5;
        end
    end
endmodule
Method_Two
module UART_PC_Better(
    Clk,
    Reset_N,
    Data40,
    Trans_Go,
    UART_TX,
    Trans_Done
);
    input Clk;
    input Reset_N;
    input [39:0]Data40;
    input Trans_Go;
    output UART_TX;
    output reg Trans_Done;

    reg [7:0]Data;
    reg Send_Go;
    wire Tx_Done;

    UART UART(
            .Clk(Clk),
            .Reset_N(Reset_N),
            .Data(Data),
            .Send_Go(Send_Go),
            .Baud_Set(4),
            .UART_TX(UART_TX),
            .Tx_Done(Tx_Done)
        );

    reg [2:0]state;
    always@(posedge Clk or negedge Reset_N)
    if(!Reset_N)begin
        state <= 0;
        Data <= 0;
        Send_Go <= 0;
        Trans_Done <= 0;
    end
    else begin
        case(state)
            0:  begin
                    Trans_Done <= 0;
                    if(Trans_Go)begin
                    //产生Send_Go  启动发送第一个字节
                        Data <= Data40[7:0];
                        Send_Go <= 1;
                        state <= 1;
                    end
                    else begin
                    //等待传输请求_Trans_Go
                        Data <= Data;
                        Send_Go <= 0;
                        state <= 0;
                    end
               end
           1:  begin
                    if(Tx_Done)begin
                        Data <= Data40[15:8];
                        Send_Go <= 1;
                        state <= 2;
                    end
                    else begin
                    //等待该字节数据发送完成
                        Data <= Data;
                        Send_Go <= 0;
                        state <= 1;
                    end
                end
            2:  begin
                    if(Tx_Done)begin
                        Data <= Data40[23:16];
                        Send_Go <= 1;
                        state <= 3;
                    end
                    else begin
                    //等待该字节数据发送完成
                        Data <= Data;
                        Send_Go <= 0;
                        state <= 2;
                    end
                end
            3:  begin
                    if(Tx_Done)begin
                        Data <= Data40[31:24];
                        Send_Go <= 1;
                        state <= 4;
                    end
                    else begin
                    //等待该字节数据发送完成
                        Data <= Data;
                        Send_Go <= 0;
                        state <= 3;
                    end
                end
            4:  begin
                    if(Tx_Done)begin
                        Data <= Data40[39:32];
                        Send_Go <= 1;
                        state <= 5;
                    end
                    else begin
                    //等待该字节数据发送完成
                        Data <= Data;
                        Send_Go <= 0;
                        state <= 4;
                    end
                end
            5:  begin
                    if(Tx_Done)begin
                        Send_Go <= 0;
                        Trans_Done <= 1;
                        state <= 0;
                    end
                    else begin
                    //等待该字节数据发送完成
                        Data <= Data;
                        Send_Go <= 0;
                        state <= 5;
                    end
                end
            default:
                begin
                        Data <= Data;
                        Send_Go <= 0;
                        state <= 0;
                end
           endcase
       end
endmodule
仿真文件程序
`timescale 1ns / 1ns

module UART_PC_tb();
    reg Clk;
    reg Reset_N;
    reg [39:0]Data40;
    reg Trans_Go;
    wire UART_TX;

//隐实例化
 UART_PC_Better UART_PC(
        Clk,
        Reset_N,
        Data40,
        Trans_Go,
        UART_TX,
        Trans_Done
    );

    initial Clk = 1;
    always #10 Clk = !Clk;
    initial begin
        Reset_N = 0;
        Data40 = 0;
        Trans_Go = 0;
        #201;
        Reset_N = 1;
        #200;
        Data40 = 40'h123456789a;
        Trans_Go = 1;
        #20;
        Trans_Go = 0;
        @(posedge Trans_Done);
        #200000;
        Data40 = 40'ha987654321;
        Trans_Go = 1;
        #20;
        Trans_Go = 0;
        @(posedge Trans_Done);
        #200000;
        $stop;
    end
endmodule
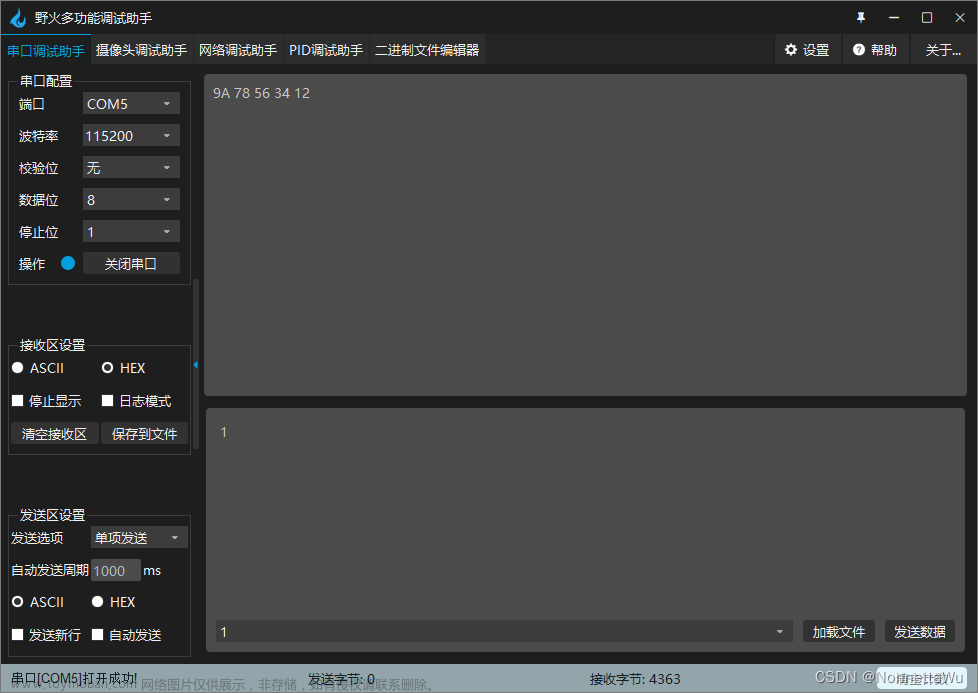
任务_板级验证结果
 文章来源地址https://www.toymoban.com/news/detail-658976.html
到了这里,关于FPGA入门学习笔记(十)Vivado设计状态机实现UART多字节数据发送的文章就介绍完了。如果您还想了解更多内容,请在右上角搜索TOY模板网以前的文章或继续浏览下面的相关文章,希望大家以后多多支持TOY模板网!


