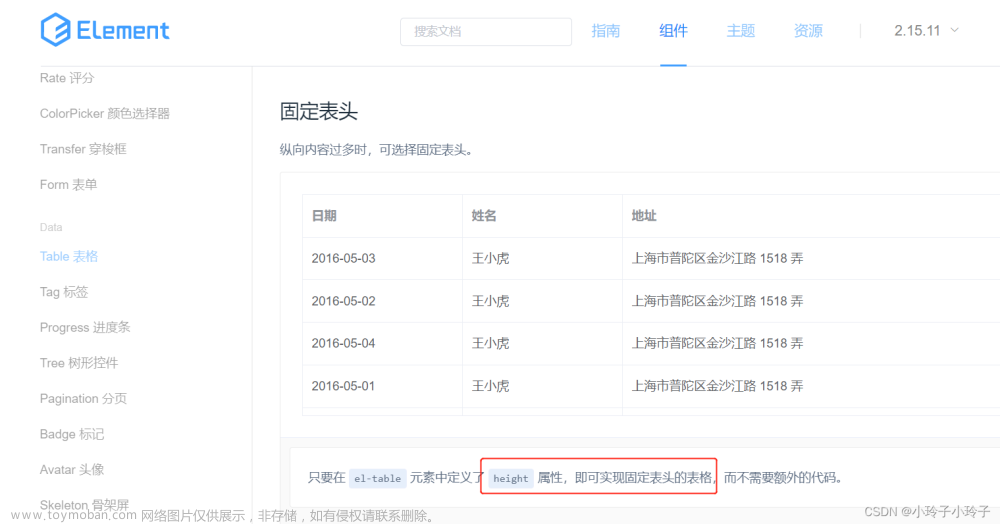
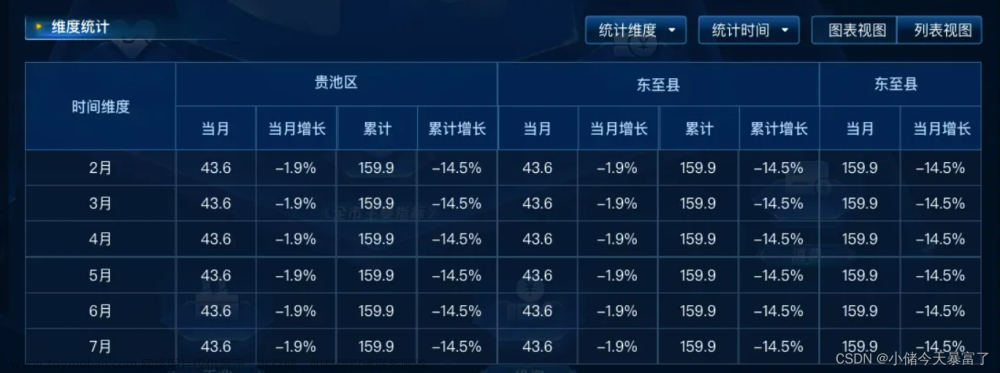
Ⅰ、Element-ui 提供的Table组件与想要目标情况的对比:
1、Element-ui 提供Table组件情况:
其一、Element-ui 自提供的Table代码情况为(示例的代码):

// Element-ui 自提供的代码:
 <template>
    <el-table
      :data="tableData"
      style="width: 100%">
      <el-table-column
        prop="date"
        label="日期"
        width="180">
      </el-table-column>
      <el-table-column
        prop="name"
        label="姓名"
        width="180">
      </el-table-column>
      <el-table-column
        prop="address"
        label="地址">
      </el-table-column>
    </el-table>
  </template>

  <script>
    export default {
      data() {
        return {
          tableData: [{
            date: '2016-05-02',
            name: '王小虎',
            address: '上海市普陀区金沙江路 1518 弄'
          }, {
            date: '2016-05-04',
            name: '王小虎',
            address: '上海市普陀区金沙江路 1517 弄'
          }, {
            date: '2016-05-01',
            name: '王小虎',
            address: '上海市普陀区金沙江路 1519 弄'
          }, {
            date: '2016-05-03',
            name: '王小虎',
            address: '上海市普陀区金沙江路 1516 弄'
          }]
        }
      }
    }
  </script>
代码地址:https://element.eleme.cn/#/zh-CN/component/table
其二、页面的显示情况为:

2、目标修改后的情况:
 文章来源:https://www.toymoban.com/news/detail-665179.html
Ⅱ、实现 Table 表格达到目标效果变化的过程:
1、Table 表格设置表头及去除下标线等属性的修改:
其一、代码:
<style lang="scss" scoped>
//设置表头的背景色(可以设置和页面背景色一致):
/deep/.el-table th {
  background-color: #00083e;
}
//设置表每一行的背景色,字体颜色及字体粗细;
/deep/.el-table tr {
  background-color: rgba(150, 157, 128, 0.9);
  color: #fff;
  font-weight: 500;
}
//去除表格每一行的下标线;
/deep/.el-table td {
  border-bottom: none;
}
//去除表头的下标线;
/deep/.el-table th.is-leaf {
  border-bottom: none;
}
//去除表格的最下边框线;
.el-table::before {
  height: 0;
}
//设置表格的背景色问题(否则一般默认的背景色是白色);
.el-table,
.el-table__expanded-cell {
  background-color: #00083e;
}
</style>
其二、效果展示:
A、页面表格展示为:

B、存在的问题:悬停背景为白色

2、Table 表格去除悬停背景色及设置行间距等属性的修改:
其一、代码:
<style lang="scss" scoped>
// 设置整个表格的内边距问题:
.container-table {
  padding: 0 30px 0 30px;
}
//设置表头的背景色(可以设置和页面背景色一致):
/deep/.el-table th {
  background-color: #00083e;
}
//设置表每一行的背景色,字体颜色及字体粗细;
/deep/.el-table tr {
  background-color: rgba(150, 157, 128, 0.9);
  color: #fff;
  font-weight: 500;
}
//去除表格每一行的下标线;
/deep/.el-table td {
  border-bottom: none;
}
//去除表头的下标线;
/deep/.el-table th.is-leaf {
  border-bottom: none;
}
//去除表格的最下边框线;
.el-table::before {
  height: 0;
}
//设置表格的背景色问题(否则一般默认的背景色是白色);
.el-table,
.el-table__expanded-cell {
  background-color: #00083e;
}
//设置表格的行间距;
::v-deep .el-table__body {
  -webkit-border-vertical-spacing: 13px;
}
//设置标题行(th)的字体属性;
::v-deep .el-table th > .cell {
  line-height: 11px;
  font-size: 5px;
  padding-left: 20px;
}
//设置 table 中的每个 cell 的属性值;
::v-deep .el-table .cell {
  padding-left: 20px;
  line-height: 58px;
}
//设置 table 中的 th td 的 padding 值;
::v-deep .el-table td,
::v-deep .el-table th {
  padding: 0;
}
//将表格的每一行悬停的背景色都设置为:transparent;
/deep/.el-table--enable-row-hover .el-table__body tr:hover > td {
  background-color: transparent;
}
</style>
其二、效果展示:
A、页面表格展示为:

B、解决:悬停背景问题(即:悬停背景色设置为 transparent );
3、Table 表格使用 slot-scope=“scope“ 插入序号的修改:
其一、代码:
<style lang="scss" scoped>
// 设置整个表格的内边距问题:
.container-table {
  padding: 0 30px 0 30px;
}
//设置表头的背景色(可以设置和页面背景色一致):
/deep/.el-table th {
  background-color: #00083e;
}
//设置表每一行的背景色,字体颜色及字体粗细;
/deep/.el-table tr {
  background-color: rgba(150, 157, 128, 0.9);
  color: #fff;
  font-weight: 500;
}
//去除表格每一行的下标线;
/deep/.el-table td {
  border-bottom: none;
}
//去除表头的下标线;
/deep/.el-table th.is-leaf {
  border-bottom: none;
}
//去除表格的最下边框线;
.el-table::before {
  height: 0;
}
//设置表格的背景色问题(否则一般默认的背景色是白色);
.el-table,
.el-table__expanded-cell {
  background-color: #00083e;
}
//设置表格的行间距;
::v-deep .el-table__body {
  -webkit-border-vertical-spacing: 13px;
}
//设置标题行(th)的字体属性;
::v-deep .el-table th > .cell {
  line-height: 11px;
  font-size: 5px;
  padding-left: 20px;
}
//设置 table 中的每个 cell 的属性值;
::v-deep .el-table .cell {
  padding-left: 20px;
  line-height: 58px;
}
//设置 table 中的 th td 的 padding 值;
::v-deep .el-table td,
::v-deep .el-table th {
  padding: 0;
}
//将表格的每一行悬停的背景色都设置为:transparent;
/deep/.el-table--enable-row-hover .el-table__body tr:hover > td {
  background-color: transparent;
}
//设置插入 scope 的用于标记序号的圆;
.table-circle {
  width: 30px;
  height: 30px;
  border-radius: 50%;
  background-color: rgb(106, 248, 18);
  margin: 6px 5px 0 0;
  display: inline-block;
  text-align: center;
  line-height: 29px;
}
//设置插入 scope 的值考左对齐;
.table_right{
  float: left;
}
//将插入 sope 的最后一个 icon 值设置为:不显示;
.table_right:last-of-type {
  /deep/.el-icon-right {
    display: none;
  }
}
// 设置 Element-ui 小图标的属性;
.el-icon-right{
  width: 20px;
  height: 20px;
  padding: 0 5px 0 5px;
  color: red;
}
</style>
其二、效果展示:
// 此时是将数据中的序号和 element-ui 的 icon 加上了;
Ⅲ、修改 Table 表格达到目标效果的展示:
1、整体的代码(即:总的代码):
<template>
  <div class="container">
    <el-table
      :data="tableData"
      :height="tabHeight"
      :width="tabWidth"
      class="container-table"
      style="width: 100%"
      >
      <el-table-column prop="date" label="日期" width="180"> </el-table-column>
      <el-table-column prop="name" label="姓名" width="180"> </el-table-column>
      <el-table-column prop="address" label="地址"> </el-table-column>
      <el-table-column prop="process" label="">
        <!-- 此时就是 slot-scope="scope" 的使用过程: -->
        <template slot-scope="scope">
          <div
           class="table_right"
           v-for="(iterm, indx) in scope.row.process"
           :key="indx"
           style="float: left; color: black"
           >
            <span class="table-circle">{{ iterm.order }}</span>
            <!-- 此时引入的是:element-ui 中的 icon 值; -->
            <span class="el-icon-right"></span>
          </div>
        </template>
      </el-table-column>
    </el-table>
  </div>
</template>

<script>
export default {
  data() {
    return {
      // tabHeight 与 tabWidth 是为了设置:表格的宽度与高度(即:在页面中的展示位置);
      tabHeight: window.innerHeight - 150,
      tabWidth: window.innerWidth - 1000,
      tableData: [
        {
          date: "2016-05-02",
          name: "王小虎",
          address: "上海市普陀区金沙江路 1518 弄",
           process: [
            {
              order: "01",
            },
            {
              order: "02",
            },
            {
              order: "03",
            },
            {
              order: "04",
            },
            {
              order: "05",
            },
          ],
        },
        {
          date: "2016-05-04",
          name: "王小虎",
          address: "上海市普陀区金沙江路 1517 弄",
           process: [
            {
              order: "01",
            },
            {
              order: "02",
            },
            {
              order: "03",
            },
            {
              order: "04",
            },
            {
              order: "05",
            },
          ],
        },
        {
          date: "2016-05-01",
          name: "王小虎",
          address: "上海市普陀区金沙江路 1519 弄",
           process: [
            {
              order: "01",
            },
            {
              order: "02",
            },
            {
              order: "03",
            },
            {
              order: "04",
            },
            {
              order: "05",
            },
          ],
        },
        {
          date: "2016-05-03",
          name: "王小虎",
          address: "上海市普陀区金沙江路 1516 弄",
           process: [
            {
              order: "01",
            },
            {
              order: "02",
            },
            {
              order: "03",
            },
            {
              order: "04",
            },
            {
              order: "05",
            },
          ],
        },
      ],
    };
  },
};
</script>

<style lang="scss" scoped>
// 设置整个表格的内边距问题:
.container-table {
  padding: 0 30px 0 30px;
}
//设置表头的背景色(可以设置和页面背景色一致):
/deep/.el-table th {
  background-color: #00083e;
}
//设置表每一行的背景色,字体颜色及字体粗细;
/deep/.el-table tr {
  background-color: rgba(150, 157, 128, 0.9);
  color: #fff;
  font-weight: 500;
}
//去除表格每一行的下标线;
/deep/.el-table td {
  border-bottom: none;
}
//去除表头的下标线;
/deep/.el-table th.is-leaf {
  border-bottom: none;
}
//去除表格的最下边框线;
.el-table::before {
  height: 0;
}
//设置表格的背景色问题(否则一般默认的背景色是白色);
.el-table,
.el-table__expanded-cell {
  background-color: #00083e;
}
//设置表格的行间距;
::v-deep .el-table__body {
  -webkit-border-vertical-spacing: 13px;
}
//设置标题行(th)的字体属性;
::v-deep .el-table th > .cell {
  line-height: 11px;
  font-size: 5px;
  padding-left: 20px;
}
//设置 table 中的每个 cell 的属性值;
::v-deep .el-table .cell {
  padding-left: 20px;
  line-height: 58px;
}
//设置 table 中的 th td 的 padding 值;
::v-deep .el-table td,
::v-deep .el-table th {
  padding: 0;
}
//将表格的每一行悬停的背景色都设置为:transparent;
/deep/.el-table--enable-row-hover .el-table__body tr:hover > td {
  background-color: transparent;
}
//设置插入 scope 的用于标记序号的圆;
.table-circle {
  width: 30px;
  height: 30px;
  border-radius: 50%;
  background-color: rgb(106, 248, 18);
  margin: 6px 5px 0 0;
  display: inline-block;
  text-align: center;
  line-height: 29px;
}
//设置插入 scope 的值考左对齐;
.table_right{
  float: left;
}
//将插入 sope 的最后一个 icon 值设置为:不显示;
.table_right:last-of-type {
  /deep/.el-icon-right {
    display: none;
  }
}
// 设置 Element-ui 小图标的属性;
.el-icon-right{
  width: 20px;
  height: 20px;
  padding: 0 5px 0 5px;
  color: red;
}
</style>
2、整体效果的展示:

Ⅳ、小结:
其一、哪里有不对或不合适的地方,还请大佬们多多指点和交流!
其二、有兴趣的话,可以多多关注这个专栏(Vue(Vue2+Vue3)面试必备专栏):https://blog.csdn.net/weixin_43405300/category_11525646.html?spm=1001.2014.3001.5482文章来源地址https://www.toymoban.com/news/detail-665179.html
到了这里,关于(Table)操作:Element-ui 中 Table 表格的设置表头/去除下标线/设置行间距等属性的使用及 slot-scope=“scope“ 的使用案例的文章就介绍完了。如果您还想了解更多内容,请在右上角搜索TOY模板网以前的文章或继续浏览下面的相关文章,希望大家以后多多支持TOY模板网!


