背景
GitLab 是一个强大的版本控制系统和协作平台,记录一下在实际工作中关于 GitLab 的安装使用记录。
一开始使用 GitLab 时,是在 CentOS7 上直接以 rpm 包的方式进行安装,仅作为代码托管工具来使用,版本: 14.10.4 。
后续预研 GitLab 的 CI/CD 及流水线时,采用 Docker 方式安装,版本: 16.2.3-jh ;引入了 GitLab Runner ,版本: 16.2.0 。

系统环境
[root@gitlab1 opt]# uname -a
Linux gitlab1 3.10.0-1127.el7.x86_64 #1 SMP Tue Mar 31 23:36:51 UTC 2020 x86_64 x86_64 x86_64 GNU/Linux
[root@gitlab1 opt]# cat /proc/version
Linux version 3.10.0-1127.el7.x86_64 (mockbuild@kbuilder.bsys.centos.org) (gcc version 4.8.5 20150623 (Red Hat 4.8.5-39) (GCC) ) #1 SMP Tue Mar 31 23:36:51 UTC 2020
[root@gitlab1 opt]# cat /etc/redhat-release
CentOS Linux release 7.8.2003 (Core)
[root@gitlab2 ~]# docker -v
Docker version 20.10.18, build b40c2f6
RPM方式安装GitLab
下载地址,清华镜像:https://mirrors.tuna.tsinghua.edu.cn/gitlab-ce/yum/el7/
[root@gitlab1 local]# wget https://mirrors.tuna.tsinghua.edu.cn/gitlab-ce/yum/el7/gitlab-ce-14.10.4-ce.0.el7.x86_64.rpm

错误: 无法验证 mirrors.tuna.tsinghua.edu.cn 的由 “/C=US/O=Let's Encrypt/CN=R3” 颁发的证书:
  颁发的证书已经过期。
解决:将https修改为http

[root@gitlab1 local]# rpm -ivh gitlab-ce-14.10.4-ce.0.el7.x86_64.rpm
警告:gitlab-ce-14.10.4-ce.0.el7.x86_64.rpm: 头V4 RSA/SHA1 Signature, 密钥 ID f27eab47: NOKEY
错误:依赖检测失败:
        policycoreutils-python 被 gitlab-ce-14.10.4-ce.0.el7.x86_64 需要

解决:yum install -y curl policycoreutils-python openssh-server

[root@gitlab1 local]# rpm -ivh gitlab-ce-14.10.4-ce.0.el7.x86_64.rpm
警告:gitlab-ce-14.10.4-ce.0.el7.x86_64.rpm: 头V4 RSA/SHA1 Signature, 密钥 ID f27eab47: NOKEY
准备中...                          ################################# [100%]
正在升级/安装...
   1:gitlab-ce-14.10.4-ce.0.el7       ################################# [100%]
It looks like GitLab has not been configured yet; skipping the upgrade script.

       *.                  *.
      ***                 ***
     *****               *****
    .******             *******
    ********            ********
   ,,,,,,,,,***********,,,,,,,,,
  ,,,,,,,,,,,*********,,,,,,,,,,,
  .,,,,,,,,,,,*******,,,,,,,,,,,,
      ,,,,,,,,,*****,,,,,,,,,.
         ,,,,,,,****,,,,,,
            .,,,***,,,,
                ,*,.


     _______ __  __          __
    / ____(_) /_/ /   ____ _/ /_
   / / __/ / __/ /   / __ `/ __ \
  / /_/ / / /_/ /___/ /_/ / /_/ /
  \____/_/\__/_____/\__,_/_.___/


Thank you for installing GitLab!
GitLab was unable to detect a valid hostname for your instance.
Please configure a URL for your GitLab instance by setting `external_url`
configuration in /etc/gitlab/gitlab.rb file.
Then, you can start your GitLab instance by running the following command:
  sudo gitlab-ctl reconfigure

For a comprehensive list of configuration options please see the Omnibus GitLab readme
https://gitlab.com/gitlab-org/omnibus-gitlab/blob/master/README.md

Help us improve the installation experience, let us know how we did with a 1 minute survey:
https://gitlab.fra1.qualtrics.com/jfe/form/SV_6kVqZANThUQ1bZb?installation=omnibus&release=14-10

# 编辑配置,设置访问地址
[root@gitlab1 local]# vi /etc/gitlab/gitlab.rb
external_url 'http://gitlab1'

# 重新配置生效
[root@gitlab1 local]# gitlab-ctl reconfigure

Running handlers:
Running handlers complete
Chef Infra Client finished, 606/1618 resources updated in 05 minutes 34 seconds

Warnings:
Rehashing of trusted certificates present in `/etc/gitlab/trusted-certs` failed. If on a FIPS-enabled machine, ensure `c_rehash` binary is available in $PATH.

Notes:
Default admin account has been configured with following details:
Username: root
Password: You didn't opt-in to print initial root password to STDOUT.
Password stored to /etc/gitlab/initial_root_password. This file will be cleaned up in first reconfigure run after 24 hours.

NOTE: Because these credentials might be present in your log files in plain text, it is highly recommended to reset the password following https://docs.gitlab.com/ee/security/reset_user_password.html#reset-your-root-password.

gitlab Reconfigured!
Note:
- 如何查看版本信息?在GitLab后台中查看版本:在部署域名/IP后加上help。
- 如果修改了ip或者端口等配置信息,每次更改完之后,务必记得重新加载配置:gitlab-ctl reconfigure。
[root@gitlab1 local]# cat /etc/gitlab/initial_root_password | grep Password
使用浏览器访问配置的地址,输入用户名与密码。
GitLab 常用命令
- gitlab-ctl start:启动gitlab,
- gitlab-ctl stop:停止gitlab。
- gitlab-ctl status:查看gitlab状态
- gitlab-ctl restart:重启服务
作为代码仓库, GitLab 使用包括了以下几方面:
- 创建组
- 创建项目
- 添加SSHkey
- 克隆
- 用户注册
- 用户审核
- 加入组
这种方式下,如果想使用 CI/CD 功能,则需要接着安装 GitLab Runner (不过不建议用这种直接安装的方式来用,实际生产更多的是使用 Docker 以及 Kubernetes ),分两步:安装和注册,下载地址:https://mirrors.tuna.tsinghua.edu.cn/gitlab-runner/yum/el7/
Note:
- GitLab Runner注册分两步:获取runner token,注册
- GitLab Runner分为共享型、分组型、项目型,分别在不同的位置
- 注册分为交互式和非交互式两种方式。
Docker方式安装使用GitLab
新开一台虚拟机,使用 Docker 的方式来安装和运行 GitLab 和 GitLab Runner 。
[root@gitlab2 ~]# cd /opt/
[root@gitlab2 opt]# mkdir gitlab
[root@gitlab2 opt]# export GITLAB_HOME=/opt/gitlab
根据官方文档,安装运行 GitLab Runner 的命令如下:
sudo docker run --detach \
  --hostname gitlab.example.com \
  --publish 443:443 --publish 80:80 --publish 22:22 \
  --name gitlab \
  --restart always \
  --volume $GITLAB_HOME/config:/etc/gitlab \
  --volume $GITLAB_HOME/logs:/var/log/gitlab \
  --volume $GITLAB_HOME/data:/var/opt/gitlab \
  --shm-size 256m \
  registry.gitlab.cn/omnibus/gitlab-jh:latest
实际执行时,简化了参数,设置了主机名,修改了映射端口号。
docker run -d \
  -h gitlab2 \
  -p 80:80 -p 222:22 \
  --name gitlab \
  --restart always \
  -v $GITLAB_HOME/config:/etc/gitlab \
  -v $GITLAB_HOME/logs:/var/log/gitlab \
  -v $GITLAB_HOME/data:/var/opt/gitlab \
  --shm-size 256m \
  registry.gitlab.cn/omnibus/gitlab-jh:latest
Note: 宿主机的端口22修改为222,否则报错: Error starting userland proxy: listen tcp4 0.0.0.0:22: bind: address already in use.
访问极狐 GitLab URL ,并使用用户名 root 和来自以下命令的密码登录:
[root@gitlab2 ~]# docker exec -it gitlab grep 'Password:' /etc/gitlab/initial_root_password
Password: zIrC8HPFfuxVmGSyx27nRbgTRwLaoiIhu+a2edEySMw=


通过 Docker 来对 GitLab 的服务管理。
docker start gitlab
docker stop gitlab
docker restart gitlab
docker rm gitlab
Docker方式安装注册gitlab-runner
安装GitLab Runner
根据 GitLab 的版本,指定了 GitLab Runner 的版本。
docker run -d --name gitlab-runner --restart always \
  -v /opt/gitlab-runner/config:/etc/gitlab-runner \
  -v /var/run/docker.sock:/var/run/docker.sock \
  gitlab/gitlab-runner:v16.2.0

# 查看安装的GitLab Runner的版本信息
[root@gitlab2 ~]# docker exec -it gitlab-runner gitlab-runner --version
Version:      16.2.0
Git revision: 782e15da
Git branch:   16-2-stable
GO version:   go1.20.5
Built:        2023-07-21T22:52:42+0000
OS/Arch:      linux/amd64
注册GitLab Runner
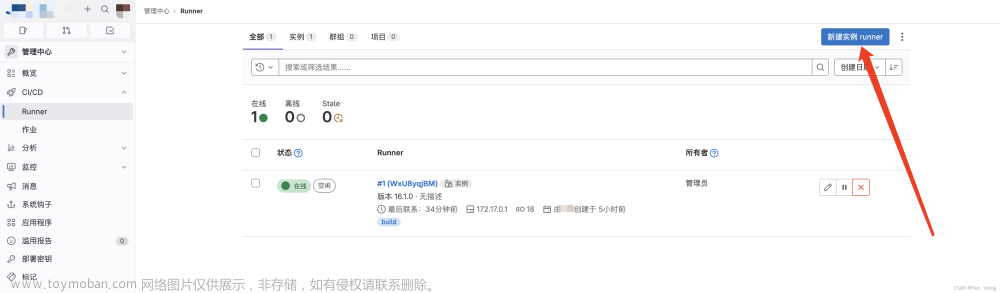
接下来,创建组,创建项目,克隆,为项目注册一个 Runner 。
Create new group ——> Create new project ——> git clone http://gitlab2/iot/test.git
# 注册为`Shell`类型的执行器。
docker run --rm -v /opt/gitlab-runner/config:/etc/gitlab-runner gitlab/gitlab-runner:v16.2.0 \
 register \
  --non-interactive \
  --executor "shell" \
  --url "http://192.168.44.149" \
  --registration-token "GR1348941NNVnhpcsLqgBbL-1JxPT" \
  --description "shell-runner" \
  --tag-list "shell,test" \
  --run-untagged="true" \
  --locked="false" \
  --access-level="not_protected"
注册过程中遇到的问题:
- ERROR: Registering runner… error runner=GR1348941NNVnhpcs status=only http or https scheme supported
原因是我将 --url 的值写成了主机名,得写成 HTTP 地址链接的形式。
- ERROR: Registering runner… failed runner=GR1348941NNVnhpcs status=couldn’t execute POST against http://gitlab2/api/v4/runners: Post “http://gitlab2/api/v4/runners”: dial tcp: lookup gitlab2 on 192.168.44.2:53: no such host
原因是我将 --url 的值写成了主机名,在容器中无法通过主机名注册成功,然后改成了 IP 地址,注册成功,以下是注册成功的效果。
[root@gitlab2 ~]# docker run --rm -v /opt/gitlab-runner/config:/etc/gitlab-runner gitlab/gitlab-runner:v16.2.0 \
>  register \
>   --non-interactive \
>   --executor "shell" \
>   --url "http://192.168.44.149" \
>   --registration-token "GR1348941NNVnhpcsLqgBbL-1JxPT" \
>   --description "shell-runner" \
>   --tag-list "shell,test" \
>   --run-untagged="true" \
>   --locked="false" \
>   --access-level="not_protected"
Runtime platform                                    arch=amd64 os=linux pid=7 revision=782e15da version=16.2.0
Running in system-mode.

WARNING: Support for registration tokens and runner parameters in the 'register' command has been deprecated in GitLab Runner 15.6 and will be replaced with support for authentication tokens. For more information, see https://gitlab.com/gitlab-org/gitlab/-/issues/380872
Registering runner... succeeded                     runner=GR1348941NNVnhpcs
Runner registered successfully. Feel free to start it, but if it's running already the config should be automatically reloaded!

Configuration (with the authentication token) was saved in "/etc/gitlab-runner/config.toml"

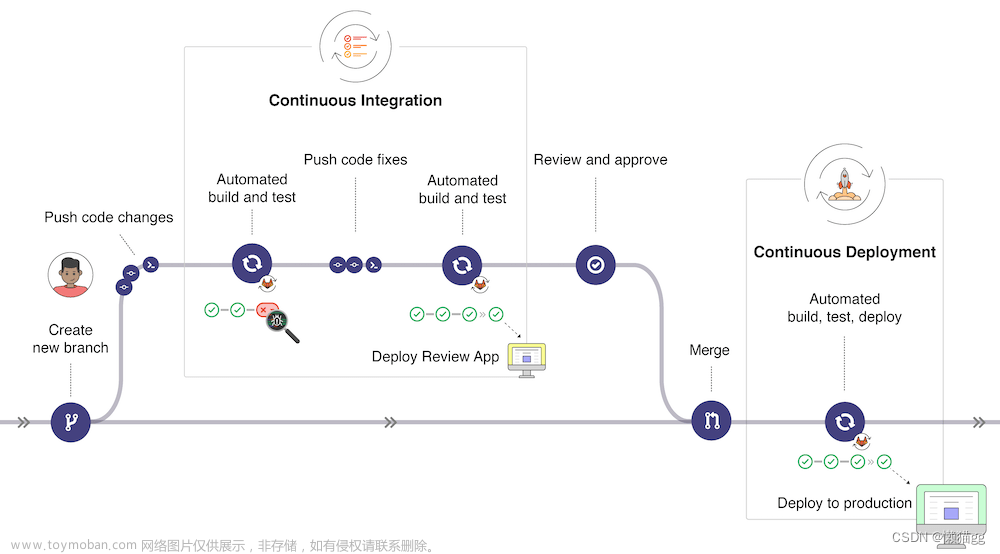
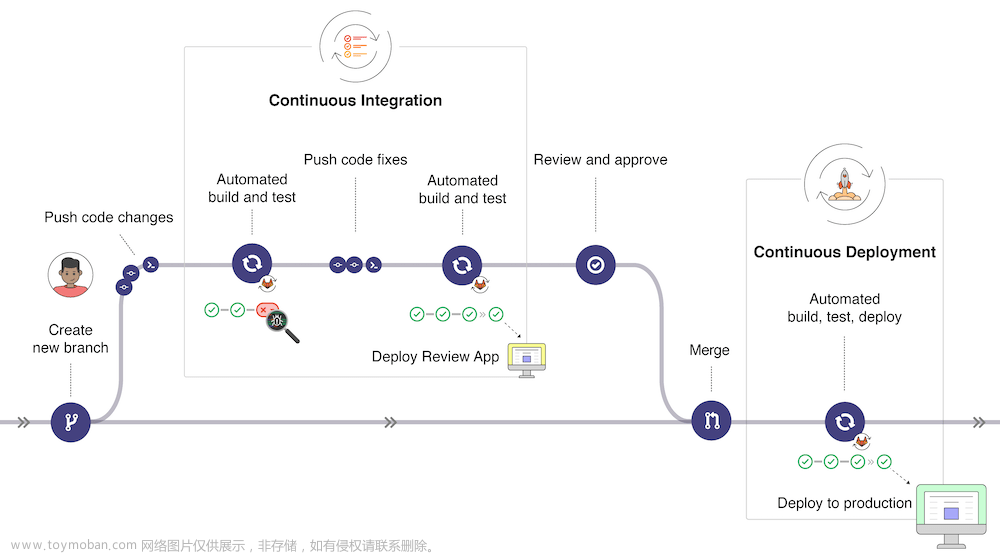
CI/CD
为了体验下 GitLab Runner 的 CI/CD 功能,接下来以一段后端服务构建与部署的配置来模拟实际的流水线过程,在创建的项目根目录下新建文件: .gitlab-ci.yml (提交后项目会自动启动流水线的执行)。
stages:
  - build
  - deploy

build:
  stage: build
  tags:
    - shell
  only:
    - master
  script:
    - echo "mvn clean"
    - echo "mvn package"

deploy:
  stage: deploy
  tags:
    - test
  only:
    - master
  script:
    - echo "java -jar x.jar"
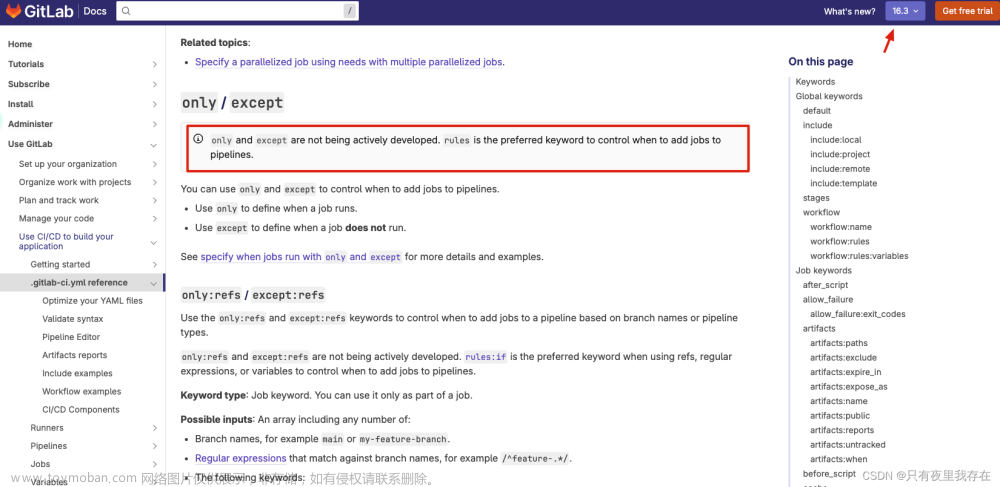
CI/CD 过程中遇到的问题:
- 第一次添加上述配置文件并提交后,并没有触发流水线。。
原来在我用的新版 GitLab 中的主分支从 master 改为了 main ,修改 .gitlab-ci.yml 中的分支名称即可。
- 流水线失败,Job日志:fatal: unable to access ‘http://gitlab2/iot/test.git/’: Could not resolve host: gitlab2

感觉还是因为 Docker 容器无法获取宿主机的主机名,进入 gitlab-runner 所在的容器, ping 宿主机 ip 是通的,但是主机名不通,简单的办法是在 config.toml 文件中添加 clone_url = "http://192.168.44.149" ,以 IP 的方式来拉取代码。
# 没有自带ping命令,自行安装
root@249b6b18ffa8:/# apt update
root@249b6b18ffa8:/# apt install -y iputils-ping

# 修改配置,增加clone_url配置,跟url并列
[root@gitlab2 ~]# vi /opt/gitlab-runner/config/config.toml
clone_url = "http://192.168.44.149"

# 重启gitlab-runner所在容器
[root@gitlab2 ~]# docker restart gitlab-runner
gitlab-runner
改成以上配置后,手动启动一个 Pipeline ,执行成功。


# 进入容器
[root@gitlab2 ~]# docker exec -it gitlab-runner /bin/bash

# 列出所有的runner
root@249b6b18ffa8:/# gitlab-runner list
Runtime platform                                    arch=amd64 os=linux pid=27 revision=782e15da version=16.2.0
Listing configured runners                          ConfigFile=/etc/gitlab-runner/config.toml
shell-runner                                        Executor=shell Token=XQEENnyfzyEVs8-2iDB9 URL=http://192.168.44.149

# 查看runner的状态
root@249b6b18ffa8:/# gitlab-runner verify
Runtime platform                                    arch=amd64 os=linux pid=37 revision=782e15da version=16.2.0
Running in system-mode.

Verifying runner... is alive                        runner=XQEENnyf
Note:
- CI Lint可以用来校验.gitlab-ci.yml的语法;
- 一个流水线包含多个作业,每个作业下至少包含一个script。
- 修改服务器的IP之后,Docker容器无法从服务器外部访问
# 服务器IP更改之后,linux数据包转发配置net.ipv4.ip_forward会变为0,即关闭状态。
[root@gitlab2 ~]# sysctl net.ipv4.ip_forward
net.ipv4.ip_forward = 0

# 重启docker,docker会默认将net.ipv4.ip_forward值临时改为1(再次新增或更改IP之后会失效)
[root@gitlab2 ~]# systemctl restart docker
小总结
以上是安装和使用 GitLab 的过程,以及CI/CD初体验, GitLab 是一个功能丰富、易于使用和安全可靠的协作平台,可以帮助团队更好地管理和开发项目。
- 集成的工作流程:
GitLab提供了一个集成的工作流程,包括代码托管、问题跟踪、持续集成和部署等功能。这使得团队成员可以在同一个平台上协作开发和管理项目。 - 代码托管:
GitLab提供了强大的代码托管功能,支持 Git 分布式版本控制系统。团队成员可以轻松地共享和管理代码,进行版本控制和协作开发。 - 问题跟踪:
GitLab提供了问题跟踪功能,可以帮助团队成员记录和解决项目中的问题。通过问题跟踪,团队成员可以更好地协作和追踪项目进展。 - 持续集成和部署:
GitLab提供了强大的持续集成和部署功能,可以自动化构建、测试和部署代码。这可以大大提高开发效率和代码质量。 - 安全性:
GitLab提供了强大的安全性功能,包括访问控制、权限管理和代码审查等。这可以帮助团队保护代码和敏感信息的安全。
Reference
- https://docs.gitlab.cn/runner/register/
If you have any questions or any bugs are found, please feel free to contact me.文章来源:https://www.toymoban.com/news/detail-667319.html
Your comments and suggestions are welcome!文章来源地址https://www.toymoban.com/news/detail-667319.html
到了这里,关于GitLab与GitLab Runner安装(RPM与Docker方式),CI/CD初体验的文章就介绍完了。如果您还想了解更多内容,请在右上角搜索TOY模板网以前的文章或继续浏览下面的相关文章,希望大家以后多多支持TOY模板网!