Unity打包WebGL: 导入Vue
1. 介绍
1.1 任务
记录将Unity项目打包成WebGL,并集成到Vue项目中的过程。
1.2 环境
-
Unity:2021.3 -
Vue:2
2. Unity项目
2.1 UI界面

2.2 添加插件
构建
WebGL项目需要添加一个.jslib文件,用于Unity脚本函数与JavaScript函数交互
详细内容参考:Unity(WebGL)与JS通讯2022最新姿势


web.jslib文件内容
mergeInto(LibraryManager.library, {

    SayHello: function () {
        window.alert("hello vue");
    },

    ReportReady: function() {
        window.ReportReady();
    }
})
2.3 添加脚本CBtn.cs
为按钮添加脚本
using System.Collections;
using System.Collections.Generic;
using UnityEngine;
using UnityEngine.UI;
using System.Runtime.InteropServices;

public class CBtn : MonoBehaviour
{
    [DllImport("__Internal")]
    private static extern void SayHello();
    [DllImport("__Internal")]
    private static extern string ReportReady();

    public Text text;

    // Start is called before the first frame update
    void Start()
    {
        ReportReady();
    }

    // Update is called once per frame
    void Update()
    {
        if (Input.GetKeyUp(KeyCode.H)) {
            SayHello();
        }
    }

    public void SetToken(string token) {
        this.text.text = token;
    }
}
绑定脚本

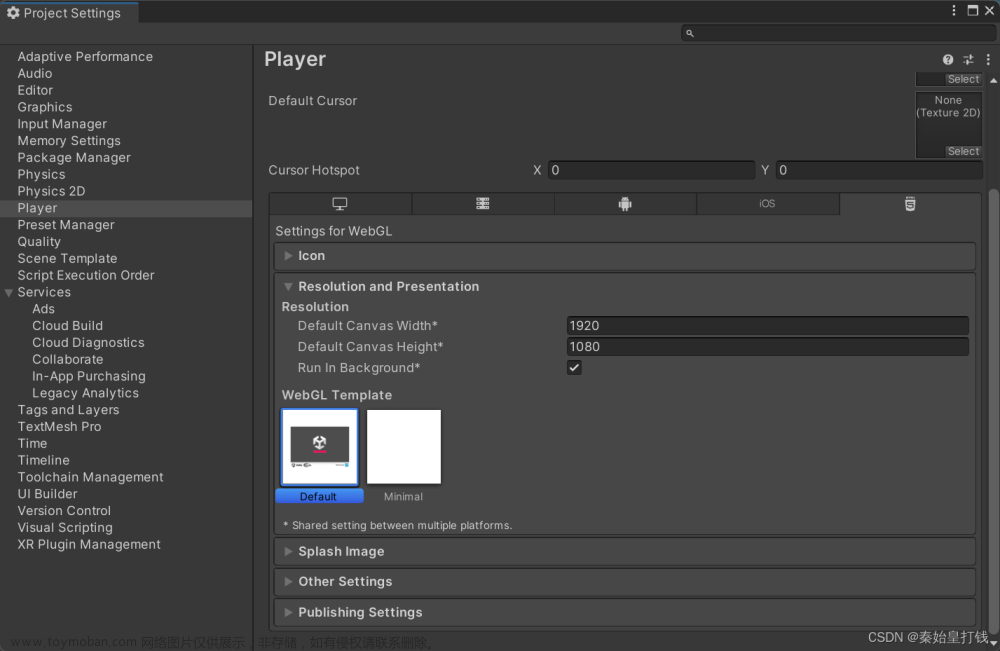
2.4 打包WebGL


一些设置参考:


构建:


2.5 修改index.html
在
html文件引入其他js文件的格式,
具体参考: webGl使用jsLib与Js交互

<!DOCTYPE html>
<html lang="en-us">
  <head>
    <meta charset="utf-8">
    <meta http-equiv="Content-Type" content="text/html; charset=utf-8">
    <title>Unity WebGL Player | Web with Vue</title>
    <link rel="shortcut icon" href="TemplateData/favicon.ico">
    <link rel="stylesheet" href="TemplateData/style.css">
  </head>
  <body>
    <div id="unity-container" class="unity-desktop">
      <canvas id="unity-canvas" width=960 height=600></canvas>
      <div id="unity-loading-bar">
        <div id="unity-logo"></div>
        <div id="unity-progress-bar-empty">
          <div id="unity-progress-bar-full"></div>
        </div>
      </div>
      <div id="unity-warning"> </div>
      <div id="unity-footer">
        <div id="unity-webgl-logo"></div>
        <div id="unity-fullscreen-button"></div>
        <div id="unity-build-title">Web with Vue</div>
      </div>
    </div>
    <script>
      var container = document.querySelector("#unity-container");
      var canvas = document.querySelector("#unity-canvas");
      var loadingBar = document.querySelector("#unity-loading-bar");
      var progressBarFull = document.querySelector("#unity-progress-bar-full");
      var fullscreenButton = document.querySelector("#unity-fullscreen-button");
      var warningBanner = document.querySelector("#unity-warning");

      // Shows a temporary message banner/ribbon for a few seconds, or
      // a permanent error message on top of the canvas if type=='error'.
      // If type=='warning', a yellow highlight color is used.
      // Modify or remove this function to customize the visually presented
      // way that non-critical warnings and error messages are presented to the
      // user.
      function unityShowBanner(msg, type) {
        function updateBannerVisibility() {
          warningBanner.style.display = warningBanner.children.length ? 'block' : 'none';
        }
        var div = document.createElement('div');
        div.innerHTML = msg;
        warningBanner.appendChild(div);
        if (type == 'error') div.style = 'background: red; padding: 10px;';
        else {
          if (type == 'warning') div.style = 'background: yellow; padding: 10px;';
          setTimeout(function() {
            warningBanner.removeChild(div);
            updateBannerVisibility();
          }, 5000);
        }
        updateBannerVisibility();
      }

      var buildUrl = "Build";
      var loaderUrl = buildUrl + "/Web.loader.js";
      var config = {
        dataUrl: buildUrl + "/Web.data",
        frameworkUrl: buildUrl + "/Web.framework.js",
        codeUrl: buildUrl + "/Web.wasm",
        streamingAssetsUrl: "StreamingAssets",
        companyName: "DefaultCompany",
        productName: "Web with Vue",
        productVersion: "0.1",
        showBanner: unityShowBanner,
      };

      // By default Unity keeps WebGL canvas render target size matched with
      // the DOM size of the canvas element (scaled by window.devicePixelRatio)
      // Set this to false if you want to decouple this synchronization from
      // happening inside the engine, and you would instead like to size up
      // the canvas DOM size and WebGL render target sizes yourself.
      // config.matchWebGLToCanvasSize = false;

      if (/iPhone|iPad|iPod|Android/i.test(navigator.userAgent)) {
        // Mobile device style: fill the whole browser client area with the game canvas:

        var meta = document.createElement('meta');
        meta.name = 'viewport';
        meta.content = 'width=device-width, height=device-height, initial-scale=1.0, user-scalable=no, shrink-to-fit=yes';
        document.getElementsByTagName('head')[0].appendChild(meta);
        container.className = "unity-mobile";
        canvas.className = "unity-mobile";

        // To lower canvas resolution on mobile devices to gain some
        // performance, uncomment the following line:
        // config.devicePixelRatio = 1;

        unityShowBanner('WebGL builds are not supported on mobile devices.');
      } else {
        // Desktop style: Render the game canvas in a window that can be maximized to fullscreen:

        canvas.style.width = "960px";
        canvas.style.height = "600px";
      }

      loadingBar.style.display = "block";

      var script = document.createElement("script");
      script.src = loaderUrl;
      script.onload = () => {
        createUnityInstance(canvas, config, (progress) => {
          progressBarFull.style.width = 100 * progress + "%";
        }).then((unityInstance) => {
          loadingBar.style.display = "none";

          // 绑定unityInstance
          window.unityInstance = unityInstance

          fullscreenButton.onclick = () => {
            unityInstance.SetFullscreen(1);
          };
        }).catch((message) => {
          alert(message);
        });
      };
      document.body.appendChild(script);

      // unity调用函数
      window.ReportReady = () => {
        // window.top.dispatchEvent(new CustomEvent())
        send({
          id: 1,
          value: 2
        })
      }

      function send(obj) {
        unityInstance.SendMessage('button', 'SetToken', JSON.stringify(obj))
      }
    </script>
  </body>
</html>
3. Vue项目
3.1 项目初始化

3.2 引入WebGL项目

3.3 监听WebGL事件
- 修改
App.vue
<template>
  <div id="app">
    <HelloWorld msg="Welcome to Your Vue.js App"/>
  </div>
</template>

<script>
import HelloWorld from './components/HelloWorld.vue'

export default {
  name: 'App',
  components: {
    HelloWorld
  }
}
</script>

<style>
#app {
  font-family: Avenir, Helvetica, Arial, sans-serif;
  -webkit-font-smoothing: antialiased;
  -moz-osx-font-smoothing: grayscale;
  text-align: center;
  color: #2c3e50;
  margin-top: 60px;
}
</style>
- 修改
HelloWorld.vue
<template>
  <div>
    <div @click="send">尝试发送数据</div>
    <iframe
      ref="iframe"
      width="1200"
      height="800"
      scrolling="no"
      src="/Unity/index.html"
      frameborder="0"></iframe>
  </div>
</template>

<script>
export default {
  name: 'HelloWorld',
  props: {
    msg: String
  },
  data () {
    return {}
  },
  mounted () {
    window.addEventListener('fn', this.unityWatch)
    this.$once('hook:beforeDestroy', () => {
      window.removeEventListener('fn', this.unityWatch)
    })
  },
  methods: {
    send () {
      // 发送数据
      this.$refs.iframe.contentWindow.send({
        id: 12,
        value: 34
      })
    },
    unityWatch (e) {
      alert(e.detail)
    }
  }
}
</script>

<!-- Add "scoped" attribute to limit CSS to this component only -->
<style scoped>

</style>
4. 测试


X. 参考
-
与Vue结合
【vue】vue与unity交互(不需要任何第三方插件)
unity发布webgl平台结合vue,并实现事件交互
vue项目接入unity3D模块并进行数据通信
vue与unity进行交互,包括unity发收,unity自动获取数据等
Unity3D(2021版)打包成webgl和前端vue交互 -
JS创建和触发 events, window.top.dispatchEvent
创建和触发 events文章来源:https://www.toymoban.com/news/detail-670353.html
下载
Unity WebGL 结合 Vue的例子文章来源地址https://www.toymoban.com/news/detail-670353.html
到了这里,关于Unity打包WebGL: 导入Vue的文章就介绍完了。如果您还想了解更多内容,请在右上角搜索TOY模板网以前的文章或继续浏览下面的相关文章,希望大家以后多多支持TOY模板网!