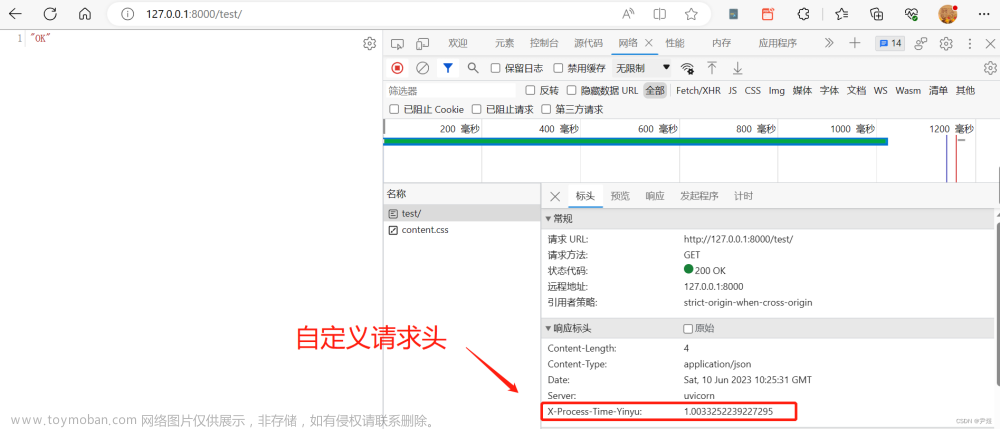
Actix-web定义中间件(middleware)记录接口耗时
actix-web的官网关于中间件的介绍如下
- https://actix.rs/docs/middleware/
这里使用的是最新版的actix-web,旧版本的可能接口不太一样
# actix-web
actix-rt = "2.6.0"
actix-web = "4.0.0"
中间件简介
我们添加的中间件能干什么?我们用一段代码来观察一下
下面是官方提供的中间件的定义方式之一,我们可以看到闭包里面有两个参数req和srv
- 其中
req(actix_web::dev::ServiceRequest)就是请求了,你可以通过它来获取请求的各种属性,比如请求的路径req.path() -
srv是一个&mut dyn actix_web::dev::Service类型的参数,代表服务处理程序。通过调用srv.call(req),我们将请求传递给实际的服务处理程序进行处理。这里其实使用的是装饰器模式,这使得我们能在具体service方法调用前后做一些操作。官网上写到可以添加这些操作- Pre-process the Request:在请求时做前置处理
- Post-process a Response:在响应时进行后置处理
- Modify application state:修改state。state是我
actix-web在整个调用链路中的上下文,可以用来存储我们自己想要保存的数据 - Access external services (redis, logging, sessions):可以访问外部的服务,例如redis等等
use actix_web::{dev::Service as _, web, App};
use futures_util::future::FutureExt;

#[actix_web::main]
async fn main() {
    let app = App::new()
        .wrap_fn(|req, srv| {
            // Pre-process the Request
            println!("Hi from start. You requested: {}", req.path());
            srv.call(req).map(|res| {
                // Post-process a Response
                println!("Hi from response");
                res
            })
        })
        .route(
            "/index.html",
            web::get().to(|| async { "Hello, middleware!" }),
        );
}
中间件添加的两种方式(接口耗时中间件)
上述添加中间件的方式其实是通过wrap_fn来实现的,我们可以通过传入闭包的方式完成我们中间件的逻辑
但是一般我们中间件处理的逻辑可能很多,在闭包中修改会显得很冗余,我们还可以通过方法warp传入一个实现了 Service trait and Transform trait 的struct,这样就会调用我们实现好的方法
在实现前我们需要先添加一些依赖
# actix-web
actix-rt = "2.6.0"
actix-web = "4.0.0"
# 提供对异步编程的支持和工具
futures-util = "0.3"
使用wrap_fn + 闭包实现
use actix_web::{dev::Service as _, web, App};
use futures_util::future::FutureExt;
use std::time::{Duration, Instant};

#[actix_web::main]
async fn main() {
    let app = App::new()
        .wrap_fn(|req, srv| {
            let start_time = Instant::now();
            let path = req.path().to_owned();
            let fut = srv.call(req);
            async move {
                let res = fut.await;
                let elapsed_time = start_time.elapsed();
                println!(
                    "Request to {} took {:?}",
                    path,
                    elapsed_time
                );
                res
            }
        })
        .route(
            "/index.html",
            web::get().to(|| async { "Hello, middleware!" }),
        );
}
这样就能打印接口耗时的日志了
Request to /index.html took 381.325909ms
使用warp + struct实现
使用struct需要实现两个trait:Transform和Service
// 中间件 => 打印接口耗时

use std::{future::{ready, Ready}, time::Instant};

use actix_web::{
    dev::{forward_ready, Service, ServiceRequest, ServiceResponse, Transform},
    Error,
};
use futures_util::future::LocalBoxFuture;

// There are two steps in middleware processing.
// 1. Middleware initialization, middleware factory gets called with
//    next service in chain as parameter.
// 2. Middleware's call method gets called with normal request.
pub struct Timed;

// Middleware factory is `Transform` trait
// `S` - type of the next service
// `B` - type of response's body
impl<S, B> Transform<S, ServiceRequest> for Timed
where
    S: Service<ServiceRequest, Response = ServiceResponse<B>, Error = Error>,
    S::Future: 'static,
    B: 'static,
{
    type Response = ServiceResponse<B>;
    type Error = Error;
    type InitError = ();
    type Transform = TimedMiddleware<S>;
    type Future = Ready<Result<Self::Transform, Self::InitError>>;

    fn new_transform(&self, service: S) -> Self::Future {
        ready(Ok(TimedMiddleware { service }))
    }
}

pub struct TimedMiddleware<S> {
    service: S,
}

impl<S, B> Service<ServiceRequest> for TimedMiddleware<S>
where
    S: Service<ServiceRequest, Response = ServiceResponse<B>, Error = Error>,
    S::Future: 'static,
    B: 'static,
{
    type Response = ServiceResponse<B>;
    type Error = Error;
    type Future = LocalBoxFuture<'static, Result<Self::Response, Self::Error>>;

    forward_ready!(service);

    fn call(&self, req: ServiceRequest) -> Self::Future {
        let start_time = Instant::now();
        let path = req.path().to_owned();
        let method = req.method().to_string();
        let remote_addr = req.connection_info().peer_addr().unwrap_or("unknown").to_string();
        let version = format!("{:?}", req.version()); // 使用 format! 宏转换版本号为字符串
        let headers = req.headers().clone();
        println!("{}", "1. Pre-process the Request");
        let fut = self.service.call(req);

        Box::pin(async move {
            let res = fut.await?;
            let elapsed = start_time.elapsed();
            let status = res.status();
            let content_length = res
                .headers()
                .get(actix_web::http::header::CONTENT_LENGTH)
                .and_then(|v| v.to_str().ok())
                .unwrap_or("-");

            let user_agent = headers
                .get(actix_web::http::header::USER_AGENT)
                .and_then(|v| v.to_str().ok())
                .unwrap_or("-");
            println!("{}", "2. Post-process a Response")
            println!("{} {} {} {} {} {} {}  time took [{:.6}] ms",
                remote_addr,
                method,
                path,
                version,
                status.as_u16(),
                content_length,
                user_agent,
                elapsed.as_millis());

            Ok(res)
        })
    }
}
在主程序中添加
use actix_web::{dev::Service as _, web, App};
use futures_util::future::FutureExt;
use std::time::{Duration, Instant};

#[actix_web::main]
async fn main() {
    let app = App::new()
        .wrap_fn(|req, srv| {
          	println!("{}", "2. Pre-process the Request")
            let start_time = Instant::now();
            let path = req.path().to_owned();
            let fut = srv.call(req);
            async move {
                let res = fut.await;
                let elapsed_time = start_time.elapsed();
                println!("{}", "3. Post-process a Response")
                println!(
                    "Request to {} took {:?}",
                    path,
                    elapsed_time
                );
                res
            }
        })
  			.wrap(Timed)
        .route(
            "/index.html",
            web::get().to(|| async { "Hello, middleware!" }),
        );
}
打印情况
1. Pre-process the Request
2. Pre-process the Request
3. Post-process a Response
Request to /index.html took 70.694224ms
4. Post-process a Response
127.0.0.1 GET /index.html HTTP/1.1 200 - Apifox/1.0.0 (https://www.apifox.cn)  time took [70] ms
中间件调用顺序
如果我们有多个中间件,调用顺序可以从官方上看到这样一句话
Warning: if you use
wrap()orwrap_fn()multiple times, the last occurrence will be executed first.也就是后面添加的中间件会先执行
笔者根据上面添加的中间件,对于前置和后置处理我们可以总结出调用顺序
- 前置比后置处理先调用
- 前置处理是后添加的先执行
- 后置处理按照中间件添加的属性进行执行
actix自带的接口耗时中间件
其实在actix中自带了接口耗时的记录,我们只需要指定日志,并启用就可以看到了
# 日志相关
log = "0.4.0"
env_logger = "0.10.0"
use actix_web::{dev::Service as _, web, App, middleware};
use futures_util::future::FutureExt;
use std::time::{Duration, Instant};
use log::info;

#[actix_web::main]
async fn main() {
  	// 初始化日志
    init_logger();
    let app = App::new()
  			// 日志中间件
        .wrap(middleware::Logger::default())
        .wrap_fn(|req, srv| {
          	println!("{}", "2. Pre-process the Request")
            let start_time = Instant::now();
            let path = req.path().to_owned();
            let fut = srv.call(req);
            async move {
                let res = fut.await;
                let elapsed_time = start_time.elapsed();
                println!("{}", "3. Post-process a Response")
                println!(
                    "Request to {} took {:?}",
                    path,
                    elapsed_time
                );
                res
            }
        })
  			.wrap(Timed)
        .route(
            "/index.html",
            web::get().to(|| async { "Hello, middleware!" }),
        );
}


fn init_logger() {
    use env_logger::fmt::Color;
    use env_logger::Env;
    use log::LevelFilter;

    let env = Env::default().filter_or("MY_LOG_LEVEL", "debug");
    // 设置日志打印格式
    env_logger::Builder::from_env(env)
        .format(|buf, record| {
            let level_color = match record.level() {
                log::Level::Error => Color::Red,
                log::Level::Warn => Color::Yellow,
                log::Level::Info => Color::Green,
                log::Level::Debug | log::Level::Trace => Color::Cyan,
            };

            let mut level_style = buf.style();
            level_style.set_color(level_color).set_bold(true);

            let mut style = buf.style();
            style.set_color(Color::White).set_dimmed(true);

            writeln!(
                buf,
                "{} {} [{}] {}",
                Local::now().format("%Y-%m-%d %H:%M:%S"),
                level_style.value(record.level()),
                style.value(record.module_path().unwrap_or("<unnamed>")),
                record.args()
            )
        })
        .filter(None, LevelFilter::Debug)
        .init();
    info!("env_logger initialized.");
}
日志打印
2023-08-24 16:06:14 INFO [teacher_service] env_logger initialized.
2023-08-24 16:06:14 INFO [actix_server::builder] starting 2 workers
2023-08-24 16:06:14 INFO [actix_server::server] Actix runtime found; starting in Actix runtime
1. Pre-process the Request
2. Pre-process the Request
2023-08-24 16:06:50 INFO [teacher_service::my_middleware::auth] 2. Hi from start. You requested: /teacher
2023-08-24 16:06:50 INFO [teacher_service] 1. Hi from start. You requested: /teacher
2023-08-24 16:06:50 INFO [teacher_service] 2. Hi from response
2023-08-24 16:06:50 INFO [teacher_service::my_middleware::auth] 1. Hi from response
3. Post-process a Response
Request to /teacher took 355.839222ms
4. Post-process a Response
2023-08-24 16:06:50 INFO [teacher_service::my_middleware::timedMiddleware] 127.0.0.1 GET /teacher HTTP/1.1 200 - Apifox/1.0.0 (https://www.apifox.cn)  time took [355] ms
2023-08-24 16:06:50 INFO [actix_web::middleware::logger] 127.0.0.1 "GET /teacher HTTP/1.1" 200 191 "-" "Apifox/1.0.0 (https://www.apifox.cn)" 0.355607
最后一行就是actix日志记录请求的调用情况,最后一个参数就是调用时间,单位是秒
鉴权中间件
我们用相同的思路,写一个鉴权的中间件,这里具体的校验规则读者可以实现一下
use std::future::{ready, Ready};

use actix_web::{
    dev::{forward_ready, Service, ServiceRequest, ServiceResponse, Transform},
    error,
    http::header::HeaderValue,
    middleware::ErrorHandlerResponse,
    Error, HttpResponse,
};
use futures_util::{
    future::{self, LocalBoxFuture},
    FutureExt,
};
use log::info;

// There are two steps in middleware processing.
// 1. Middleware initialization, middleware factory gets called with
//    next service in chain as parameter.
// 2. Middleware's call method gets called with normal request.
pub struct Auth;

// Middleware factory is `Transform` trait
// `S` - type of the next service
// `B` - type of response's body
impl<S, B> Transform<S, ServiceRequest> for Auth
where
    S: Service<ServiceRequest, Response = ServiceResponse<B>, Error = Error>,
    S::Future: 'static,
    B: 'static,
{
    type Response = ServiceResponse<B>;
    type Error = Error;
    type InitError = ();
    type Transform = AuthMiddleware<S>;
    type Future = Ready<Result<Self::Transform, Self::InitError>>;

    fn new_transform(&self, service: S) -> Self::Future {
        ready(Ok(AuthMiddleware { service }))
    }
}

pub struct AuthMiddleware<S> {
    service: S,
}

impl<S, B> Service<ServiceRequest> for AuthMiddleware<S>
where
    S: Service<ServiceRequest, Response = ServiceResponse<B>, Error = Error>,
    S::Future: 'static,
    B: 'static,
{
    type Response = ServiceResponse<B>;
    type Error = Error;
    type Future = LocalBoxFuture<'static, Result<Self::Response, Self::Error>>;

    forward_ready!(service);

    fn call(&self, req: ServiceRequest) -> Self::Future {
        // 进行鉴权操作,判断是否有权限
        if has_permission(&req) {
            // 有权限,继续执行后续中间件
            let fut = self.service.call(req);
            Box::pin(async move {
                let res = fut.await?;
                Ok(res)
            })
        } else {
            // 没有权限,立即返回响应
            Box::pin(async move {
                // 鉴权失败,返回未授权的响应,停止后续中间件的调用
                Err(error::ErrorUnauthorized("Unauthorized"))
            })
        }
    }
}

fn has_permission(req: &ServiceRequest) -> bool {
    // 实现你的鉴权逻辑,根据需求判断是否有权限
    // 返回 true 表示有权限,返回 false 表示没有权限
    // unimplemented!()
    let value = HeaderValue::from_str("").unwrap();
    let token = req.headers().get("token").unwrap_or(&value);
    token.len() > 0 || req.path().to_string() == "/login"
}
接下来我们在启动的App上加上中间件,这里我们要注意⚠️,如果我们有很多中间件,我们肯定是想要我们的鉴权中间件先执行的,这样如果鉴权没有过,就不执行后面中间件的逻辑
根据官方的提示:后添加的中间件会先执行。我们应该把鉴权中间件放到最后面的位置
use actix_web::{dev::Service as _, web, App, middleware};
use futures_util::future::FutureExt;
use std::time::{Duration, Instant};
use log::info;

#[actix_web::main]
async fn main() {
  	// 初始化日志
    init_logger();
    let app = App::new()
  			// 日志中间件
        .wrap(middleware::Logger::default())
        .wrap_fn(|req, srv| {
          	println!("{}", "2. Pre-process the Request")
            let start_time = Instant::now();
            let path = req.path().to_owned();
            let fut = srv.call(req);
            async move {
                let res = fut.await;
                let elapsed_time = start_time.elapsed();
                println!("{}", "3. Post-process a Response")
                println!(
                    "Request to {} took {:?}",
                    path,
                    elapsed_time
                );
                res
            }
        })
  			.wrap(Timed)
  			// 添加自己中间件的路径
        .wrap(my_middleware::auth::Auth)
        .route(
            "/index.html",
            web::get().to(|| async { "Hello, middleware!" }),
        );
}


fn init_logger() {
    use env_logger::fmt::Color;
    use env_logger::Env;
    use log::LevelFilter;

    let env = Env::default().filter_or("MY_LOG_LEVEL", "debug");
    // 设置日志打印格式
    env_logger::Builder::from_env(env)
        .format(|buf, record| {
            let level_color = match record.level() {
                log::Level::Error => Color::Red,
                log::Level::Warn => Color::Yellow,
                log::Level::Info => Color::Green,
                log::Level::Debug | log::Level::Trace => Color::Cyan,
            };

            let mut level_style = buf.style();
            level_style.set_color(level_color).set_bold(true);

            let mut style = buf.style();
            style.set_color(Color::White).set_dimmed(true);

            writeln!(
                buf,
                "{} {} [{}] {}",
                Local::now().format("%Y-%m-%d %H:%M:%S"),
                level_style.value(record.level()),
                style.value(record.module_path().unwrap_or("<unnamed>")),
                record.args()
            )
        })
        .filter(None, LevelFilter::Debug)
        .init();
    info!("env_logger initialized.");
}
这样当我们鉴权失败后,后续的中间件就不会执行了(下面笔者写了一个接口)

鉴权成功

日志也符合预期文章来源:https://www.toymoban.com/news/detail-671101.html
 文章来源地址https://www.toymoban.com/news/detail-671101.html
到了这里,关于rust actix-web定义中间件(middleware)记录接口耗时(接口耗时中间件和鉴权中间件)的文章就介绍完了。如果您还想了解更多内容,请在右上角搜索TOY模板网以前的文章或继续浏览下面的相关文章,希望大家以后多多支持TOY模板网!
![[架构之路-239]:目标系统 - 纵向分层 - 中间件middleware](https://imgs.yssmx.com/Uploads/2024/02/723045-1.png)