20230329更新
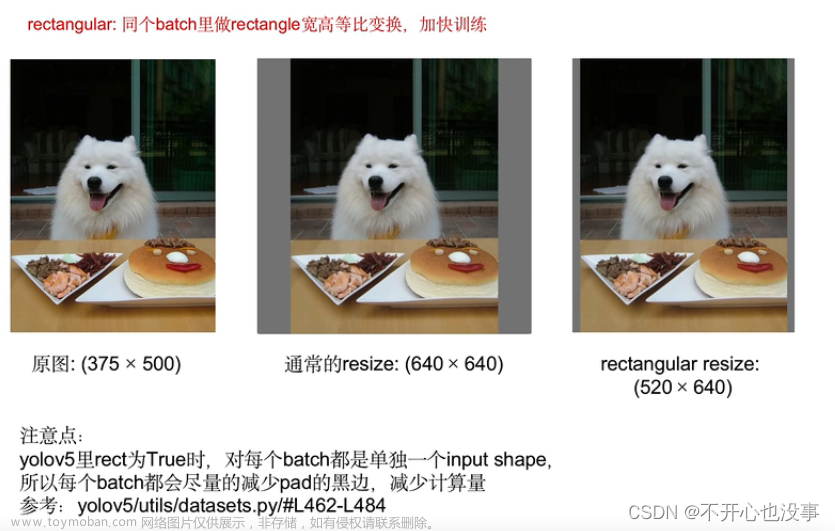
官方的源代码中,训练的时候将rect开启,即可进行长方形训练同时也会进一步降低训练时的显存。


Imagesz只需要设置图像最大尺寸即可,在dataload中,读取图像时候会进行判断处理,

在load_image过程中,会将图像等比例缩放
比如原图为1280*640。
输入的imagesize为1280的话,则读取的图像为1280*640,
输入的imagesize为640的话,则读取的图像为640*320


但是需要注意开始Rect后 不会再对图像进行mosaic的增强,如果实在需要的话可以参考原来的长方形训练(下面的文章进行更改)


长方形图像训练:
Step1: 修改训练图片的尺寸,因为默认尺寸是是对训练集和验证集的。所以此处进行修改长方形时,需要分别赋值构建一个数组。

Step2:Train.py中修改对图像尺寸检查的功能。

Step3: Train.py中修改模型属性功能。原来640 是int类型,现在【640,320】是一个数组。所以需要进行修改。

Step4: 对LoadImageAndLabels中的代码进行修改


修改mosic功能

修改Load_image功能

修改load_mosaic功能

修改mosaic拼接功能以及label拼接的功能。
注意看if isinstance 做判断的位置,都会进行修改。
    def load_mosaic(self, index):
        # YOLOv5 4-mosaic loader. Loads 1 image + 3 random images into a 4-image mosaic
        labels4, segments4 = [], []
        if isinstance(self.img_size, int):
            s = self.img_size
            yc, xc = (int(random.uniform(-x, 2 * s + x)) for x in self.mosaic_border)  # mosaic center x, y
        else:
            s_h, s_w = self.img_size  # (h,w)
            yc, xc = [int(random.uniform(-x, 2 * s + x)) for x, s in zip(self.mosaic_border, self.img_size)]
        indices = [index] + random.choices(self.indices, k=3)  # 3 additional image indices
        random.shuffle(indices)
        for i, index in enumerate(indices):
            # Load image
            img, _, (h, w) = self.load_image(index)
            if isinstance(self.img_size, int):
                # place img in img4
                if i == 0:  # top left
                    img4 = np.full((s * 2, s * 2, img.shape[2]), 114, dtype=np.uint8)  # base image with 4 tiles
                    x1a, y1a, x2a, y2a = max(xc - w, 0), max(yc - h, 0), xc, yc  # xmin, ymin, xmax, ymax (large image)
                    x1b, y1b, x2b, y2b = w - (x2a - x1a), h - (y2a - y1a), w, h  # xmin, ymin, xmax, ymax (small image)
                elif i == 1:  # top right
                    x1a, y1a, x2a, y2a = xc, max(yc - h, 0), min(xc + w, s * 2), yc
                    x1b, y1b, x2b, y2b = 0, h - (y2a - y1a), min(w, x2a - x1a), h
                elif i == 2:  # bottom left
                    x1a, y1a, x2a, y2a = max(xc - w, 0), yc, xc, min(s * 2, yc + h)
                    x1b, y1b, x2b, y2b = w - (x2a - x1a), 0, w, min(y2a - y1a, h)
                elif i == 3:  # bottom right
                    x1a, y1a, x2a, y2a = xc, yc, min(xc + w, s * 2), min(s * 2, yc + h)
                    x1b, y1b, x2b, y2b = 0, 0, min(w, x2a - x1a), min(y2a - y1a, h)
            else:
                if i == 0:  # top left
                    img4 = np.full((s_h * 2, s_w * 2, img.shape[2]), 114, dtype=np.uint8)  # base image with 4 tiles
                    x1a, y1a, x2a, y2a = max(xc - w, 0), max(yc - h, 0), xc, yc  # xmin, ymin, xmax, ymax (large image)
                    x1b, y1b, x2b, y2b = w - (x2a - x1a), h - (y2a - y1a), w, h  # xmin, ymin, xmax, ymax (small image)
                elif i == 1:  # top right
                    x1a, y1a, x2a, y2a = xc, max(yc - h, 0), min(xc + w, s_w * 2), yc
                    x1b, y1b, x2b, y2b = 0, h - (y2a - y1a), min(w, x2a - x1a), h
                elif i == 2:  # bottom left
                    x1a, y1a, x2a, y2a = max(xc - w, 0), yc, xc, min(s_h * 2, yc + h)
                    x1b, y1b, x2b, y2b = w - (x2a - x1a), 0, w, min(y2a - y1a, h)
                elif i == 3:  # bottom right
                    x1a, y1a, x2a, y2a = xc, yc, min(xc + w, s_w * 2), min(s_h * 2, yc + h)
                    x1b, y1b, x2b, y2b = 0, 0, min(w, x2a - x1a), min(y2a - y1a, h)

            img4[y1a:y2a, x1a:x2a] = img[y1b:y2b, x1b:x2b]  # img4[ymin:ymax, xmin:xmax]
            padw = x1a - x1b
            padh = y1a - y1b

            # Labels
            labels, segments = self.labels[index].copy(), self.segments[index].copy()
            if labels.size:
                labels[:, 1:] = xywhn2xyxy(labels[:, 1:], w, h, padw, padh)  # normalized xywh to pixel xyxy format
                segments = [xyn2xy(x, w, h, padw, padh) for x in segments]
            labels4.append(labels)
            segments4.extend(segments)
至此就完成了程序上的修改
附mosaic增强
mosaic拼接并不是将图片进行4等份拼接。
1:会随机设定中心点,然后这个中心点将数据分为4份,然后将图片填充到每一份中。
马赛克的中心点值,随机从-x ---2*s+x 中随机抽选,一般X的值为-320,所以就变成 了 320- -960中随机抽选中心值。
Step0: 初始化整幅图,将图片的像素都填充为114
Step1:读取当前要填充的图片,并获取图片的长和宽
Step2: 计算当前图片在大图中的位置 ,如果当前图片超过大图界限,越界部分就取消掉。
同时如果当前图片过小,填充不了大图给定的区域位置。
不管大图小图都要计算其在整幅图片中的位置,计算差异值,因为接下来要取更新标签(label)
(标签是相对于图片的位置的,如果当前图片放入大图中,没有完全占据左上角,那么不就多余
了部分空的区域了吗直接计算标签的话肯定偏移,所以要去除掉这些空的区域再取加载原来的图片的标签并且更新)
如果有label正好在边界上,就要修正或者裁剪掉超过边界的框
Step3: 连续放入图片文章来源:https://www.toymoban.com/news/detail-672452.html
Step4: 对放入的图片进行随机的旋转,翻转 ,平移 缩放等等操作。文章来源地址https://www.toymoban.com/news/detail-672452.html
到了这里,关于YoloV5 训练长方形图像的文章就介绍完了。如果您还想了解更多内容,请在右上角搜索TOY模板网以前的文章或继续浏览下面的相关文章,希望大家以后多多支持TOY模板网!

