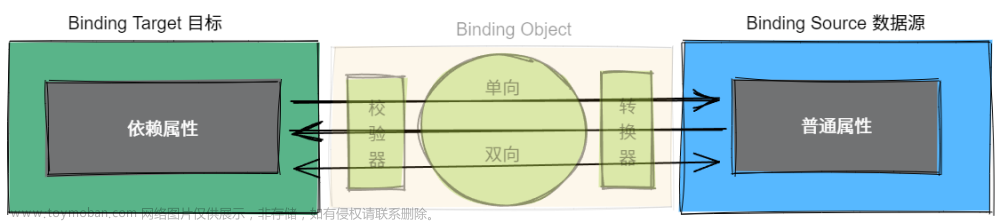
数据绑定是一种历经时间考验的传统方式,做法是从对象中提取信息,并在应用程序的用户界面中显示提取的信息,不用编写枯燥的代码就可以完成所有工作。富客户端通常使用双向绑定,这种数据绑定提供了从用户界面向一些对象推出信息的能力——同样,不需要或者几乎不需要编写代码。
构建数据对象
数据对象时准备在用户界面中显示的信息包,只要由公有属性组成(不支持字段和私有属性),任何类都可供使用。此外,如果希望使用这个对象进行修改(通过双向绑定),那么属性不能是只读的。
public class NormalClass
{
    public string BindData { get; set; } = "BindData";
}
绑定到对象
需要创建一个数据对象的实例,设置好DataContext,然后根据路径绑定到对应的属性
public partial class MainWindow : Window
{
    public MainWindow()
    {
        InitializeComponent();

        parentContainer.DataContext = this;
    }

    public NormalClass normalClass { get; set; } = new NormalClass();
}
<TextBox DataContext="{Binding Path=normalClass}" Text="{Binding Path=BindData, Mode=TwoWay}"/>更改通知
普通的属性在发生变化时,并不会通知绑定到它的目标,可使用如下三种方法解决这个问题:
1、将属性改为依赖项属性。尽管这种方法可使WPF自动执行相应的工作,单最合理的做法是将其用于控件元素——在窗口中具有可视化外观的类。对于数据类,这并非最自然的方法。
2、可为每个属性引发事件。对于这种情况,事件必须由 PropertyNameChanged 的形式进行命名(如BindDataChanged)。当属性变化时,由您负责引发事件。
3、可实现 INotifyPropertyChanged 接口,该接口需要名为 PropertyChanged 的事件。无论何时属性发生变化,都必须引发PropertyChanged 事件,并通过将属性名称作为字符串提供来指示那个属性发生了变化。当属性发生变化时,仍由您负责引发事件,但不必为每个属性定义单独的事件。
第一张方法依赖于WPF的依赖属性基础架构,而第二种和第三种依赖于事件。通常,当创建数据对象时,会使用第三种方法。对于非元素类而言,这是最简单的选择。
我这里创建了一个继承自 INotifyPropertyChanged 的基类ViewModelBase,其他的数据模型继承自ViewModelBase,在set属性设置器里面调用SetProperty 即可。
public class ViewModelBase : INotifyPropertyChanged
{
    public event PropertyChangedEventHandler? PropertyChanged;
    protected virtual void OnPropertyChanged([CallerMemberName] string? propertyName = null)
    {
        PropertyChanged?.Invoke(this, new PropertyChangedEventArgs(propertyName));
    }

    protected virtual bool SetProperty<T>(ref T member, T value, [CallerMemberName] string? propertyName = null)
    {
        if (EqualityComparer<T>.Default.Equals(member, value))
        {
            return false;
        }
        member = value;
        OnPropertyChanged(propertyName);
        return true;
    }
}
public class NotifyClass : ViewModelBase
{
    private string bindData = "BindData";
    public string BindData { get => bindData; set => SetProperty(ref bindData, value); }
}
绑定到集合
绑定到单个对象是非常直观的。但当需要绑定到对象的某些集合时,问题会变得更有趣。依赖项属性基本都支持单值绑定,但集合绑定需要智能程度更高的元素。在WPF中,所有派生自ItemsControl 的类都能显示条目的完整列表。能支持集合数据绑定的元素包括 ListBox、ComboBox、ListView 和 DataGrid。
为支持集合,ItemsControl 类定义了三个重要属性:
ItemsSource:指向的集合包含在列表中显示所有对象
DisplayMemberPath:确定用于为每个项创建显示文本的属性
ItemTemplate:接受的数据模板用于为每个子项创建可视化外观。这个属性比DisplayMemberPath属性的功能强大的多
绑定到集合的数据类型可以是任意类型的集合,唯一的要求是支持IEnumerable 接口,数组、各种类型的集合以及许多特殊的封装了数据项组的对象都支持该接口。然而,基本的IEnumerate 接口仅支持只读绑定,如果希望编辑集合(如插入和删除元素),就需要更复杂的基础结构。
<ListBox ItemsSource="{Binding Path=Exchanges}" />上面的代码会成功应用ExchangeViewModel对象填充列表,因为列表不知道如何显示产品对象,所以只是调用ToString() 方法。因为ExchangeViewModel没有重写该方法,所以只为每个项显示完全限定的类名。可以通过三种方法来解决这个问题:
设置列表的 DisplayMemberPath 属性 例如将该属性设置为 ExchangeID,以显示ExchangeID 属性的值
重写ToString() 方法,返回更有用的信息 可为每个项返回包含ExchangeID,ExchangeName 拼接的信息,可以通过这种方法显示比列表中一个属性更多的信息,然而,仍不能对数据的显示进行更多控制
提供数据模板 可使用这种方法显示属性值的任何排列,在数据模板里面会展示这种方式
我这里分别用重写ToString()方法与设置DisplayMemberPath属性来解决。
<ListBox x:Name="exchangeListListBox1" ItemsSource="{Binding Path=ExchangeList}" />
<ListBox x:Name="exchangeListListBox2" ItemsSource="{Binding Path=ExchangeList}" DisplayMemberPath="ExchangeID"/>
public class ExchangeViewModel : ViewModelBase
{
private string exchangeID = string.Empty;
public string ExchangeID { get => exchangeID; set => SetProperty(ref exchangeID, value); }
private string exchangeName = string.Empty;
public string ExchangeName { get => exchangeName; set => SetProperty(ref exchangeName, value); }
public ObservableCollection<InstrumentViewModel> Instruments { get; set; } = new ObservableCollection<InstrumentViewModel>();
public override string ToString() => exchangeID + " - " + exchangeName;
}这里的ExchangeList是List<T> 集合的对象:
public List<ExchangeViewModel> ExchangeList { get; set; } = new List<ExchangeViewModel>();在我们添加或删除ExchangeList 集合的内容时,列表控件无法获取该修改。为启用集合更改的跟踪,需要使用实现了 INotifyCollectionChanged 接口的集合。大多数通用集合没有实现该接口,包括List集合。实际上,WPF提供了一个使用 INotifyCollectionChanged 接口的集合:ObserableCollection 类。
public ObservableCollection<ExchangeViewModel> ExchangeObservableCollection { get; set; } = new ObservableCollection<ExchangeViewModel>();<ListBox x:Name="exchangeListListBox3" ItemsSource="{Binding Path=ExchangeObservableCollection}" />
<ListBox x:Name="exchangeListListBox4" ItemsSource="{Binding Path=ExchangeObservableCollection}" DisplayMemberPath="ExchangeID"/>将集合改为 ObservableCollection 类型后,再删除集合中的元素,就能够实时反映到绑定至该集合的控件上面了。
将元素绑定与数据绑定结合起来
在填写表单时候,经常会遇到根据前面选定的项,自动调整后面选项的内容的情况。我们可以构建类似这样的数据模型:
public class InstrumentViewModel : ViewModelBase
{
public InstrumentViewModel(string exchangeID, string instrumentID, string instrumentName)
{
ExchangeID = exchangeID;
InstrumentID = instrumentID;
InstrumentName = instrumentName;
}
private string _exchangeID = string.Empty;
private string _instrumentID = string.Empty;
private string _instrumentName = string.Empty;
public string ExchangeID { get => _exchangeID; set => SetProperty(ref _exchangeID, value); }
public string InstrumentID { get => _instrumentID; set => SetProperty(ref _instrumentID, value); }
public string InstrumentName { get => _instrumentName; set => SetProperty(ref _instrumentName, value); }
}
public class ExchangeViewModel : ViewModelBase
{
    private string exchangeID = string.Empty;
    public string ExchangeID { get => exchangeID; set => SetProperty(ref exchangeID, value); }
    private string exchangeName = string.Empty;
    public string ExchangeName { get => exchangeName; set => SetProperty(ref exchangeName, value); }
    public ObservableCollection<InstrumentViewModel> Instruments { get; set; } = new ObservableCollection<InstrumentViewModel>();
    public override string ToString() => exchangeID + " - " + exchangeName;
}public ObservableCollection<ExchangeViewModel> ExchangeObservableCollection { get; set; } = new ObservableCollection<ExchangeViewModel>();然后在构建这样的控件元素:
<ListBox x:Name="exchangeListListBox4" ItemsSource="{Binding Path=ExchangeObservableCollection}" DisplayMemberPath="ExchangeID"/>
<ComboBox Name="instrumentCombbox" DataContext="{Binding ElementName=exchangeListListBox4, Path=SelectedItem}" ItemsSource="{Binding Path=Instruments}" DisplayMemberPath="InstrumentID"/>
<StackPanel Orientation="Vertical" DataContext="{Binding ElementName=instrumentCombbox, Path=SelectedItem}">
<TextBlock Text="{Binding Path=ExchangeID, StringFormat=ExchangeID:{0}}"></TextBlock>
<TextBlock Text="{Binding Path=InstrumentID, StringFormat=InstrumentID:{0}}"></TextBlock>
<TextBlock Text="{Binding Path=InstrumentName, StringFormat=InstrumentName:{0}}"></TextBlock>
</StackPanel>其中,ComboBox绑定到ListBox所选择的项,根据ListBox选择的项的Instruments属性来填充其子项,而下面的StackPanel 的 DataContext 又绑定到ComboBox选择的项,三个TextBlock控件展示ComboBox所选择项的各项属性。
完整代码如下:
MainWindow.xaml文章来源:https://www.toymoban.com/news/detail-679535.html
<Window x:Class="TestBinding.MainWindow"
xmlns="http://schemas.microsoft.com/winfx/2006/xaml/presentation"
xmlns:x="http://schemas.microsoft.com/winfx/2006/xaml"
xmlns:d="http://schemas.microsoft.com/expression/blend/2008"
xmlns:mc="http://schemas.openxmlformats.org/markup-compatibility/2006"
xmlns:local="clr-namespace:TestBinding"
mc:Ignorable="d"
Title="MainWindow" Height="450" Width="800">
<Window.Resources>
<local:ExchangeViewModel x:Key="resourceExchange" ExchangeID="Test"/>
</Window.Resources>
<StackPanel Name="parentContainer">
<StackPanel Orientation="Horizontal">
<TextBlock>BindData:</TextBlock>
<TextBox Text="{Binding Path=BindData}"></TextBox>
</StackPanel>
<StackPanel Orientation="Horizontal">
<TextBlock>BindDatas:</TextBlock>
<ListBox Name="exchangeListBox" ItemsSource="{Binding Path=Exchanges}" DisplayMemberPath="ExchangeID"></ListBox>
</StackPanel>
<StackPanel>
<ComboBox Name="instrumentCombbox" DataContext="{Binding ElementName=exchangeListBox, Path=SelectedItem}" ItemsSource="{Binding Path=Instruments}" DisplayMemberPath="InstrumentID"/>
</StackPanel>
<StackPanel Orientation="Horizontal" DataContext="{Binding ElementName=instrumentCombbox, Path=SelectedItem}">
<TextBlock>ExchangeID:</TextBlock>
<TextBox Text="{Binding Path=ExchangeID}"></TextBox>
</StackPanel>
<StackPanel Orientation="Horizontal" DataContext="{Binding ElementName=instrumentCombbox, Path=SelectedItem}">
<TextBlock>InstrumentID:</TextBlock>
<TextBox Text="{Binding Path=InstrumentID}"></TextBox>
</StackPanel>
<StackPanel Orientation="Horizontal" DataContext="{Binding ElementName=instrumentCombbox, Path=SelectedItem}">
<TextBlock>InstrumentName:</TextBlock>
<TextBox Text="{Binding Path=InstrumentName}"></TextBox>
</StackPanel>
<StackPanel>
<TextBlock Text="{Binding Source={StaticResource resourceExchange}, Path=ExchangeID}"/>
</StackPanel>
<StackPanel x:Name="BindingTextBlockStackPanel">
<TextBlock x:Name="BindingSelfName" Text="{Binding RelativeSource={RelativeSource Mode=Self}, Path=Name}"></TextBlock>
<TextBlock Text="{Binding RelativeSource={RelativeSource Mode=Self}, Path=Foreground, StringFormat={}{0}}"></TextBlock>
<TextBlock Text="{Binding RelativeSource={RelativeSource Mode=FindAncestor, AncestorType={x:Type StackPanel}}, Path=Name}"></TextBlock>
</StackPanel>
<StackPanel>
<ItemsControl DataContext="{Binding Path=Exchanges}" ItemsSource="{Binding Path=Instruments}">
<ItemsControl.ItemTemplate>
<DataTemplate>
<StackPanel Orientation="Horizontal" Margin="2">
<TextBlock Text="{Binding ExchangeID}" />
<TextBlock Text="{Binding Path=InstrumentID, RelativeSource={RelativeSource Mode=PreviousData}}" Foreground="Red" Margin="5,0,0,0"/>
</StackPanel>
</DataTemplate>
</ItemsControl.ItemTemplate>
</ItemsControl>
</StackPanel>
<StackPanel >
<Button Width="64" Height="64" Content="Ellipse" Background="OrangeRed">
<Button.Template>
<ControlTemplate TargetType="Button">
<Grid>
<Ellipse Fill="{Binding RelativeSource={RelativeSource Mode=TemplatedParent}, Path=Background}"/>
<ContentPresenter VerticalAlignment="Center" HorizontalAlignment="Center"/>
</Grid>
</ControlTemplate>
</Button.Template>
</Button>
</StackPanel>
</StackPanel>
</Window>
MainWindow.xaml.cs文章来源地址https://www.toymoban.com/news/detail-679535.html
using System;
using System.Collections.Generic;
using System.Collections.ObjectModel;
using System.ComponentModel;
using System.Runtime.CompilerServices;
using System.Windows;
using System.Windows.Controls;
using System.Windows.Data;
using System.Windows.Media.TextFormatting;
namespace TestBinding;
public class NormalClass
{
public string BindData { get; set; } = "BindData";
}
public class NotifyClass : ViewModelBase
{
private string bindData = "BindData";
public string BindData { get => bindData; set => SetProperty(ref bindData, value); }
}
public class ViewModelBase : INotifyPropertyChanged
{
public event PropertyChangedEventHandler? PropertyChanged;
protected virtual void OnPropertyChanged([CallerMemberName] string? propertyName = null)
{
PropertyChanged?.Invoke(this, new PropertyChangedEventArgs(propertyName));
}
protected virtual bool SetProperty<T>(ref T member, T value, [CallerMemberName] string? propertyName = null)
{
if (EqualityComparer<T>.Default.Equals(member, value))
{
return false;
}
member = value;
OnPropertyChanged(propertyName);
return true;
}
}
public class InstrumentViewModel : ViewModelBase
{
    public InstrumentViewModel(string exchangeID, string instrumentID, string instrumentName)
    {
        ExchangeID = exchangeID;
        InstrumentID = instrumentID;
        InstrumentName = instrumentName;
    }

    private string _exchangeID = string.Empty;
    private string _instrumentID = string.Empty;
    private string _instrumentName = string.Empty;
    public string ExchangeID { get => _exchangeID; set => SetProperty(ref _exchangeID, value); }
    public string InstrumentID { get => _instrumentID; set => SetProperty(ref _instrumentID, value); }
    public string InstrumentName { get => _instrumentName; set => SetProperty(ref _instrumentName, value); }
}
public class ExchangeViewModel : ViewModelBase
{
    private string exchangeID = string.Empty;
    public string ExchangeID { get => exchangeID; set => SetProperty(ref exchangeID, value); }
    private string exchangeName = string.Empty;
    public string ExchangeName { get => exchangeName; set => SetProperty(ref exchangeName, value); }
    public ObservableCollection<InstrumentViewModel> Instruments { get; set; } = new ObservableCollection<InstrumentViewModel>();
    public override string ToString() => exchangeID + " - " + exchangeName;
}
public partial class MainWindow : Window
{
public MainWindow()
{
InitializeComponent();
InitExchanges();
parentContainer.DataContext = this;
}
public void InitExchanges()
{
ExchangeViewModel exchange1 = new ExchangeViewModel();
exchange1.ExchangeID = "SHSE";
exchange1.ExchangeName = "上海证券交易所";
exchange1.Instruments.Add(new InstrumentViewModel("SHSE", "601155", "新城控股"));
exchange1.Instruments.Add(new InstrumentViewModel("SHSE", "600036", "招商银行"));
exchange1.Instruments.Add(new InstrumentViewModel("SHSE", "600266", "城建发展"));
exchange1.Instruments.Add(new InstrumentViewModel("SHSE", "600837", "海通证券"));
exchange1.Instruments.Add(new InstrumentViewModel("SHSE", "601668", "中国建筑"));
ExchangeViewModel exchange2 = new ExchangeViewModel();
exchange2.ExchangeID = "SZSE";
exchange2.ExchangeName = "深圳证券交易所";
exchange2.Instruments.Add(new InstrumentViewModel("SZSE", "000002", "万科A"));
exchange2.Instruments.Add(new InstrumentViewModel("SZSE", "000001", "平安银行"));
exchange2.Instruments.Add(new InstrumentViewModel("SZSE", "000623", "吉林敖东"));
exchange2.Instruments.Add(new InstrumentViewModel("SZSE", "002739", "万达电影"));
exchange2.Instruments.Add(new InstrumentViewModel("SZSE", "300642", "透景生命"));
ExchangeList.Add(exchange1);
ExchangeList.Add(exchange2);
ExchangeObservableCollection.Add(exchange1);
ExchangeObservableCollection.Add(exchange2);
}
public NormalClass normalClass { get; set; } = new NormalClass();
public NotifyClass notifyClass { get; set; } = new NotifyClass();
public List<ExchangeViewModel> ExchangeList { get; set; } = new List<ExchangeViewModel>();
public ObservableCollection<ExchangeViewModel> ExchangeObservableCollection { get; set; } = new ObservableCollection<ExchangeViewModel>();
private void ChangeDataButton_Click(object sender, RoutedEventArgs e)
{
normalClass.BindData = "BindDataChange";
notifyClass.BindData = "BindDataChange";
}
private void RemoveSelectedList1Button_Click(object sender, RoutedEventArgs e)
{
if(exchangeListListBox1.SelectedItem != null)
{
ExchangeList.Remove((ExchangeViewModel)exchangeListListBox1.SelectedItem);
}
}
private void RemoveSelectedList2Button_Click(object sender, RoutedEventArgs e)
{
if (exchangeListListBox2.SelectedItem != null)
{
ExchangeList.Remove((ExchangeViewModel)exchangeListListBox1.SelectedItem);
}
}
private void RemoveSelectedList3Button_Click(object sender, RoutedEventArgs e)
{
if (exchangeListListBox3.SelectedItem != null)
{
ExchangeObservableCollection.Remove((ExchangeViewModel)exchangeListListBox3.SelectedItem);
}
}
private void RemoveSelectedList4Button_Click(object sender, RoutedEventArgs e)
{
if (exchangeListListBox4.SelectedItem != null)
{
ExchangeObservableCollection.Remove((ExchangeViewModel)exchangeListListBox4.SelectedItem);
}
}
}
到了这里,关于WPF数据绑定的文章就介绍完了。如果您还想了解更多内容,请在右上角搜索TOY模板网以前的文章或继续浏览下面的相关文章,希望大家以后多多支持TOY模板网!