Rust 基础语法学习
hello world
rust中的程序从main函数作为入口,hello rust!
fn main() {
    println!("hello world!");// println!是宏
}
变量
使用let关键字定义变量:
let k = 1;//定义整数变量 k
rust是强类型的,但声明是可以不写明类型,会自动推导类型。
如果要加入数据类型,也可以使用下面方式:
let k:i32 = 1;// k为i32类型整数
数据类型
整数类型
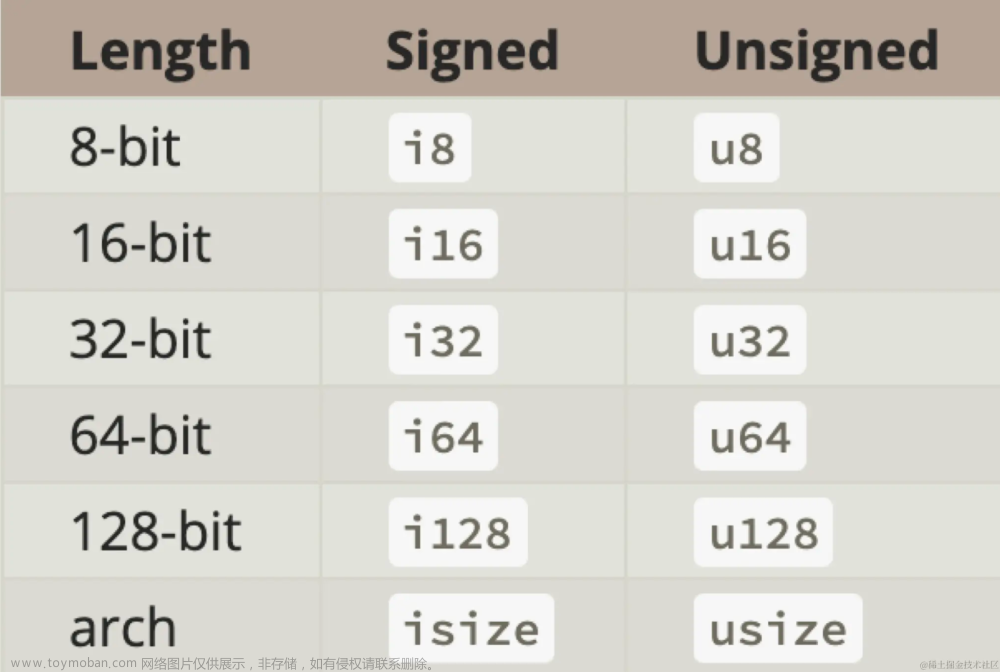
按照比特位长度和有无符号分类:
| bit-length | unsigned | signed |
|---|---|---|
| 8 | u8 | i8 |
| 16 | u16 | i16 |
| 32 | u32 | i32 |
| 64 | u64 | i64 |
| 128 | u128 | i128 |
| 根据平台、架构决定 | usize | isize |
这种类型命名方式非常直观,看到类型即可知道数据长度。
进制表示方法
十进制:12_345
16进制:0xff
八进制:0o77
二进制:0b1010_0101
使用下划线避免了数0的麻烦,非常直观。
浮点数类型
根据bit位数,分32位、64位浮点数,使用f32、f64表示。使用let声明浮点数,默认使用更高精度的f64。
let f = 1.0; //f64
let f:f32 = 1.0;// 声明 f32类型变量
布尔类型
使用bool关键字声明布尔变量,值为true或false。
let bl = true;
let bl = false;
字符类型
在 Rust 中,字符类型是 char。char 类型表示一个 Unicode 标量值(Unicode Scalar Value),它占用 4 个字节(32 位)。Unicode 标量值是 Unicode 编码中的第一个级别,它包括了符号、文字、数字、标点符号、控制符和其他字符等,涵盖了世界上大部分使用的语言和符号。
fn main() {
    let c1 = 'a';
    let c2 = 'α';
    let c3 = '😄';
    println!("char: {} {} {}", c1, c2, c3);
}
字符串
String 是一种可变的字符串类型,它可以动态地分配内存以容纳字符串数据,并且可以在运行时修改字符串内容。
创建字符串,如:
let mut my_string = String::new();//空字符串
let my_string = String::from("hello world");
复合类型
元组
在Rust中,允许将多个不同类型的值组合成一个单独的复合值,这种类型称为“元组”。
如:
let tuple_demo = ("1+1 =", 2, "is", true);
访问元组的方法:使用.x,x为元素索引。
println!("{} {} {} {}", tuple_demo.0, tuple_demo.1, tuple_demo.2, tuple_demo.3);
元组一旦定义就不能修改元素。
结构体
rust结构体定义:
struct 结构体名称{
    成员1: 成员1类型,
    成员2: 成员2类型,
	...
}
如定义一个student结构体,用于表述学生信息:
struct Student {
    name: String,//姓名
    id: u32,//学号
    age: u32//年龄
}
初始化
一般的初始化方法如下,使用key-value格式:
    let student = Student {
        name: String::from("zhangsan"),
        id: 001,
        age: 16
    };
可以使用外部同名变量进行快速初始化:
fn main() {
    let name = String::from("lisi");
    let id:u32 = 001;
    let student = Student {
        name,
        id,
        age: 16
    };
    println!("student info: {:?}", student);
}
也可以使用外部存在的同类型结构体变量,更新其余成员:
fn main() {
    let student = Student {
        name: String::from("xiaowang"),
        id: 001,
        age: 16
    };
    let name = String::from("wangwu");
    let id = 002;
    let new_student = Student {
        name,//使用外部name、id变量初始化
        id,
        ..student//其余部分使用student变量一次性初始化
    };
    println!("new_student info: {:?}", new_student);
}
元组结构体
元组结构体是一种没有具体字段名的结构体,它的字段只有类型而没有字段名。这使得它在表示简单的数据组合时非常有用。
struct Point2D(i32, i32);

fn main() {
    let point = Point2D(10, 20);
    println!("X: {}, Y: {}", point.0, point.1);
}
切片类型
切片(slice)是对集合(数组、向量等)的连续部分进行引用的数据类型。它们允许以安全且高效的方式操作和访问集合的子集,而无需复制数据。
切片由两个主要部分组成:指向数据的指针和切片的长度。切片语法:
let slice: &[T] = &data[start..end];
字符串切片
直接上代码领悟:
fn main() {
    let str_demo = String::from("hello world");
    let str1 = &str_demo[..5]; /* 取0~4 */
    let str2 = &str_demo[6..11];/* 取6~10 */
    let str3 = &str_demo[6..];  /* 从第6个开始,取到最后一个 */
    let str4 = &str_demo[..];  /* 从头到尾 */

    println!("str1: {}, str2: {}, str3: {}, str4: {}", str1, str2, str3, str4);
    // str1: hello, str2: world, str3: world, str4: hello world
}
数组切片
fn main() {
    let array = [0, 1, 2, 3, 4, 5];

    let array_part1 = &array[0..1]; /* 0 */
    let array_part2 = &array[..3];  /* 0 1 2 */
    let array_part3 = &array[3..];  /* 3 4 5 */
    let array_all   = &array[..];   /* all */

    println!("
            &array[0..1]= {:?},
            &array[..3] = {:?},
            &array[3..] = {:?},
            &array[..]  = {:?}", array_part1, array_part2, array_part3, array_all);
    /* output
            &array[0..1]= [0],
            &array[..3] = [0, 1, 2],
            &array[3..] = [3, 4, 5],
            &array[..]  = [0, 1, 2, 3, 4, 5]
     */
}
不可变变量与可变变量
使用let单独声明的变量是不可变变量,声明后值无法修改。如果要声明一个值可以修改的变量,需要加入mut关键字,来表示变量可变的(mutable)。
fn main() {
    let a = 1;//a此后无法修改
    let mut b = 2;//b可以修改
    a = 2;//编译会出错
    b = 3;//mut变量是可变的
}
常量
使用const关键字声明常量,rust中要求常量必须使用全部大写字母表示,并使用下划线分割。否则会有编译警告。
const PI_VAL:f64 = 3.1415926;
注释
- 代码注释:与C语言相同,使用//表示单行注释,/**/表示多行注释。
- 文档注释,使用///在文档开头,使用这种注释方式,可以在导出程序说明文档更方便。
/// 将字符串转换成大写字母,并返回
///
/// # Examples
///
/// ```
/// let s = "hello world";
/// assert_eq!("HELLO WORLD", to_uppercase(s));
/// ```
fn to_uppercase(s: &str) -> String {
    s.to_uppercase()
}
函数
基本形式:
fn add2number(arg1: i32, arg2: i32) -> i32 {
    println!("{}+{} = {}", arg1, arg2, arg1+arg2);
    return arg1+arg2;
}
对于RUST,函数包含参数时,必须标明类型。
需要返回值时,使用 -> 在声明后表明返回值类型。
语句与表达式
rust函数由语句和表达式构成。
语句没有返回值,语句通常是执行某些操作、没有返回值的,如一些变量声明,如:
let a = 1;
表达式有计算步骤且有返回值,如:
a = 7
b + 2
c * (a + b)
通过表达式的返回值,可以直接传递到函数返回值,如:
fn add2number(arg1: i32, arg2: i32) -> i32 {
    println!("{}+{} = {}", arg1, arg2, arg1+arg2);
    arg1+arg2
}
arg1+arg2是一个表达式,它的返回值直接传递到函数返回值,不用再写return。
流程控制语句
if else条件判断
示例:
fn main() {
    let a = 3;
    if a > 2 {
        println!("a is greater than 2");
    } else if a < 2 {
        println!("a is less than 2");
    } else {
        println!("a is equal to 2");
    }
}
while循环
先判断再执行循环体代码:
fn main() {
    let mut count = 0;
    while count < 10 {
        count += 1;
    }
    println!("Count is {}", count);
}
loop循环
loop先执行函数体代码,在函数体中可以判断进行break 退出循环。
fn main() {
    let mut count = 0;
    loop {
        count += 1;
        if count > 10 {
            break;
        }
    }
    println!("Count is {}", count);
}
for循环
用于遍历或迭代某些集合类型数据。
fn main() {
    let arr: [i32; 5] = [1, 2, 3, 4, 5];

    // 遍历打印数组中的每个元素
    for num in &arr {
        println!("{}", num);
    }
}
if let 条件表达式
有点像c中的三目运算符:
fn main() {
    let condition = true;
    let number = if condition { 5 } else { 6 };

    print!("The value of number is: {}", number);
}
match-arm表达式
match-arm用于匹配,与很多语言中的switch-case类似。
基本语法:
match <var> {
	type1 => { /*do-something*/ },
	type2 => { /*do-something*/ },
	...
}
所谓arm就是match表达式内的不同分支情况。文章来源:https://www.toymoban.com/news/detail-682927.html
常用在枚举类型的匹配中,简单使用下:文章来源地址https://www.toymoban.com/news/detail-682927.html
enum Color{// 颜色枚举
    Red,/* 红色 */
    Green,/* 绿色 */
    Blue,/* 蓝色 */
}
fn main() {
    let ocean_color = Color::Blue;
    match ocean_color {
        Color::Blue => {/* 匹配蓝色 */
            println!("Ocean is blue");
        }
        _ => {/* 匹配其他 */
            println!("Special Ocean");
        }
    }
}
到了这里,关于Rust 基础语法学习的文章就介绍完了。如果您还想了解更多内容,请在右上角搜索TOY模板网以前的文章或继续浏览下面的相关文章,希望大家以后多多支持TOY模板网!


