概要
项目需要装了一个Windows Server 2022,由于不能亲自到场调试,我就打开了OpenSSH服务支持,给有需要的小伙伴参考下。
整体架构流程
教程只适用于Windows10 1809+,Windows11和Windows Server 2019+,请将系统升级到最新版。
整体思路就是添加OpenSSH服务端->设置自启动->改配置和端口
技术细节
上面列的版本都是直接支持的,其他版本请升级到那些版本再进行下一步。
1.安装OpenSSH服务端
这一步需要网咯
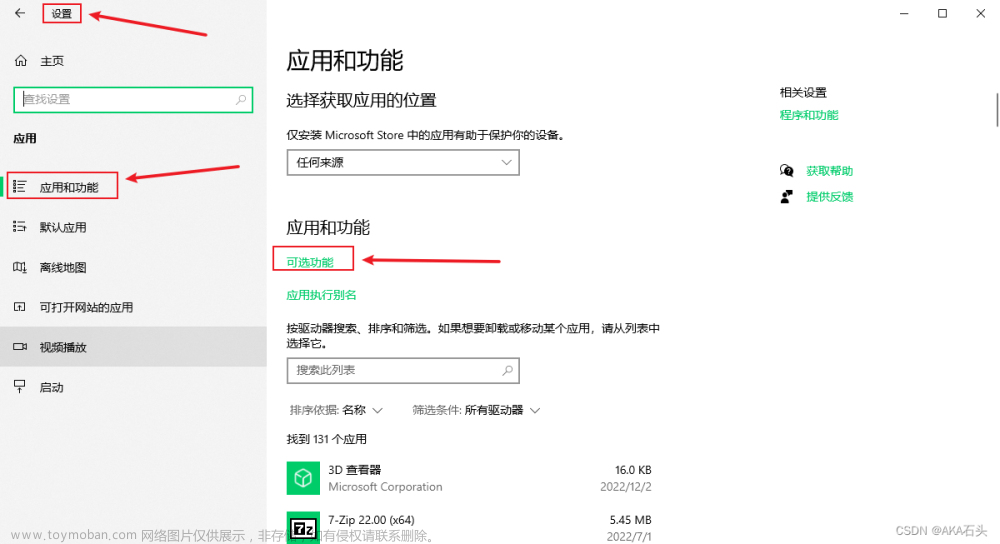
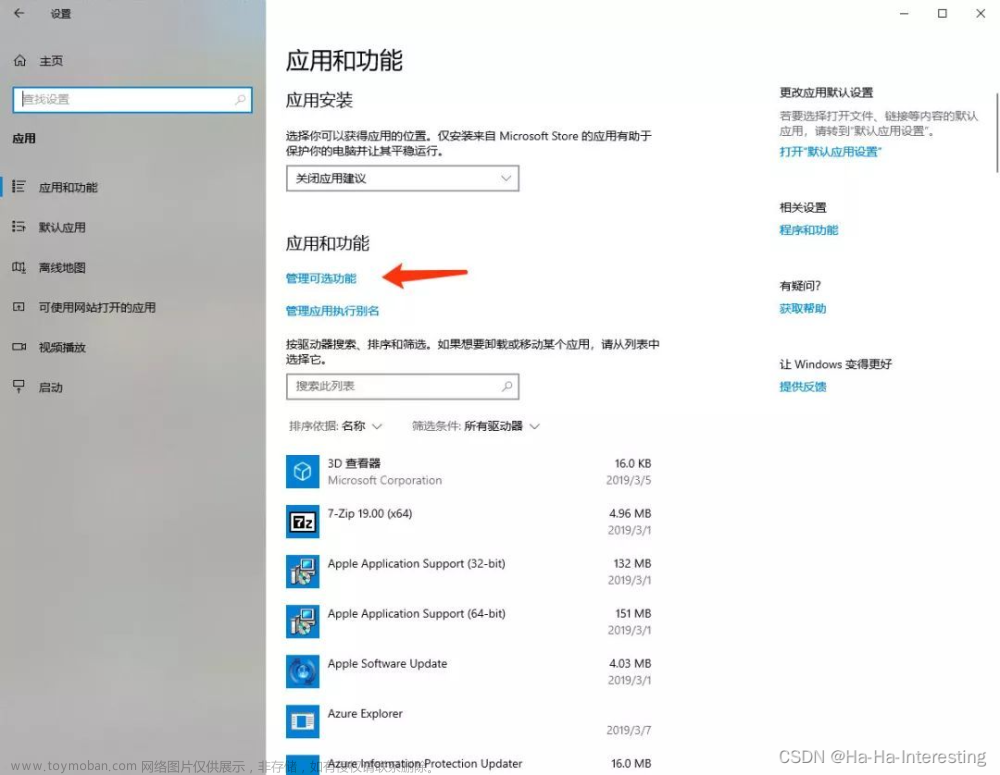
打开 设置->应用->可选功能
2.设置自启动
Win+R并输入services.msc,下拉找到OpenSSH SSH Server
双击点进去,将手动改为自动,不用选延迟。一定要应用,这样才能保存
3.启动服务
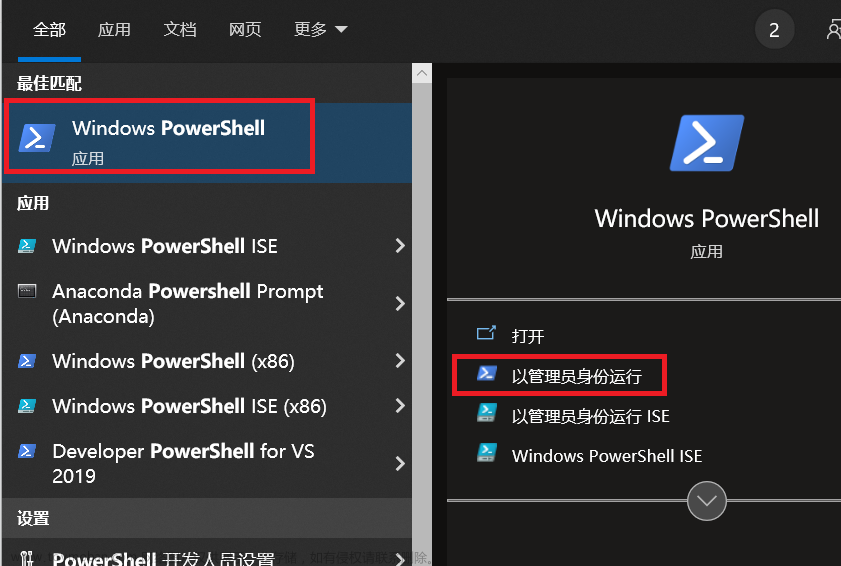
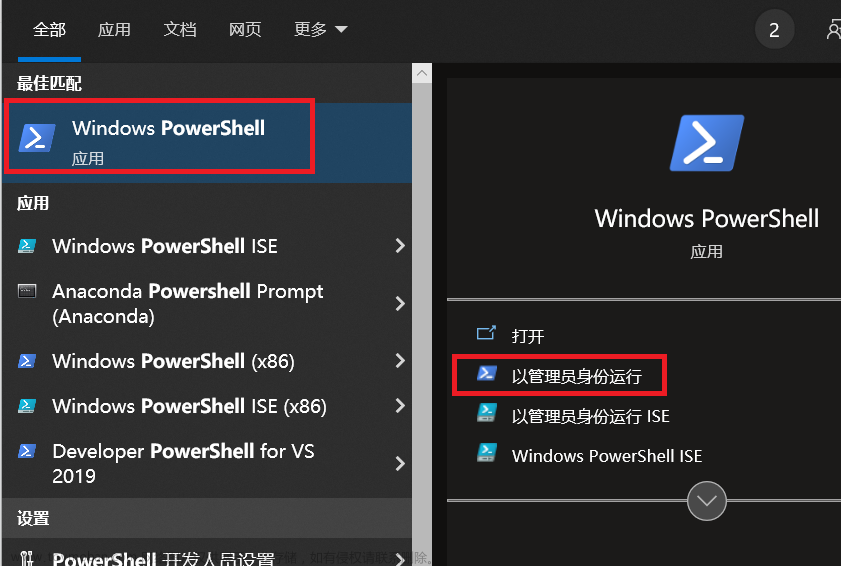
这一步需要管理员权限
用管理员权限打开一个powershell,输入下面指令
net start sshd
没报错就是成功了。
关闭使用stop即可。
4.资源监视器
打开资源监视器,找到监听端口,选择升序排列并找到22
这个时候你就可以正常使用了。
修改配置
很多配置再WIndows上是有效的,有些在Linux上是有效的,Windows上无效。
默认配置保存在C:\Windows\System32\OpenSSH\sshd_config_default
这个配置是不能写入的,你只需要另存为sshd_config然后覆盖到指定位置就行了。
具体位置就在C:\ProgramData\ssh\sshd_config,这个文件夹是隐藏文件,你需要设置下才能看到它。
请看默认配置:
# This is the sshd server system-wide configuration file.  See
# sshd_config(5) for more information.

# The strategy used for options in the default sshd_config shipped with
# OpenSSH is to specify options with their default value where
# possible, but leave them commented.  Uncommented options override the
# default value.

#Port 22
#AddressFamily any
#ListenAddress 0.0.0.0
#ListenAddress ::

#HostKey __PROGRAMDATA__/ssh/ssh_host_rsa_key
#HostKey __PROGRAMDATA__/ssh/ssh_host_dsa_key
#HostKey __PROGRAMDATA__/ssh/ssh_host_ecdsa_key
#HostKey __PROGRAMDATA__/ssh/ssh_host_ed25519_key

# Ciphers and keying
#RekeyLimit default none

# Logging
#SyslogFacility AUTH
#LogLevel INFO

# Authentication:

#LoginGraceTime 2m
#PermitRootLogin prohibit-password
#StrictModes yes
#MaxAuthTries 6
#MaxSessions 10

#PubkeyAuthentication yes

# The default is to check both .ssh/authorized_keys and .ssh/authorized_keys2
# but this is overridden so installations will only check .ssh/authorized_keys
AuthorizedKeysFile	.ssh/authorized_keys

#AuthorizedPrincipalsFile none

# For this to work you will also need host keys in %programData%/ssh/ssh_known_hosts
#HostbasedAuthentication no
# Change to yes if you don't trust ~/.ssh/known_hosts for
# HostbasedAuthentication
#IgnoreUserKnownHosts no
# Don't read the user's ~/.rhosts and ~/.shosts files
#IgnoreRhosts yes

# To disable tunneled clear text passwords, change to no here!
#PasswordAuthentication yes
#PermitEmptyPasswords no

# GSSAPI options
#GSSAPIAuthentication no

#AllowAgentForwarding yes
#AllowTcpForwarding yes
#GatewayPorts no
#PermitTTY yes
#PrintMotd yes
#PrintLastLog yes
#TCPKeepAlive yes
#UseLogin no
#PermitUserEnvironment no
#ClientAliveInterval 0
#ClientAliveCountMax 3
#UseDNS no
#PidFile /var/run/sshd.pid
#MaxStartups 10:30:100
#PermitTunnel no
#ChrootDirectory none
#VersionAddendum none

# no default banner path
#Banner none

# override default of no subsystems
Subsystem	sftp	sftp-server.exe

# Example of overriding settings on a per-user basis
#Match User anoncvs
#	AllowTcpForwarding no
#	PermitTTY no
#	ForceCommand cvs server

Match Group administrators
       AuthorizedKeysFile __PROGRAMDATA__/ssh/administrators_authorized_keys
说一下能改的几个配置:
Port:就是绑定端口,不改的话就是22
ListenAddress:可以指定本地回环或其他网卡地址或全地址
PubkeyAuthentication:支持公钥登录
PasswordAuthentication:支持密码登录,默认支持
不支持的配置:
AcceptEnv
AllowStreamLocalForwarding
AuthorizedKeysCommand
AuthorizedKeysCommandUser
AuthorizedPrincipalsCommand
AuthorizedPrincipalsCommandUser
压缩
ExposeAuthInfo
GSSAPIAuthentication
GSSAPICleanupCredentials
GSSAPIStrictAcceptorCheck
HostbasedAcceptedKeyTypes
HostbasedAuthentication
HostbasedUsesNameFromPacketOnly
IgnoreRhosts
IgnoreUserKnownHosts
KbdInteractiveAuthentication
KerberosAuthentication
KerberosGetAFSToken
KerberosOrLocalPasswd
KerberosTicketCleanup
PermitTunnel
PermitUserEnvironment
PermitUserRC
PidFile
PrintLastLog
RDomain
StreamLocalBindMask
StreamLocalBindUnlink
StrictModes
X11DisplayOffset
X11Forwarding
X11UseLocalhost
XAuthLocation
防火墙
可以先关掉防火墙测试,完了后再打开防火墙。如果你打开了防火墙要配置规则的,否则可能导致无法访问的情况。文章来源:https://www.toymoban.com/news/detail-684019.html
小结
总体来说,除非特别有必要,否则尽量不要用这个功能,优先选私钥登录。主要还是安全优先。文章来源地址https://www.toymoban.com/news/detail-684019.html
到了这里,关于【Windows打开OpenSSH服务端支持】的文章就介绍完了。如果您还想了解更多内容,请在右上角搜索TOY模板网以前的文章或继续浏览下面的相关文章,希望大家以后多多支持TOY模板网!

